In this blog we will go over replacing the LocalManager certificate in NSX. In this example I will be using the UI to generate the self signed certificate and then an API call to replace the certificate.
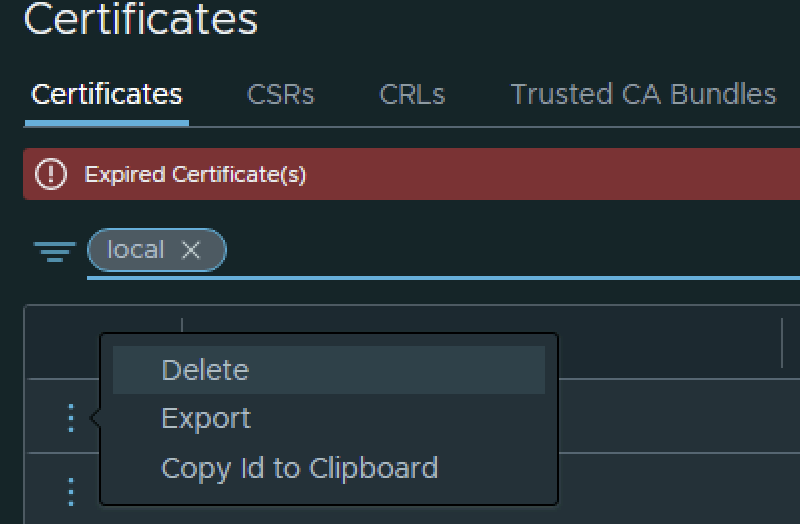
In my case the LocalManager certificate has already expired
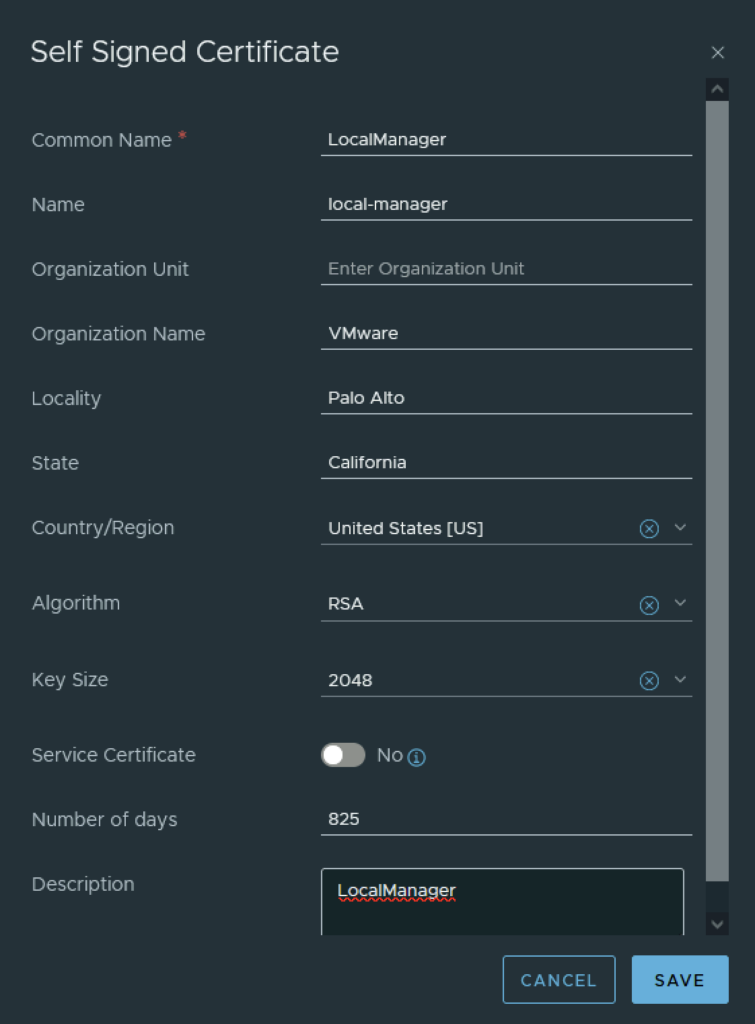
In the top menu bar I went to Generate -> Generate Self Signed Certificate
Next I had to grab the new certificate ID
The next step is to replace the old certificate with the new certificate via an API call. For this I used Postman but any other tool could potentially be used.
The URL for the post call would go against https://nsx_fqdn/api/v1/trust-management/certificates?action=set_pi_certificate_for_federation
For authentication I used basic, per best practices we should be using a token.
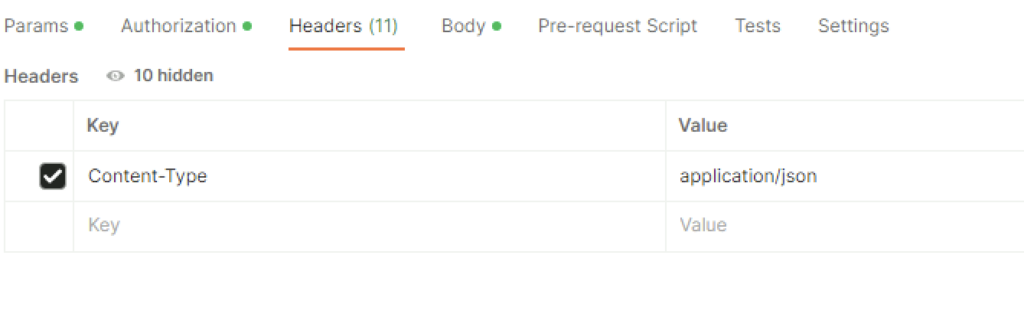
For headers had to add Content-Type application\json ex
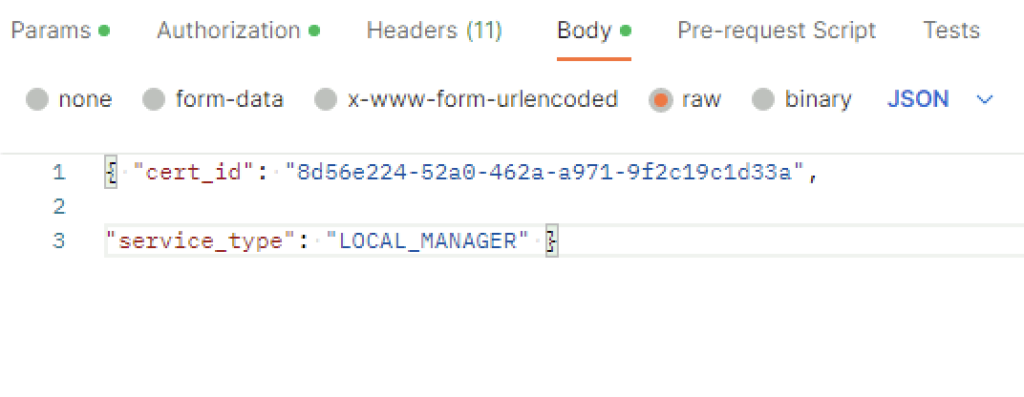
In the body I picket raw and added the following in
VMware Cloud Foundation (VCF) has revolutionized data center virtualization by seamlessly integrating compute, storage, and networking components. In a VCF environment, the NSX platform provides crucial software-defined networking capabilities. At times, removing NSX edges becomes necessary due to infrastructure changes, optimization efforts, or other reasons. To simplify this process, VMware has introduced the NSX Edge Removal Tool. In this blog post, we will explore how this tool can streamline the removal of NSX edges in a VCF environment while preserving dependencies.
Understanding the NSX Edge Removal Tool
The NSX Edge Removal Tool is a powerful utility developed by VMware to assist with removing NSX edges in a VCF environment. It simplifies the edge removal process and ensures the preservation of critical dependencies. Let’s delve into the steps involved in using this tool effectively.
Step 1: Preparing for NSX Edge Removal
Before utilizing the NSX Edge Removal Tool, it is crucial to thoroughly understand your VCF environment and identify all dependencies associated with the NSX edges you plan to remove. Review your network configuration, firewall rules, security policies, and any applications or services relying on the edges. This assessment will help you plan and execute the edge removal process more efficiently.
Step 2: Installing and Configuring the NSX Edge Removal Tool
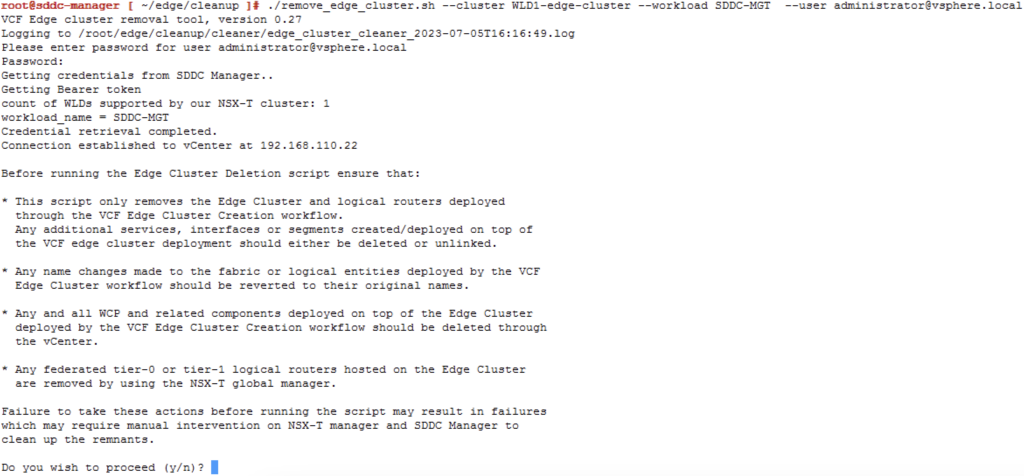
To begin, download the NSX Edge Removal Tool from the VMware website. As of the writing of this blog the latest download can be found here. Follow the installation and configuration instructions provided by VMware to integrate the tool into your VCF environment seamlessly. Ensure that you have the necessary credentials and permissions to access and modify the NSX edges. In my case I downloaded edge_cluster_cleaner_0.27.tar.gz and transferred it to the server.
Step 3: Running the NSX Edge Removal Tool
Once the tool is installed and configured, it’s time to execute the removal process. Launch the NSX Edge Removal Tool and provide the required information, such as the NSX Manager IP address, credentials, and the specific edges you wish to remove. The tool will validate the environment and dependencies, ensuring a safe removal process. ex ./remove_edge_cluster.sh --cluster WLD1-edge-cluster --workload SDDC-MGT --user [email protected]
Step 4: Verifying and Analyzing the Dependency Report
After executing the removal process, the NSX Edge Removal Tool generates a dependency report. This report provides crucial insights into the dependencies associated with the removed NSX edges. Review the report thoroughly to understand any potential impacts on your network infrastructure and applications.
Step 5: Addressing Dependencies and Network Adjustments
Based on the generated dependency report, it’s essential to address the identified dependencies and make necessary adjustments to your network configuration. Collaborate with network administrators, application owners, and other stakeholders to migrate the dependencies to alternative network resources. Update firewall rules, adjust routing configurations, and ensure seamless connectivity for critical services.
Step 6: Post-Removal Validation and Testing
After addressing the dependencies and making the required adjustments, perform comprehensive validation and testing to ensure that the network connectivity and critical services are functioning optimally. Monitor the network closely for any abnormalities or performance issues, and address them promptly.
Conclusion
The NSX Edge Removal Tool provides a streamlined approach to removing NSX edges in a VMware Cloud Foundation (VCF) environment while preserving critical dependencies. By following the steps outlined in this blog post and utilizing the tool effectively, you can simplify the edge removal process and ensure the smooth operation of your VCF environment. Embrace this tool to optimize your network infrastructure and enhance the agility of your virtualized data center.
I recently ran in to a problem where i wanted to perform a clean configuration of one of my ESXi hosts from an NSX perspective, however i ran in to a problem where NSX was reporting that the packages are already installed. To fix the issue i had to run the following to list the packages installed:
esxcli software vib list | grep -i nsx
Once i had the list all i had to do is uninstall them using:
I`ve recently ran through a problem when trying to upgrade NSX-T from version 2.5.0 to 2.5.1. When using the Upgrade function within the UI i was getting the following error:
This page is only available on the NSX Manager where Upgrade Coordinator is running. To configure the service, run the command “restart service install-upgrade” on the NSX Manager.
White checking the status of the service the service seemed to be running with no issues. I also checked the release notes for a couple of releases back and i found a similar issue in the release notes for the 2.3 release https://docs.vmware.com/en/VMware-NSX-T-Data-Center/2.3/rn/VMware-NSX-T-Data-Center-23-Release-Notes.html
Due to my install being a home lab i could not contact support. If you are experiencing this issue i would strongly advise to contact support before continuing further. VMware support contact information can be found here: https://www.vmware.com/group/vmware/get-help/
White reading the NSX-T 2.5.1 Upgrade guide from vmware documentation at page 22 i stumbled on instructions to upgrade the CSM. The instructions reference a .nub file but with no instructions on how to retrieve it. Based on whats available on the vmware download portal i was able to find a .mub file.
In order to bypass the error i was experiencing i downloaded the 2.5.1 version of the .mub file from vmware download portal.
After downloading the .mub file i used an unrachiver in my case 7-zip trying to extract an archive from the .mub file. Ive found that the .mub file included a .tar.gz archive and a .sig file. After extracting the tar.gz archive i was presented with a number of folders that included the VMware-NSX-unified-appliance-<version>.nub file i was looking for.
The file should be under Manager\nub. Once extracted it should be uploaded to /image/vmware/nsx/file-store/ on the nsx manager server
Verify the upgrade bundle by running: verify upgrade-bundle VMware-NSX-unified-appliance-<version> as the admin user. The output in my case was