Browse Category

NSX

How to Enable SSH on the NSX appliance

Enabling SSH on NSX appliances via the CLI (Command Line Interface) is an essential skill for VMware administrators, providing a more direct and scriptable approach to managing and configuring the NSX environment. Here’s how to enable SSH on NSX from the CLI, allowing for secure, remote administration of your virtual network infrastructure.

Pre-Requisites

Ensure you have local or console access to the NSX appliance (NSX Manager, NSX Edge, or Controller) for initial setup. Administrative credentials will be required to execute the following commands. The instructions have been tested on NSX 4.1.2.3

Steps to Enable SSH on NSX via CLI

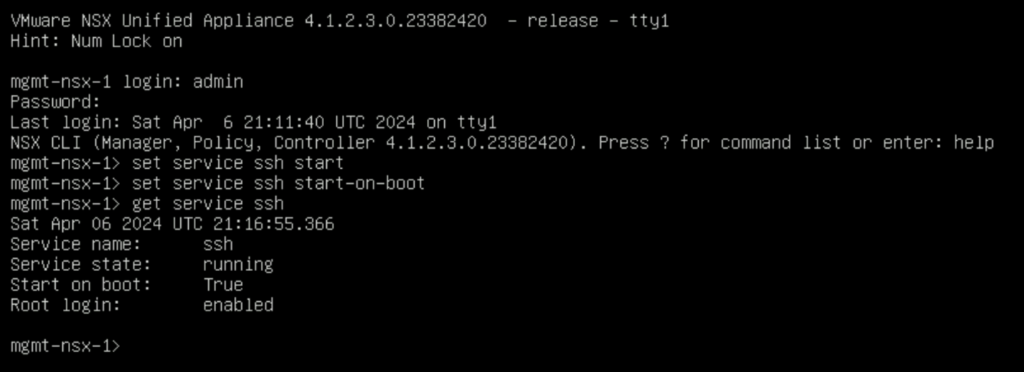
  1. Access the NSX Appliance CLI: Connect to the console of the NSX appliance.
  2. Log in as Admin: Use the username admin and the password configured during the NSX appliance setup to log in.
  3. Enable SSH Service: Execute the command set service ssh start to enable the SSH service. This command starts the SSH daemon, allowing SSH connections to the appliance.
  4. (Optional) Configure SSH Service to Start on Boot: To ensure the SSH service is automatically started upon system reboot, execute set service ssh start-on-boot. This step is crucial for maintaining remote access after system restarts.
  5. Verify SSH Service Status: To confirm the SSH service is running, you can use the command get service ssh. This command displays the current status of the SSH service, including whether it’s running and if it’s configured to start on boot.

Security Considerations

When enabling SSH, consider implementing security measures to protect your NSX environment:

  • Use Strong Passwords: Ensure that all user accounts have strong, complex passwords.
  • Implement Access Control: Restrict SSH access to trusted hosts or networks using firewall rules.
  • SSH Key Authentication: For enhanced security, use SSH key-based authentication instead of passwords.
  • Regularly Update and Patch: Keep your NSX and all connected systems up to date with the latest security patches.

Conclusion

Enabling SSH on NSX via the CLI is a straightforward process that enhances the manageability and accessibility of your network virtualization environment. With SSH enabled, administrators can securely manage the NSX appliances from remote locations, streamlining operations and maintenance tasks. Always follow security best practices to safeguard your environment against unauthorized access.

Replacing the idps reporting Corfu certificate in NSX

In this blog we will go over replacing the idps reporting Corfu certificate in NSX Corfu certificate in NSX. In this example I will be using the UI to generate the self signed certificate and then an API call to replace the certificate.

In my case the cluster manager Corfu certificate has already expired

In the top menu bar I went to Generate -> Generate Self Signed Certificate

Next I had to grab the new certificate ID

The next step is to replace the old certificate with the new certificate via an API call. For this I used Postman but any other tool could potentially be used.

The URL for the post call would go against https://nsx-vip-01a.corp.local/api/v1/trust-management/certificates/cert_id?action=apply_certificate&service_type=CBM_IDPS_REPORTING&node_id=node_id

The node ID can be found under Appliances -> View details on node, the value to the right for UUID ex

For authentication I used basic, per best practices we should be using a token.

For headers had to add Content-Type application\json ex

In the body I picket raw and added the following in

{ "cert_id": "0cc2f4f0-f409-4849-bf01-cfe454349a12",
"service_type": "CBM_IDPS_REPORTING" }

The cert ID is from the certificate I generated earlier. ex

Once I clicked send I was presented back with a 200 OK

Going in the web browser I can also see that the new certificate is now used and the old one doesn’t have anything assigned to it ex

The final step I did was removing the old certificate by clicking on the 3 dots to left and picking delete from the menu

Replacing the cluster manager Corfu certificate in NSX

In this blog we will go over replacing the cluster manager Corfu certificate in NSX. In this example I will be using the UI to generate the self signed certificate and then an API call to replace the certificate.

In my case the cluster manager Corfu certificate has already expired

In the top menu bar I went to Generate -> Generate Self Signed Certificate

Next I had to grab the new certificate ID

The next step is to replace the old certificate with the new certificate via an API call. For this I used Postman but any other tool could potentially be used.

The URL for the post call would go against https://nsx-vip-01a.corp.local/api/v1/trust-management/certificates/cert_id?action=apply_certificate&service_type=CBM_CLUSTER_MANAGER&node_id=node_id

The node ID can be found under Appliances -> View details on node, the value to the right for UUID ex

For authentication I used basic, per best practices we should be using a token.

For headers had to add Content-Type application\json ex

In the body I picket raw and added the following in

{ "cert_id": "0d77eb4c-b305-41a1-b0c4-da7260191d6d",
"service_type": "CBM_CLUSTER_MANAGER" }

The cert ID is from the certificate I generated earlier. ex

Once I clicked send I was presented back with a 200 OK

Going in the web browser I can also see that the new certificate is now used and the old one doesn’t have anything assigned to it ex

The final step I did was removing the old certificate by clicking on the 3 dots to left and picking delete from the menu

Replacing the Monitoring Corfu certificate in NSX

In this blog we will go over replacing the Corfu certificate in NSX. In this example I will be using the UI to generate the self signed certificate and then an API call to replace the certificate.

In my case the Monitoring Corfu certificate has already expired

In the top menu bar I went to Generate -> Generate Self Signed Certificate

Next I had to grab the new certificate ID

The next step is to replace the old certificate with the new certificate via an API call. For this I used Postman but any other tool could potentially be used.

The URL for the post call would go against https://nsx-vip-01a.corp.local/api/v1/trust-management/certificates/cert_id?action=apply_certificate&service_type=CBM_MONITORING&node_id=node_id

The node ID can be found under Appliances -> View details on node, the value to the right for UUID ex

For authentication I used basic, per best practices we should be using a token.

For headers had to add Content-Type application\json ex

In the body I picket raw and added the following in

{ "cert_id": "de5aed8d-cc84-4d0b-b487-8b6be2a022ba",
"service_type": "CBM_MONITORING" }

The cert ID is from the certificate I generated earlier. ex

Once I clicked send I was presented back with a 200 OK

Going in the web browser I can also see that the new certificate is now used and the old one doesn’t have anything assigned to it ex

The final step I did was removing the old certificate by clicking on the 3 dots to left and picking delete from the menu

Replacing the CSM Corfu certificate in NSX

In this blog we will go over replacing the Corfu certificate in NSX. In this example I will be using the UI to generate the self signed certificate and then an API call to replace the certificate.

In my case the CSM Corfu certificate has already expired

In the top menu bar I went to Generate -> Generate Self Signed Certificate

Next I had to grab the new certificate ID

The next step is to replace the old certificate with the new certificate via an API call. For this I used Postman but any other tool could potentially be used.

The URL for the post call would go against https://nsx-vip-01a.corp.local/api/v1/trust-management/certificates/cert_id?action=apply_certificate&service_type=CBM_CSM&node_id=node_id

The node ID can be found under Appliances -> View details on node, the value to the right for UUID ex

For authentication I used basic, per best practices we should be using a token.

For headers had to add Content-Type application\json ex

In the body I picket raw and added the following in

{ "cert_id": "65f3c890-485c-4c54-b80a-51cef8db7124",
"service_type": "CBM_CSM" }

The cert ID is from the certificate I generated earlier. ex

Once I clicked send I was presented back with a 200 OK

Going in the web browser I can also see that the new certificate is now used and the old one doesn’t have anything assigned to it ex

The final step I did was removing the old certificate by clicking on the 3 dots to left and picking delete from the menu

Replacing the GM Corfu certificate in NSX

In this blog we will go over replacing the Corfu certificate in NSX. In this example I will be using the UI to generate the self signed certificate and then an API call to replace the certificate.

In my case the GM Corfu certificate has already expired

In the top menu bar I went to Generate -> Generate Self Signed Certificate

Next I had to grab the new certificate ID

The next step is to replace the old certificate with the new certificate via an API call. For this I used Postman but any other tool could potentially be used.

The URL for the post call would go against https://nsx-vip-01a.corp.local/api/v1/trust-management/certificates/cert_id?action=apply_certificate&service_type=CBM_MP&node_id=node_id

The node ID can be found under Appliances -> View details on node, the value to the right for UUID ex

For authentication I used basic, per best practices we should be using a token.

For headers had to add Content-Type application\json ex

In the body I picket raw and added the following in

{ "cert_id": "570dace5-8c8a-4f0f-a08f-69dc2054285b",
"service_type": "CBM_GM" }

The cert ID is from the certificate I generated earlier. ex

Once I clicked send I was presented back with a 200 OK

Going in the web browser I can also see that the new certificate is now used and the old one doesn’t have anything assigned to it ex

The final step I did was removing the old certificate by clicking on the 3 dots to left and picking delete from the menu

Replacing the MP Corfu certificate in NSX

In this blog we will go over replacing the Corfu certificate in NSX. In this example I will be using the UI to generate the self signed certificate and then an API call to replace the certificate.

In my case the MP Corfu certificate has already expired

In the top menu bar I went to Generate -> Generate Self Signed Certificate

Next I had to grab the new certificate ID

The next step is to replace the old certificate with the new certificate via an API call. For this I used Postman but any other tool could potentially be used.

The URL for the post call would go against https://nsx-vip-01a.corp.local/api/v1/trust-management/certificates/cert_id?action=apply_certificate&service_type=CBM_MP&node_id=node_id

The node ID can be found under Appliances -> View details on node, the value to the right for UUID ex

For authentication I used basic, per best practices we should be using a token.

For headers had to add Content-Type application\json ex

In the body I picket raw and added the following in

{ "cert_id": "e060f100-5e5a-42c8-b735-0cb58f944b43",
"service_type": "CBM_MP" }

The cert ID is from the certificate I generated earlier. ex

Once I clicked send I was presented back with a 200 OK

Going in the web browser I can also see that the new certificate is now used and the old one doesn’t have anything assigned to it ex

The final step I did was removing the old certificate by clicking on the 3 dots to left and picking delete from the menu

Replacing the CCP Corfu certificate in NSX

In this blog we will go over replacing the Corfu certificate in NSX. In this example I will be using the UI to generate the self signed certificate and then an API call to replace the certificate.

In my case the CCP Corfu certificate has already expired

In the top menu bar I went to Generate -> Generate Self Signed Certificate

Next I had to grab the new certificate ID

The next step is to replace the old certificate with the new certificate via an API call. For this I used Postman but any other tool could potentially be used.

The URL for the post call would go against https://nsx-vip-01a.corp.local/api/v1/trust-management/certificates/cert_id?action=apply_certificate&service_type=CBM_CCP&node_id=node_id

The node ID can be found under Appliances -> View details on node, the value to the right for UUID ex

For authentication I used basic, per best practices we should be using a token.

For headers had to add Content-Type application\json ex

In the body I picket raw and added the following in

{ "cert_id": "5a6f1a51-95ec-45f3-8b7a-92ac2abd75cb",

"service_type": "CBM_CCP" }

The cert ID is from the certificate I generated earlier. ex

Once I clicked send I was presented back with a 200 OK

Going in the web browser I can also see that the new certificate is now used and the old one doesn’t have anything assigned to it ex

The final step I did was removing the old certificate by clicking on the 3 dots to left and picking delete from the menu

Replacing the AR Corfu certificate in NSX

In this blog we will go over replacing the Corfu certificate in NSX. In this example I will be using the UI to generate the self signed certificate and then an API call to replace the certificate.

In my case the AR Corfu certificate has already expired

In the top menu bar I went to Generate -> Generate Self Signed Certificate

Next I had to grab the new certificate ID

The next step is to replace the old certificate with the new certificate via an API call. For this I used Postman but any other tool could potentially be used.

The URL for the post call would go against https://nsx-vip-01a.corp.local/api/v1/trust-management/certificates/cert_id?action=apply_certificate&service_type=CBM_AR&node_id=node_id

The node ID can be found under Appliances -> View details on node, the value to the right for UUID ex

For authentication I used basic, per best practices we should be using a token.

For headers had to add Content-Type application\json ex

In the body I picket raw and added the following in

{ "cert_id": "625fb6e6-00ff-4c59-9275-0e7583bcb0c7",

"service_type": "CBM_AR" }

The cert ID is from the certificate I generated earlier. ex

Once I clicked send I was presented back with a 200 OK

Going in the web browser I can also see that the new certificate is now used and the old one doesn’t have anything assigned to it ex

The final step I did was removing the old certificate by clicking on the 3 dots to left and picking delete from the menu

Certificate delete failed: Certificate cannot be deleted because it is used by 1 MP node

I was recently trying to replace some service certificates and I accidentally associated the certificate with the wrong service. When trying to delete the certificate I was presented with an error “Certificate delete failed: Certificate cannot be deleted because it is used by 1 MP node”

The first step I did was try to figure out what service is associated with the certificate. For that I leveraged the instructions in KB 75277. Performing a GET /api/v1/trust-management/certificates/{cert-id} I was able to identify that CBM_API service was using the certificate.

To remove it I had to run curl -k -X POST -H "Content-Type: application/json" -H 'X-NSX-Username:admin' -H 'X-NSX-Groups:superuser' -d '{"service_type":"CBM_API","node_id":"{node_id}"}' "http://localhost:7440/nsxapi/api/v1/trust-management/certificates/{certificate_id}?action=release"

The command allowed me to unregister the component and allowed me to delete the old certificate.

  • 1
  • 2