As i was installing\upgrading my lab environment to ESXi 7.0 i received an error that the CPU was unsupported. As per the release notes vSphere 8.0 release notes my CPU is no longer on the compatibility list.
Since this is a lab environment i wanted to continue using my current hardware. It goes without saying that this method should not be used in a production environment.
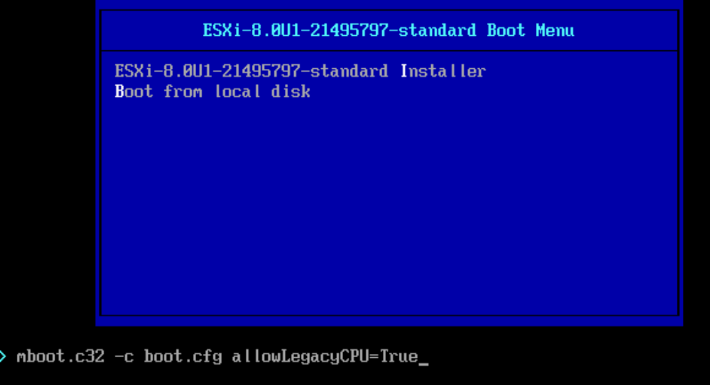
To allow the legacy CPU all I had to do is boot up from the ISO, on the boot Menu I pressed TAB or Shift + O and added allowLegacyCPU=True option as seen in the screenshot below
I recently ran in to a problem where i wanted to perform a clean configuration of one of my ESXi hosts from an NSX perspective, however i ran in to a problem where NSX was reporting that the packages are already installed. To fix the issue i had to run the following to list the packages installed:
esxcli software vib list | grep -i nsx
Once i had the list all i had to do is uninstall them using:
With the latest release of ESXi7U1 i wanted to get my lab up to date. I dont have enough resources in my lab to migrate the vCenter to another ESXi server so i want to perform the upgrade via cli. More details about the release can found here
The first step was to open the firewall for outgoing traffic for http
esxcli network firewall ruleset set -e true -r httpClient
This returned a list of updates that were available:
I reviewed the downloads website here to double check the version. Based on the information I found the ESXi-7.0U3f-20036589-standard is the latest release
With the release of vCenter 7 Update 1, VMware introduced the vCLS (vSphere Clustering Service). More information can be found here.
Looking at the error details it looks like it is looking for a feature called cpuid.mwait
Reviewing the VMX file it seems like EVC is enabled on the vCLS VMs. I didnt want to enable EVC on the whole cluster so i wanted to do it only on the specific VMs.
Doing some research i found that the VMs need to be at version 14. After upgrading the VM i was able to disable EVC on the specific VMs by following these steps:
In the vSphere Client, navigate to the virtual machine
Under the Actions -> Compatibility -> Upgrade VM compatibility
We can disable EVC on per VM level on version 14 and above, so in my case i chose ESXi 6.7U2 and later
Next go to the Configure Tab
Pick VMware EVC and click on Edit
Click on Yes
Click on Disable EVC and Click OK
The next time it tries to power on the VM it should go through.
Once the first VM starts up it will most likely deploy a few additional ones, follow the same steps as above again on the new VMs
With the latest release of ESXi7U1 i wanted to get my lab up to date. I dont have enough resources in my lab to migrate the vCenter to another ESXi server so i want to perform the upgrade via cli. More details about the release can found here
The first step was to open the firewall for outgoing traffic for http
esxcli network firewall ruleset set -e true -r httpClient
This returned a list of updates that were available:
I reviewed the downloads website here to double check the version. Based on the information i found the ESXi-7.0.1-16850804-standard is the latest release
While i was trying to perform an upgrade to my ESXi installation i ran in to the below error:
The fix was pretty simple. The hypervisor doesnt have enough space to download and install the package so we need to enable one of the available datastores for the function.
For vCenter go to the host in question to Configure -> System -> System Swap
While reviewing the configuration i noticed that i had 2 options enabled
Clicking on the edit button on the right corner i noticed that i can add one of the datastores
After i Clicked ok i was able to continue with my upgrade
With the release of vCenter 7 Update 1, VMware introuced the vCLS (vSphere Clustering Service). More information can be found here.
Looking at the error details it looks like it is looking for a feature called cpuid.mwait
Reviewing the VMX file it seems like EVC is enabled on the vCLS VMs. I didnt want to enable EVC on the whole cluster so i wanted to do it only on the specific VMs.
Doing some research i found that the VMs need to be at version 14. After upgrading the VM i was able to disable EVC on the specific VMs by following these steps:
In the vSphere Client, navigate to the virtual machine
Under the Actions -> Compatibility -> Upgrade VM compatibility
We can disable EVC on per VM level on version 14 and above, so in my case i chose ESXi 6.7 and later
Next go to the Configure Tab
Pick VMware EVC and click on Edit
Click on Yes
Click on Disable EVC and Click OK
The next time it tries to power on the VM it should go through.
Once the first VM starts up it will most likely deploy a few additional ones, follow the same steps as above again on the new VMs
Ive ran recently in to an issue where i couldnt perform an update from the admin UI, in order to get up and running i executed the following from a ssh shell. I was luky enough to find the documentation here
I recently ran in to an issue where the vCenter server appliance update timed out. Rebooting the vCenter server brought the server back up but i was unable to log in to the administration section due to an Update installation in progress error
Doing some research i found that there is a file that holds this information fount at /etc/applmgmt/appliance/software_update_state.conf At this point all i had to do was edit the file using vi
vi /etc/applmgmt/appliance/software_update_state.conf
When opening the file i noticed that the state was INSTALL_IN_PROGRESS
Tge version was also different from what the console was showing
So i updated the file to reflect the actual version of the appliance. The end result looked like this: