Browse Category

Uncategorized

SaltStack: The Ultimate Tool for Windows Patch Management

Windows systems are vulnerable to security threats and need to be regularly patched to protect against these threats. However, managing patches for a large number of Windows systems can be a tedious and time-consuming task. This is where SaltStack comes in to help.

SaltStack is a popular open-source configuration management and orchestration tool that can be used to manage Windows systems, including patch management. In this blog, we will discuss how to use SaltStack to patch Windows systems.

Installing the Salt Minion on Windows

Before you can use SaltStack to manage Windows systems, you need to install the Salt Minion software on each Windows system you want to manage. The Salt Minion is a lightweight software that allows the Salt Master to communicate with the Windows system and execute commands on it.

To install the Salt Minion on Windows, follow these steps:

  1. Download the Salt Minion MSI package from the SaltStack website.
  2. Double-click the MSI package to start the installation process.
  3. Follow the on-screen instructions to complete the installation.

Once the installation is complete, the Salt Minion will be running on the Windows system and will be ready to receive commands from the Salt Master.

Using the Salt Command to Install Updates

Once the Salt Minion is installed on a Windows system, you can use the salt command to install updates. The salt command allows you to run the built-in win_update module on a specific Windows system to install updates.

For example, the following command will install all available updates on a Windows system with the ID “windows-server-01”:

salt windows-server-name cmd.run 'salt-call win_update.update'

Using the win_updates State Module

SaltStack also provides the win_updates state module to manage updates on Windows systems. The win_updates state module allows you to define the desired state of your Windows systems, including which updates to install.

For example, the following command will install all available updates on all Windows systems managed by SaltStack:

salt '*' state.apply win_updates

Using the winrepo Feature

SaltStack’s winrepo feature allows you to manage custom Windows updates and patch packages. This feature allows you to create a local repository of Windows updates and patches that can be easily distributed to all of your Windows systems.

For example, the following command will update the local repository of custom packages on all Windows systems managed by SaltStack:

salt '*' state.apply winrepo_update

Conclusion

In this blog, we discussed how to use SaltStack to patch Windows systems. SaltStack provides a powerful and flexible solution for Windows patch management, allowing you to manage updates for a large number of Windows systems in an efficient and automated manner.

Whether you are managing a few Windows systems or hundreds, SaltStack is the ultimate tool for Windows patch management. So, start using SaltStack today and make your Windows patch management process a breeze!

vROPs tagging and workload optimization

Optimizing workloads in a custom datacenter with multiple clusters is a challenging task that requires a comprehensive understanding of the underlying infrastructure and the applications running on it. One of the key components of this optimization process is proper tagging using vRealize Operations Manager (vROPs).

Tagging in vROPs is a process of assigning metadata to objects such as virtual machines, hosts, and clusters. This metadata provides context to the objects and helps to categorize them based on their characteristics, making it easier to manage and monitor the infrastructure.

In the context of workload optimization across a custom datacenter with multiple clusters, vROPs tagging plays a critical role in several ways:

  1. Resource Utilization: By tagging objects with relevant metadata, vROPs can provide real-time visibility into the resource utilization of each cluster, allowing administrators to identify over-utilized or under-utilized resources.
  2. Workload Placement: vROPs tagging can be used to determine the most appropriate cluster for a given workload based on its resource requirements and the available resources in each cluster. This helps to ensure that workloads are placed in the right environment to meet their performance and availability requirements.
  3. Capacity Planning: Tagging enables vROPs to gather data on resource utilization trends, which can be used to plan for future capacity needs. This information helps administrators to make informed decisions about resource allocation and identify areas where additional resources may be required.
  4. Compliance and Governance: By tagging objects with relevant metadata, vROPs can enforce compliance and governance policies. For example, administrators can use tags to ensure that sensitive data is stored on compliant clusters or that workloads are placed in clusters that meet specific security requirements.

In conclusion, vROPs tagging is an essential component of workload optimization across a custom datacenter with multiple clusters. It enables administrators to gather real-time visibility into the resource utilization of each cluster, make informed decisions about resource allocation, and enforce compliance and governance policies. By leveraging vROPs tagging, administrators can ensure that their infrastructure is running efficiently, effectively, and securely.

vROPs DRS requirements across multiple data centers

vSphere Resource Management with vRealize Operations (vROPs) DRS across multiple data centers is a critical requirement for managing large-scale virtualized environments. In this blog, we’ll discuss the requirements for using DRS in vROPs across multiple data centers.

  1. Cross vCenter vMotion (CVC-vMotion) Support: CVC-vMotion enables vMotion of virtual machines across multiple vCenter servers. This capability is a pre-requisite for vROPs DRS across multiple data centers.
  2. vCenter Server 6.7 Update 1 or later: vROPs DRS across multiple data centers requires vCenter Server 6.7 Update 1 or later. This ensures that the necessary APIs are available to enable vROPs to manage resources across multiple vCenter servers.
  3. Network Connectivity: All data centers should have a reliable and high-speed network connectivity, with the necessary firewall ports opened for communication between vCenter servers and vROPs instances.
  4. vROPs Replication: vROPs instances in different data centers must be able to communicate with each other. vROPs replication can be used to keep the data in all vROPs instances in sync, ensuring that the vROPs DRS decisions are based on consistent data.
  5. Same vROPs version: All vROPs instances must be running the same version of vROPs to ensure compatibility and prevent any issues with data consistency.
  6. Same vROPs license: All vROPs instances must be licensed with the same vROPs license, and the license should include the vROPs DRS capability.
  7. Cluster Configuration: The virtual machines that need to be managed by vROPs DRS must be in a vSphere cluster that spans across multiple vCenter servers. The vSphere cluster must be configured with the appropriate DRS settings, such as automated DRS, to ensure that vROPs DRS can make effective resource management decisions.

In conclusion, vROPs DRS across multiple data centers is a powerful tool for managing virtualized environments at scale. By following these requirements, organizations can ensure that their vROPs DRS implementation is effective, efficient, and reliable.

DRS Rules in vROPs and vCenter

The Distributed Resource Scheduler (DRS) is a key component of the vSphere platform, and is used to manage resource allocation and workload distribution within virtualized data centers. DRS works by analyzing resource utilization and workload demands of virtual machines (VMs) and making recommendations for placement and resource allocation based on a set of rules.

In the context of vRealize Operations Manager (vROps), DRS rules play an important role in ensuring optimal performance and utilization of virtualized resources. By using vROps, administrators can monitor resource utilization and workload demands in real-time, and make informed decisions about resource allocation based on this data.

There are several types of DRS rules that can be created and configured in vROps, including:

  1. Affinity rules: These rules define the relationships between VMs and specify whether they should run on the same host, or whether they should run on separate hosts. This allows administrators to control the placement of VMs to ensure optimal performance.
  2. Anti-affinity rules: These rules define the relationships between VMs and specify that they should not run on the same host. This helps to ensure that VMs are isolated from each other, and helps to prevent resource contention.
  3. Shares and limits: These rules define the amount of resources (such as CPU, memory, and storage) that should be allocated to each VM. This allows administrators to control resource utilization and ensure that VMs are not over-allocated.
  4. Automation levels: DRS can be configured to operate in either fully-automated or partially-automated mode. In fully-automated mode, DRS makes all placement and resource allocation decisions, while in partially-automated mode, administrators can specify the rules and policies that should be used.

In vCenter, administrators can manage and configure DRS rules through the vCenter Server interface. The vCenter interface provides a graphical interface for creating, editing, and deleting DRS rules, and allows administrators to monitor resource utilization and workload demands in real-time.

In conclusion, the Distributed Resource Scheduler (DRS) rules play a critical role in ensuring optimal performance and utilization of virtualized resources in vSphere environments. By using vROps and vCenter, administrators can monitor resource utilization, configure rules, and make informed decisions about resource allocation to ensure that virtualized resources are used effectively and efficiently.

Enabling Basic authentication in VMware Orchestrator

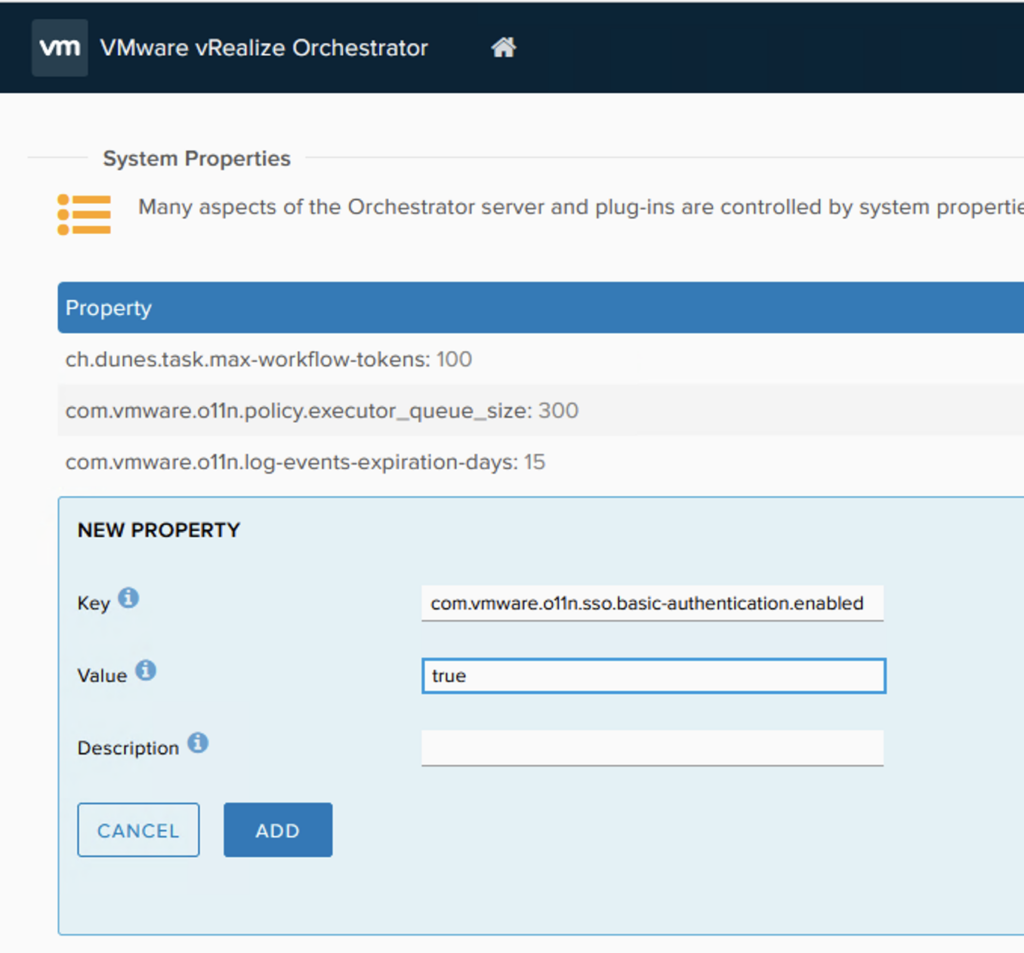
VMware Orchestrator is a powerful automation platform for administrators. In order to secure the access to the Orchestrator, it is recommended to use Single Sign-On (SSO) authentication. However, there may be instances where SSO is not available and you need to use basic authentication instead (ex: Aria Operations plugin). In this case, you can set the value of com.vmware.o11n.sso.basic-authentication.enabled property to true.

Here are the steps to set com.vmware.o11n.sso.basic-authentication.enabled value in VMware Orchestrator:

  • Access the vRealize Orchestrator configuration interface at https://your_orchestrator_FQDN/vco-controlcenter or https://your_vra_FQDN/vco-controlcenter with the vRA appliance root credentials. This can be done through the vRealize Orchestrator Client by going to “Administration” > “System Properties”.
  • In the “System Properties” section, click on “New”.
  • In the “Property name” field, type “com.vmware.o11n.sso.basic-authentication.enabled”.
  • Change the value to “true”.
  • Click on “Add”.
  • The services vRealize Orchestrator service should automatically restart for the change to affect.
  • Verify that authentication now works

By setting the com.vmware.o11n.sso.basic-authentication.enabled property to true, you can use basic authentication instead of SSO for accessing the VMware Orchestrator. This can be useful when SSO is not available or when you need to use a different authentication mechanism.

Note: If you are using a load balancer for vRealize Orchestrator, you need to set the property on all the vRealize Orchestrator nodes in the cluster.

In conclusion, setting com.vmware.o11n.sso.basic-authentication.enabled value in VMware Orchestrator is a simple process and can be done through the vRealize Orchestrator configuration interface. Just follow the steps outlined in this article and you’ll be up and running in no time!

SDDC SaltStack Modules – vRA edition

In this blog post I will go over the steps I took in order to to be able to query my vRA components from SaltStack using the SDDC SaltStack Modules. The SDDC SaltStack Modules were introduced in 2011. You can find the technical release blog here. The modules can be found on GitHub here. There is also a getting quick start guide that can be found here. The vRA module which needs to be installed manually can be found here.

The first step was to create the /srv/salt/_modules folder as it does not exist by default

mkdir -p /srv/salt/_modules

If you don’t have git installed it can be easily installed by running:

yum install -y git

This will also install the dependencies:

Once completed we can run the below to clone the repo. Make sure you are in the /srv/salt/_modules directory

git clone https://github.com/VMwareCMBUTMM/salt_module_for_vra.git

As per documentation the python script should be in /srv/salt/_modules/ however with the git clone it actually created a subdirectory. To fix it i ran:

mv /srv/salt/_modules/salt_module_for_vra/* /srv/salt/_modules/

Now that i had the module in the proper location, I had to let salt know by running a sync

salt-call saltutil.sync_modules

or to sync it across all minions

salt '*' saltutil.sync_modules

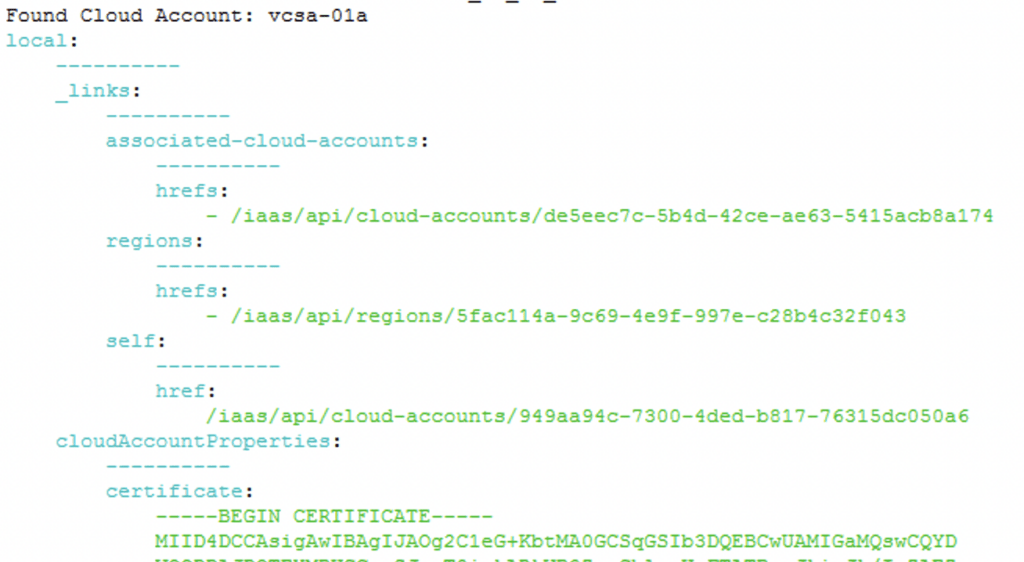
Looking at the api documentation found here i picked on getting detail for my vsphere cloud account using the get_ca_by_name function. For the purposes of my test i did a salt-call. Per the documentation we need to include the function, username, password and account. It looked like this in my environment:

salt-call vra.get_ca_by_name vra-01a.corp.local administrator password vcsa-01a

Next i wanted to see if i can create a cloud account. Based on the API reference i can use the create_vsphere_ca followed by vra_url, username, password, vcenter anme, vcenter username, vcenter password, name i want for the account, region to add from vcenter. It looked like this in my environment:

salt-call vra.create_vsphere_ca vra-01a.corp.local administrator password vcsa-01a.corp.local [email protected] password vcsa-01a Datacenter:datacenter-3

Once ran, i was able to verify in vRA that the account was created

As a remidner the API documentation can be found here

And the module can be downloaded from here

Next i would recommend looking at the example i have for vSphere found here

SDDC SaltStack Modules – vSphere edition

In this blog post I will go over the steps I took in order to to be able to query my vCenter components from SaltStack using the SDDC SaltStack Modules. The SDDC SaltStack Modules were introduced in 2011. You can find the technical release blog here. The modules can be found on GitHub here. There is also a getting quick start guide that can be found here.

I am using the pre packaged ova for deployment which includes most of the components however it does have some outdated packages. The first step for was to upgrade pip:

python3 -m pip install --upgrade pip

Install the saltext.vmware module by running

salt-call pip.install saltext.vmware

Next I had to create a pillar that includes the vCenter information for the connection details.

Actual code:

{
    "vmware_config": {
        "host": "vcsa-01a.corp.local",
        "password": "vcenter password",
        "user": "[email protected]"
    }
}

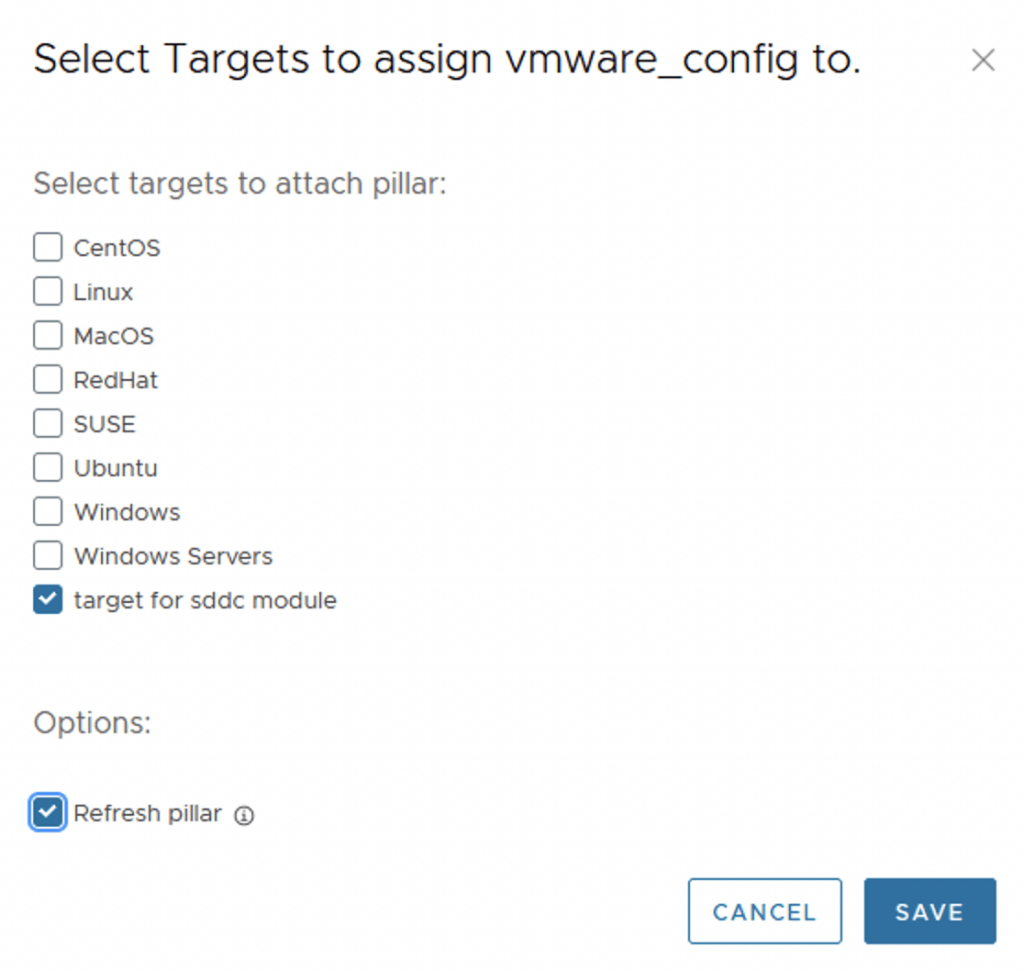
Next I had to attach the pillar to a target by clicking on update targets:

In my case I created a specific target that contained the minion where I want to run it from

Going to the minion I was able to verify that the pillar has been attached by running

salt-call pillar.items

The output shows exactly the data that I had in my pillar

Next I wanted to get the configuration for the MOTD. I was able to simply run the bellow command to get an output

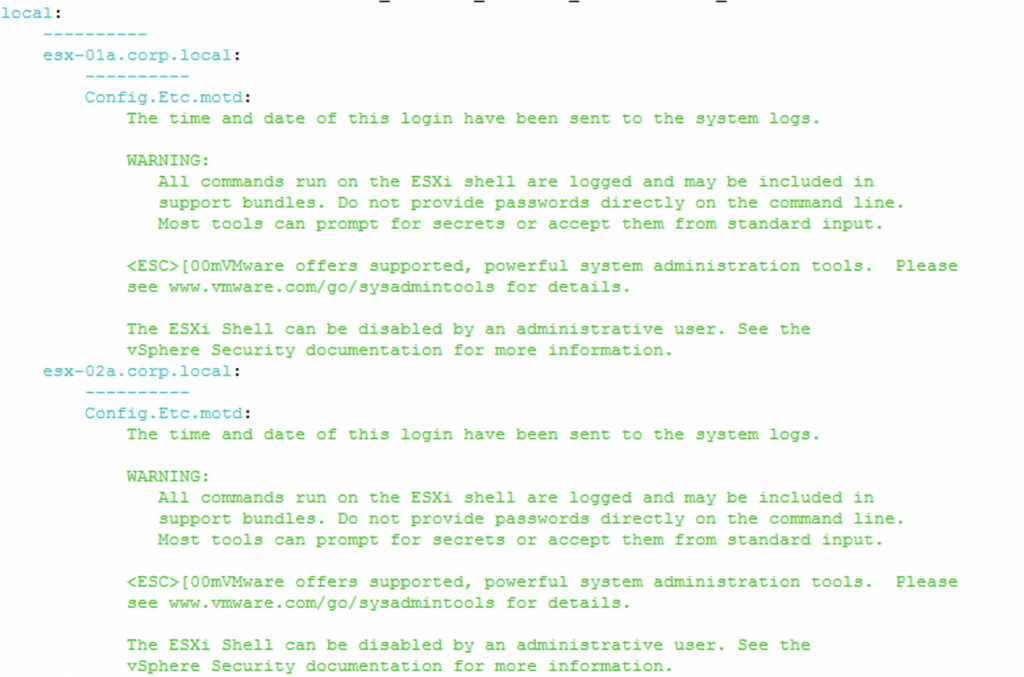
salt-call vmware_esxi.get_advanced_config config_name=Config.Etc.motd

As we can see in the screenshot below all hosts in my vCenter that had Config.Etc.motd as an configuration item reported their configuration

Additionally I was also able to check that the configuration exists in vCenter under the Advanced host configuration example:

Next I wanted to see if I can push a specific configuration change.

salt-call vmware_esxi.set_advanced_config config_name=Config.Etc.motd host_name=esx-01a.corp.local  config_value=Hello

The return was

Checking the vSphere UI I was able to verify that the change was actually pushed through

Next I wanted to add it to the SaltStack UI in order for other team members to be able to use this functionality

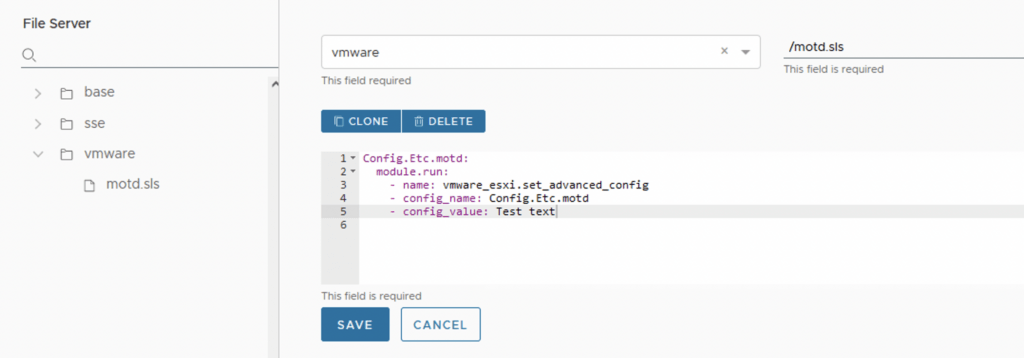
First I navigated to SaltStack Config -> Config -> File Server. I also created another environment called vmware and inside it I created my motd.sls

The sls file had the following:

Config.Etc.motd:
  module.run:
    - name: vmware_esxi.set_advanced_config
    - config_name: Config.Etc.motd
    - config_value: Test text

If you are not familiar with the sls construct here is an explanation on where the values came from:

Config.Etc.motd: - Just a title
  module.run: - this tells salt to run the module
    - name: vmware_esxi.set_advanced_config - the name of the module that needs to be ran
    - config_name: Config.Etc.motd - The config name from vCenter
    - config_value: Test text - The Actual value to write

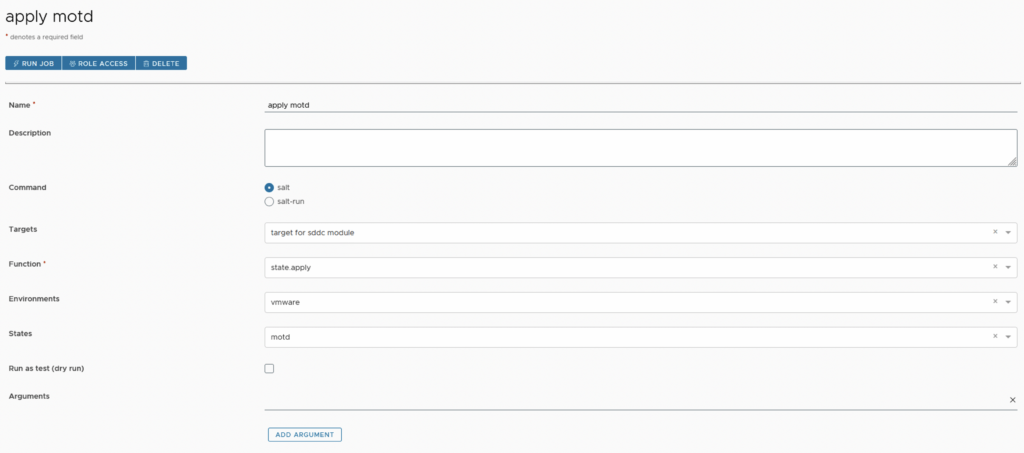
Next I wanted to create a job so it can be around for future use. In the SaltStack Config UI I navigated to Config -> Jobs -> Create job

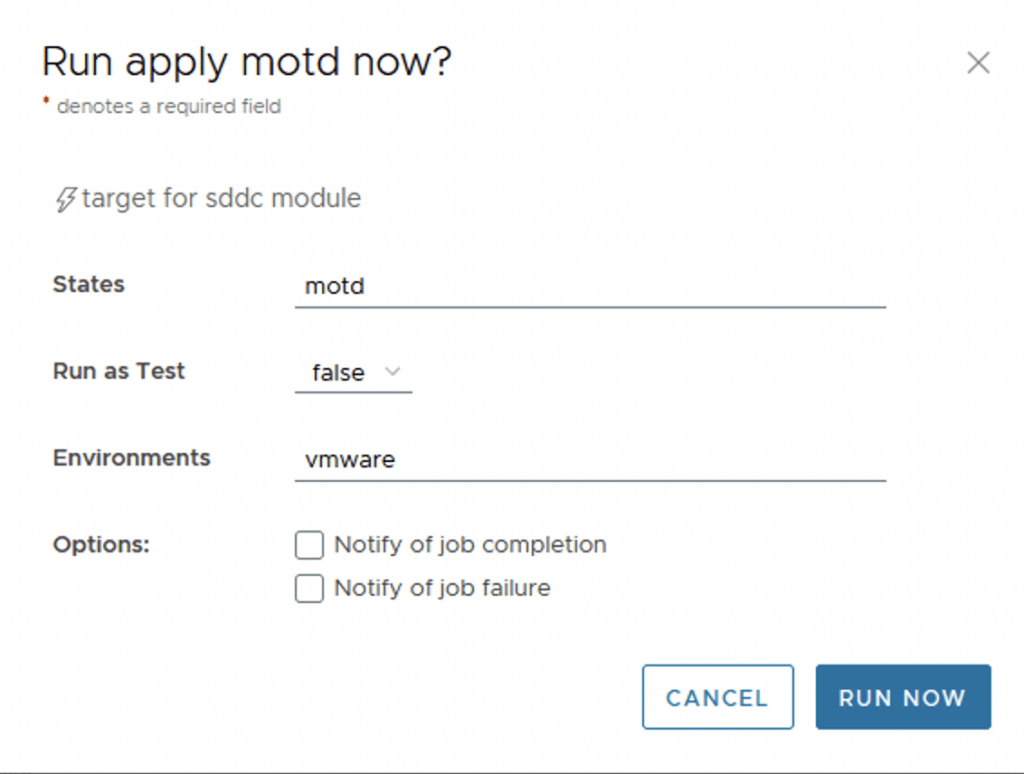
Once I saved the job I was able to go ahead and apply it by running it

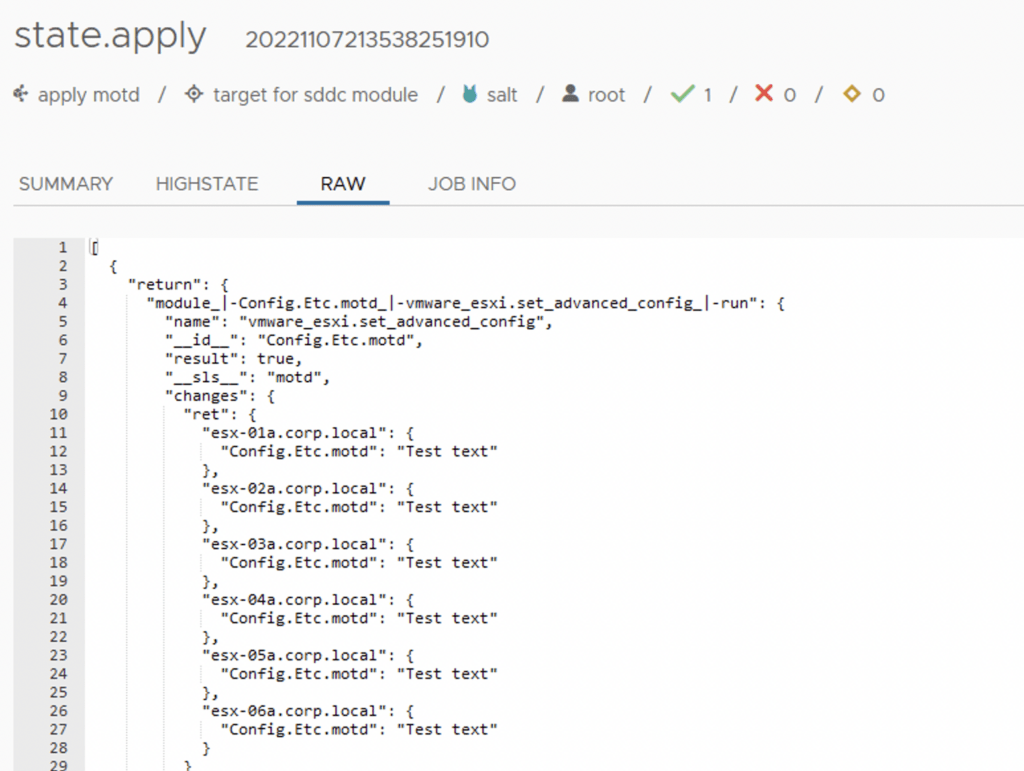
Post completion I was able to verify that my state apply applied the desired configuration across all of my hosts in vCenter

From a vCenter perspective I was also able to double check that the config has actually changed

The additional modules can be found here

The other vSphere modules can be found here

Why Automate Virtual Infrastructure, Why Do it Now, and Why Do it with vRealize Automation

Our IT culture has shifted from managing infrastructure to the management of services. We deliver a self-service catalog to our consumers who manage their environment. Providing our consumers with the self-service catalog reduced delivery of workloads from weeks to hours and it significantly increased their overall satisfaction. – Senior IT director and enterprise architect (Large Healthcare System in western Pennsylvania healthcare system)  

Automation is a journey. The primary reason to adopt automation is to streamline manual processes, enabling your information technology teams to focus on more valuable activities. The goal is to shift lifecycle management of workloads and day-to-day actions to the internal consumer. We look to the future to see where we want to end up and then plan how to get there.  

  • The first decision: your end-state – do you want a self-service or IT as a Service model?  
  • The second decision: which delivery method do you want to use, imperative or declarative code, and do you have the skillset to support the method of choice?  
  • Imperative is IT as a Service. It is programmatically based and relies on your IT coding team.  
  • Declarative can be consumer self-service or IT as a Service.  

Whether you are focused on a private or multi-cloud environment, either method can be employed. But only the declarative approach can deliver self-service capabilities to your internal customers. Here is an example of an organization using the declarative method and its impact.  

Examples:  

  • A well-known children’s hospital in Pennsylvania adopted lifecycle management/process automation.
    • They chose vRealize Automation due to their desire to build out a self-service catalog 
    • Once they deployed vRealize Automation they, they trained their consumers and turned over lifecycle management. 
    • This allowed the Automation Engineers to focus on delivering platform updates and new services for their consumers. 
    • They benefited by avoiding 13,000 helpdesk tickets in their first year by implementing day two actions. 
      • Based on a conservative estimate of a 20-minute resolution per ticket, they avoided 4400 hours of an FTE’s time or 110 weeks (about two years).  
      • Equally as important, this freed up the help desk to focus on level two, and level three issues 
  • Why Do it Now?
    • Why not do it now is the question to be asked? 
  • Information technologies’ role is to provide the infrastructure that supports business-critical applications.  
    • IT cannot be a bottleneck.  
    • The ability to deliver quickly and consistently gives your organization a competitive advantage.  
  • Process automation moves IT from a delivery arm of your business to a support arm. That means:  
    • Self Service: Internal application owners, Database Managers, and DevOps Engineers, lifecycle manage their environments.  
    • Risk Mitigation  
    • Automation of Day-to-Day tasks – You leave room for error when you repeatedly perform a task every day. Invariably it happens. Why is it because we are human, and human beings’ fat finger the keyboard?  
    • Creation of a process that ensures prompt delivery of your customer requests.  
    • Remove backlog of customer requests 
    • Increase internal customer Net Promoter Score (NPS)  
  • Why Do it with vRealize Automation? 
    • vRealize Automation uses the declarative code: build it, and they will come
  • Many organizations utilize commercial off-the-shelf applications.  
    • In this scenario, coders are less relevant.  
    • The declarative method enables IT to build out the relevant use cases for their customer base and make them available in the self-service catalog.  
  • Build use-case templates 
    • Day Zero- deployment of new workloads or services 
    • Day Two – manage the environment.  
    • Day N – retirement  
    • Place all use-cases in a self-service catalog.  
    • Let your Internal consumers consume  
  • The benefits of automating your virtual environment 
    • Deployment of workloads and services is consistent and reliable.  
    • IT or the internal consumer can deliver in hours versus weeks. 
    • IT can monitor compliance and remediate it as needed within minutes vs. hours. 
    • Support teams can recover time and focus on bringing more value to the organization 
    • vRealize Automation deploys and manages across the public, hybrid, and private clouds with the same processes 

Credit goes to Steve Lieberson, Tom Gillaspy and Cosmin Trif. You can find Steve on Twitter and LinkedIn, Tom on Twitter and LinkedIn, and Cosmin on Twitter and LinkedIn

Deploying an AVS cluster on Azure

In this post we will go over the steps for deploying an AVS cluster on Azure.

The first step was to log in to the azure portal at portal.azure.com. Once logged on we can search for “azure vmware solution”

Then I tried to create a cluster by clicking on the Create button on the top left

This opened a wizard for me with the Requirements. Trying to go forward without opening a ticket gave me this error:

Azure VMware Solution is available for all customers with an existing Microsoft Enterprise Agreement or those under a Cloud Solution Provider Azure plan. Prior to creating and deploying your Azure VMware Solution Private Cloud, please review and follow the process for node allocation to your subscription type here.

The instructions send me to the documentation on the steps required and I had to open a ticket to request a quota increase. Here is the direct link to open a ticket

  1. In your Azure portal, under Help + Support, create a New support request and provide the following information:
    • Issue type: Technical
    • Subscription: Select your subscription
    • Service: All services > Azure VMware Solution
    • Resource: General question
    • Summary: Need capacity
    • Problem type: Capacity Management Issues
    • Problem subtype: Customer Request for Additional Host Quota/Capacity
  2. In the Description of the support ticket, on the Details tab, provide information for:
    • Region Name
    • Number of hosts
    • Any other details NoteAzure VMware Solution requires a minimum of three hosts and recommends redundancy of N+1 hosts.
  3. Select Review + Create to submit the request.

It would look like this:

The next screens were pretty self explanatory so I won’t go through them. Once the ticket is created a Microsoft engineer will most likely reach out to verify the details and provision the capacity.

Once the capacity has been provisioned we have a few more steps to follow.

First is to go to subscriptions -> Select Subscription

-> Resource providers -> Search for ads -> Click on register

Before navigating away make sure the Resource shows as registered:

After completing the above going to the Azure VMware Solution allows me to register the go through the screen without errors. Please note that we can only provision resources where they were allocated in the ticket. For example we can’t use resources in West 2 region if the capacity was added to East 2. The ticket from Microsoft would include these details. Sample setup:

The last screen is the review and create. Once we click create the resources will get provisioned.

The deployment will go on for a while. In my case it was 4 hours. Once the deployment is complete we can go to the Azure VMware Solution

After completing the above I would recommend checking out the tutorials on the overview page

SSC 8.8 Authentication failed: no Authorization header

I recently upgraded my LCM deployed SSC server to 8.8.x. If you need a guide to go through the upgrade you can find my other post here.

After the upgrade was completed i was noticing strange behavior in the SSC UI so i checked the status the of the services. Here are the errors i found and how i fixed them

The first step was to check the status of the service

systemctl status salt-master

The return was this

* salt-master.service - The Salt Master Server
   Loaded: loaded (/lib/systemd/system/salt-master.service; enabled; vendor preset: enabled)
   Active: active (running) since Sat 2022-07-16 20:30:29 UTC; 1 day 2h ago
     Docs: man:salt-master(1)
           file:///usr/share/doc/salt/html/contents.html
           https://docs.saltproject.io/en/latest/contents.html
 Main PID: 801 (salt-master)
    Tasks: 40 (limit: 9830)
   Memory: 499.5M
   CGroup: /system.slice/salt-master.service
           |-  801 /bin/python3 /usr/bin/salt-master
           |- 1005 /bin/python3 /usr/bin/salt-master
           |- 1088 /bin/python3 /usr/bin/salt-master
           |- 1090 /bin/python3 /usr/bin/salt-master
           |- 1101 /bin/python3 /usr/bin/salt-master
           |- 1102 /bin/python3 /usr/bin/salt-master
           |- 1110 /bin/python3 /usr/bin/salt-master
           |- 1113 /bin/python3 /usr/bin/salt-master
           |- 1119 /bin/python3 /usr/bin/salt-master
           |- 1120 /bin/python3 /usr/bin/salt-master
           |- 1397 /bin/python3 /usr/bin/salt-master
           |- 1398 /bin/python3 /usr/bin/salt-master
           |- 1400 /bin/python3 /usr/bin/salt-master
           |- 1410 /bin/python3 /usr/bin/salt-master
           |- 1414 /bin/python3 /usr/bin/salt-master
           |- 1419 /bin/python3 /usr/bin/salt-master
           |- 1420 /bin/python3 /usr/bin/salt-master
           |- 1424 /bin/python3 /usr/bin/salt-master
           `-15430 /bin/python3 /usr/bin/salt-master

Jul 17 21:07:47 ssc-01a.corp.local salt-master[801]: [ERROR   ] Failed to authenticate: Authentication failed: no Authorization header
Jul 17 21:07:47 ssc-01a.corp.local salt-master[801]: [ERROR   ] Failed to send minion key state to SSE: 401 Authentication failed: no Authorization header
Jul 17 21:07:48 ssc-01a.corp.local salt-master[801]: [ERROR   ] Failed to authenticate: Authentication failed: no Authorization header
Jul 17 21:07:48 ssc-01a.corp.local salt-master[801]: [ERROR   ] Failed to send minion cache to SSE: 401 Authentication failed: no Authorization header
Jul 17 21:07:48 ssc-01a.corp.local salt-master[801]: [ERROR   ] Failed to authenticate: Authentication failed: no Authorization header
Jul 17 21:07:48 ssc-01a.corp.local salt-master[801]: [ERROR   ] Failed to send master fileserver data to SSE: 401 Authentication failed: no Authorization header
Jul 17 21:07:50 ssc-01a.corp.local salt-master[801]: [ERROR   ] Failed to authenticate: Authentication failed: no Authorization header
Jul 17 21:07:50 ssc-01a.corp.local salt-master[801]: [ERROR   ] sseapi_event_queue: failed to send entries to SSE (will requeue): 401 Authentication failed: no Authorization header
Jul 17 21:07:55 ssc-01a.corp.local salt-master[801]: [ERROR   ] Failed to authenticate: Authentication failed: no Authorization header
Jul 17 21:07:55 ssc-01a.corp.local salt-master[801]: [ERROR   ] sseapi_event_queue: failed to send entries to SSE (will requeue): 401 Authentication failed: no Authorization header

The first step to resolve the error was to delete the master key from the UI by going to SSC UI -> Administration -> Master Keys -> Accepted -> Select the old key and click on delete ex:

Next we need to stop the salt master service by running

systemctl stop salt-master

Additionally on the cli we also need to delete the old key file located at:

/etc/salt/pki/master/sseapi_key.pub

We can delete it by running:

rm /etc/salt/pki/master/sseapi_key.pub

Once the above steps are complete we can get start the services again and accept the new key in the UI.

We can start the service back up by running:

systemctl start salt-master

We can now check the service and add the key back in the UI

systemctl status salt-master

Finally we can restart the saltstack service and verify that its running without errors:

* salt-master.service - The Salt Master Server
   Loaded: loaded (/lib/systemd/system/salt-master.service; enabled; vendor preset: enabled)
   Active: active (running) since Sun 2022-05-15 20:02:56 UTC; 51s ago
     Docs: man:salt-master(1)
           file:///usr/share/doc/salt/html/contents.html
           https://docs.saltproject.io/en/latest/contents.html
 Main PID: 31309 (salt-master)
    Tasks: 39 (limit: 9830)
   Memory: 330.0M
   CGroup: /system.slice/salt-master.service
           |-31309 /bin/python3 /usr/bin/salt-master
           |-31315 /bin/python3 /usr/bin/salt-master
           |-31320 /bin/python3 /usr/bin/salt-master
           |-31323 /bin/python3 /usr/bin/salt-master
           |-31325 /bin/python3 /usr/bin/salt-master
           |-31326 /bin/python3 /usr/bin/salt-master
           |-31327 /bin/python3 /usr/bin/salt-master
           |-31328 /bin/python3 /usr/bin/salt-master
           |-31330 /bin/python3 /usr/bin/salt-master
           |-31397 /bin/python3 /usr/bin/salt-master
           |-31398 /bin/python3 /usr/bin/salt-master
           |-31400 /bin/python3 /usr/bin/salt-master
           |-31411 /bin/python3 /usr/bin/salt-master
           |-31412 /bin/python3 /usr/bin/salt-master
           |-31413 /bin/python3 /usr/bin/salt-master
           |-31414 /bin/python3 /usr/bin/salt-master
           |-31415 /bin/python3 /usr/bin/salt-master
           `-31416 /bin/python3 /usr/bin/salt-master

May 15 20:02:54 ssc-01a.corp.local systemd[1]: Starting The Salt Master Server...
May 15 20:02:56 ssc-01a.corp.local systemd[1]: Started The Salt Master Server.

If the status page a return similar to this

* salt-master.service - The Salt Master Server
   Loaded: loaded (/lib/systemd/system/salt-master.service; enabled; vendor preset: enabled)
   Active: active (running) since Sun 2022-07-17 23:19:35 UTC; 3min 24s ago
     Docs: man:salt-master(1)
           file:///usr/share/doc/salt/html/contents.html
           https://docs.saltproject.io/en/latest/contents.html
 Main PID: 21532 (salt-master)
    Tasks: 40 (limit: 9830)
   Memory: 346.7M
   CGroup: /system.slice/salt-master.service
           |-21532 /bin/python3 /usr/bin/salt-master
           |-21538 /bin/python3 /usr/bin/salt-master
           |-21546 /bin/python3 /usr/bin/salt-master
           |-21550 /bin/python3 /usr/bin/salt-master
           |-21552 /bin/python3 /usr/bin/salt-master
           |-21553 /bin/python3 /usr/bin/salt-master
           |-21554 /bin/python3 /usr/bin/salt-master
           |-21555 /bin/python3 /usr/bin/salt-master
           |-21556 /bin/python3 /usr/bin/salt-master
           |-21557 /bin/python3 /usr/bin/salt-master
           |-21628 /bin/python3 /usr/bin/salt-master
           |-21629 /bin/python3 /usr/bin/salt-master
           |-21631 /bin/python3 /usr/bin/salt-master
           |-21641 /bin/python3 /usr/bin/salt-master
           |-21644 /bin/python3 /usr/bin/salt-master
           |-21645 /bin/python3 /usr/bin/salt-master
           |-21646 /bin/python3 /usr/bin/salt-master
           |-21647 /bin/python3 /usr/bin/salt-master
           `-21648 /bin/python3 /usr/bin/salt-master

Jul 17 23:19:33 ssc-01a.corp.local systemd[1]: Starting The Salt Master Server...
Jul 17 23:19:35 ssc-01a.corp.local systemd[1]: Started The Salt Master Server.

Next we need to go back to the UI and accept the new master key. SSC UI -> Administration -> Master Keys -> Pending Select the new key and click on Accept Key

And with that the issue should be resolved.

Here are a few additional blogs that might be useful post upgrade:

Error Code: LCMVSSC10018

SSC 8.8 sseapi_rpc_queue: could not connect to SSE server

SSC 8.8 urllib3 (1.25.11) or chardet (4.0.0) doesn’t match a supported version