In the evolving landscape of VMware ESXi environments, maintaining compatibility and ensuring that systems adhere to specific boot requirements is essential. As more environments transition towards UEFI, there might still be a need to check or enforce legacy BIOS boot methods on certain ESXi servers, especially for compatibility with older hardware or specific operational requirements. This blog post will guide VMware administrators on how to automate the process of checking the boot option (UEFI or Legacy BIOS) on multiple ESXi hosts using PowerShell and Plink.
Understanding the Need for Legacy Boot Options
Legacy BIOS and UEFI are two different types of firmware interfaces for computers, with UEFI being the modern replacement offering advantages like secure boot, faster boot times, and support for larger hard drives. However, certain scenarios or legacy applications may require maintaining the Legacy BIOS boot method. Identifying which ESXi hosts are not configured with the required boot method can be tedious in large environments. Automation to the rescue!
Setting Up Plink for Automation
Plink (PuTTY Link) is a command-line connection tool that simplifies automated tasks requiring SSH connections. Before you begin, download Plink from the official PuTTY download page and ensure it’s accessible in your system’s PATH, or specify its full path in the scripts.
For security and ease of use, setting up SSH key-based authentication for your ESXi hosts is recommended. This method enhances security by avoiding password storage in scripts and facilitates seamless SSH connections without interactive logins.
Automating Boot Option Checks
Our goal is to automate the detection of the boot method used by ESXi hosts managed by a vCenter Server. This involves two primary steps: gathering the hostnames of your ESXi servers and executing a command on each host to check the boot method.
Step 1: Gathering ESXi Hostnames
First, we’ll use VMware PowerCLI to connect to your vCenter Server and compile a list of all managed ESXi hosts, saving their names to a file.
# Connect to vCenter
$vCenterServer = "your-vcenter-server"
$vCenterUsername = "your-vcenter-username"
$vCenterPassword = ConvertTo-SecureString "your-vcenter-password" -AsPlainText -Force
$Credential = New-Object System.Management.Automation.PSCredential($vCenterUsername, $vCenterPassword)

Connect-VIServer -Server $vCenterServer -Credential $Credential

# Get all ESXi hosts and output to a file
$hostsFile = "C:\path\to\your\esxi_hosts.txt"
Get-VMHost | Select-Object -ExpandProperty Name | Out-File -FilePath $hostsFile

# Disconnect from vCenter
Disconnect-VIServer -Server $vCenterServer -Confirm:$false -Force
Step 2: Checking Boot Methods Using Plink
With the hostnames ready, we’ll utilize Plink to execute a command on each host that determines its boot method, capturing the results for review.
$plinkPath = "C:\path\to\plink.exe"
$sshUsername = "your-ssh-username"
$sshPassword = "your-ssh-password"
$hostsFile = "C:\path\to\your\esxi_hosts.txt"
$resultsFile = "C:\path\to\your\boot_methods.txt"
if (Test-Path $resultsFile) {
Remove-Item $resultsFile
}
# Read the hostnames from the file
$hosts = Get-Content -Path $hostsFile
foreach ($esxiHost in $hosts) {
try {
# Build the command for Plink, escaping the password for use in a command line
$sshPasswordEscaped = $sshPassword -replace '(["$`])', '`$1'
$command = "vsish -e get /hardware/firmwareType"
$plinkCommand = "$plinkPath -ssh -l $sshUsername -pw $sshPasswordEscaped -batch -no-antispoof $esxiHost $command"
$result = & cmd /c $plinkCommand
$output = "Firmware Type for $esxiHost $result"
Write-Host $output
$output | Out-File -FilePath $resultsFile -Append
} catch {
$errorMessage = "An error occurred processing $esxiHost $_"
Write-Host $errorMessage
$errorMessage | Out-File -FilePath $resultsFile -Append
}
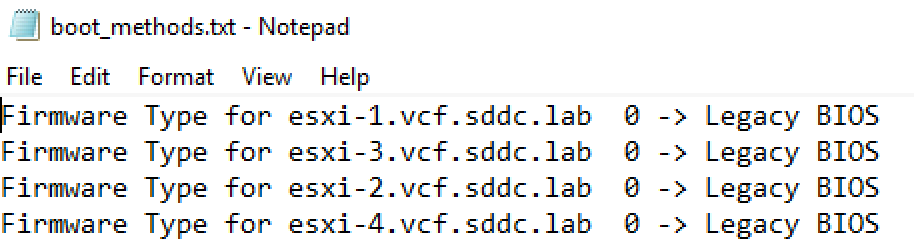
}Interpreting the Results
After running the script, the boot_methods.txt file will contain the boot method (UEFI or Legacy BIOS) for each ESXi host. Review this file to identify which hosts are not configured according to your operational requirements.
Conclusion
Automating the check for legacy boot options across multiple ESXi hosts simplifies compliance with specific operational standards or compatibility requirements. By leveraging PowerShell and Plink, VMware administrators can efficiently ensure their environments align with the necessary boot methods, saving time and enhancing system reliability.
Happy automating, and here’s to maintaining optimal configurations across your VMware landscape!