Browse Author

admin

Enhancing vCenter Server Firewall Management with Ansible

In today’s dynamic IT environments, maintaining a secure and efficient infrastructure is paramount. For VMware vSphere administrators, managing the firewall settings on vCenter servers is a critical task that ensures the security of the entire virtualized infrastructure. Ansible, an open-source automation tool, offers a streamlined approach to managing firewall settings across multiple vCenter servers. This blog post will guide you through automating vCenter server firewall configurations using Ansible, showcasing how to apply these changes across multiple servers seamlessly.

Prerequisites:

  • Ansible installed on a control node (e.g., your workstation or a dedicated Ansible server).
  • Administrative access to your vCenter Server(s).
  • SSH access enabled on all target vCenter servers for Ansible.
  • A user account with sufficient privileges to modify firewall settings on the vCenter servers.

Part 1: Preparing Your Ansible Environment Before automating the firewall settings, ensure Ansible can communicate with your vCenter servers. This involves setting up an inventory file that lists all the target servers.

  1. Create an Inventory File: In your Ansible working directory, create a file named hosts.ini and add your vCenter servers under a group [vcenters]:
[vcenters]
vcenter1.example.com
vcenter2.example.com
vcenter3.example.com
...

Part 2: Writing Your Ansible Playbook An Ansible playbook defines the tasks to be executed on the target machines. For firewall management, you’ll create a playbook that ensures the desired firewall rules are present and active.

  1. Create the Playbook: In your Ansible working directory, create a file named manage_firewall.yml. Below is an example playbook that enables SSH access on the vCenter servers by modifying the firewall settings.
---
- name: Manage Firewall Settings on vCenter Servers
  hosts: vcenters
  become: yes  # Use elevated privileges
  tasks:
    - name: Ensure SSH access is allowed in the firewall
      ansible.builtin.firewalld:
        service: ssh
        state: enabled
        permanent: true
        immediate: yes

This playbook uses the ansible.builtin.firewalld module to manage firewall settings, specifically to enable SSH access. Adjust the module parameters as needed for your specific firewall rules.

Part 3: Executing the Playbook With the playbook and inventory file ready, you can now apply the firewall configurations to your vCenter servers.

  1. Run the Playbook: Execute the following command from your Ansible control node:
ansible-playbook -i hosts.ini manage_firewall.yml

This command instructs Ansible to run the playbook manage_firewall.yml against the hosts listed in hosts.ini, applying the firewall settings as defined.

Part 4: Scaling and Automating with Ansible Ansible’s power lies in its ability to scale and automate complex IT workflows. Consider integrating this playbook into your regular IT automation routines, such as part of a CI/CD pipeline or scheduled via Ansible Tower or AWX for regular compliance checks and updates.

Conclusion: Automating the management of firewall settings on vCenter servers with Ansible not only improves your security posture but also enhances operational efficiency by reducing manual tasks and potential for human error. By leveraging Ansible’s straightforward playbook syntax and powerful modules, you can ensure consistent firewall configurations across your VMware environment, freeing up time to focus on other critical IT initiatives.

Note: Always test your Ansible playbooks in a non-production environment before deploying them to production to ensure they work as expected and do not disrupt your services.

Streamlining vCenter Server Firewall Management with SaltStack Config

In the realm of VMware vSphere management, securing your vCenter Server is critical to maintaining a robust and secure infrastructure. SaltStack Config, integrated into VMware’s vRealize Automation suite, offers a powerful way to automate and manage configurations across your VMware environment, including firewall settings. This blog explores how to leverage SaltStack Config to automate firewall adjustments on your vCenter servers, ensuring consistent security policies and simplifying the process across multiple instances.

Prerequisites:

  • A working VMware vSphere environment with vCenter Server(s).
  • SaltStack Config setup and integrated with your vSphere environment.
  • Basic understanding of SaltStack fundamentals and the Salt state files.

Part 1: Setting Up Your SaltStack Environment Before diving into firewall management, ensure that your SaltStack Config is correctly set up and that your Minions (managed nodes) are communicating with the Salt Master. The Minions in this context would be the servers or systems where the vCenter Server runs.

  1. Verify Minion Connectivity: Use the salt-key command to check if your Minions are correctly connected and authenticated with the Salt Master.
salt-key -L

This command lists all Minions connected to your Salt Master.

Part 2: Creating a Salt State for Firewall Management You’ll create a Salt state file to manage the firewall settings on your vCenter servers. This example assumes you’re managing firewall rules related to SSH access, but you can adjust the configuration according to your specific needs.

  1. Create a Salt State File: Navigate to your Salt Master’s state file directory (typically /srv/salt) and create a new state file named vcenter_firewall.sls.

enable_ssh_access:
firewalld.present:
– name: ssh
– enabled: True

This state ensures the SSH service firewall rule is enabled, allowing SSH access to the vCenter server.

Part 3: Applying the State Across Multiple vCenter Servers With the state file ready, you can now apply this configuration across your vCenter servers. If your vCenter servers are already configured as Minions and grouped appropriately, you can target them directly.

  1. Apply the State: Use the salt command to apply your state file to the targeted vCenter servers.

salt ‘vcenter_minion_group’ state.apply vcenter_firewall

Replace 'vcenter_minion_group' with your specific target or group name. This command applies the firewall configuration state to all targeted Minions.

Part 4: Automating and Scheduling State Application To ensure ongoing management and enforcement of your firewall settings, consider scheduling the state application using SaltStack’s scheduler or integrating it into your CI/CD pipeline for regular enforcement.

  1. Scheduling with SaltStack: You can use SaltStack’s built-in scheduler to regularly apply your state to ensure compliance and react to any changes.

schedule_firewall_management:
schedule.present:
– function: state.apply
– job_args:
– vcenter_firewall
– minutes: 1440 # Adjust the timing based on your requirements.

Conclusion: Automating firewall management on vCenter servers with SaltStack Config not only strengthens your VMware environment’s security posture but also streamlines operations, reducing manual effort and potential for error. By leveraging SaltStack’s powerful automation capabilities, you can ensure consistent firewall policies across your infrastructure, enhancing overall security and compliance.

Note: Always validate your automation scripts and state files in a test environment before deploying them in production to avoid unintended disruptions.

Automating vCenter Server Firewall Configuration with PowerShell: A Guide for Scaling to Multiple Environments

The vCenter Server acts as the central nervous system for VMware vSphere environments, providing crucial management capabilities. As with any critical component of your infrastructure, ensuring the vCenter Server is secured is paramount. The firewall settings play a vital role in protecting your vCenter Server against unauthorized access. This blog post dives into how you can programmatically change the firewall settings on the vCenter Server using PowerShell, and how to scale this automation across multiple vCenter servers efficiently.

Prerequisites:

  • PowerShell 5.1 or higher.
  • VMware PowerCLI 12.0 or higher installed.
  • Administrative access to your vCenter Server(s).
  • A list of vCenter Server IPs or hostnames you intend to manage.

Part 1: Setting Up Your Environment First, ensure that VMware PowerCLI is installed on your machine. PowerCLI is a command-line tool offering over 600 cmdlets for managing and automating vSphere and vCenter environments.

Install-Module -Name VMware.PowerCLI -Scope CurrentUser

Part 2: Automating Firewall Changes on a Single vCenter Server To modify the firewall settings on a vCenter Server, we’ll first connect to the vCenter instance using PowerCLI. Then, we’ll execute commands to adjust the firewall settings as needed.

  1. Connect to the vCenter Server:
$vcServer = 'vCenterServerNameOrIP'
Connect-VIServer -Server $vcServer -User 'yourUsername' -Password 'yourPassword'
  1. Change Firewall Settings: Assuming you want to enable SSH access through the firewall, you can use the following script:
Get-VMHost | Get-VMHostFirewallException | Where-Object {$_.Name -eq "SSH Server"} | Set-VMHostFirewallException -Enabled $true

This command gets all ESXi hosts managed by the vCenter, retrieves the firewall rule for the SSH Server, and enables it.

Part 3: Scaling to Multiple vCenter Servers To scale this process across 10 vCenter Servers, you can wrap the commands into a function and iterate over an array of vCenter Server addresses.

function Set-FirewallSettings {
    param (
        [String]$vcServer,
        [String]$username,
        [String]$password
    )
    Connect-VIServer -Server $vcServer -User $username -Password $password
    Get-VMHost | Get-VMHostFirewallException | Where-Object {$_.Name -eq "SSH Server"} | Set-VMHostFirewallException -Enabled $true
    Disconnect-VIServer -Server $vcServer -Confirm:$false
}

$vCenters = @('vCenter1', 'vCenter2', 'vCenter3', 'vCenter4', 'vCenter5', 'vCenter6', 'vCenter7', 'vCenter8', 'vCenter9', 'vCenter10')

foreach ($vc in $vCenters) {
    Set-FirewallSettings -vcServer $vc -username 'yourUsername' -password 'yourPassword'
}

Part 4: Automating as a Batch Job To automate this process as a batch job, you can schedule the script using Task Scheduler on Windows or cron jobs on Linux. Ensure the machine where the script is scheduled has VMware PowerCLI installed and is configured to run scripts.

Conclusion: Automating firewall configuration on your vCenter Servers enhances your infrastructure’s security posture and saves time. By leveraging PowerShell and VMware PowerCLI, you can efficiently manage firewall settings across multiple vCenter Servers, ensuring consistent security policies across your VMware environment.

Remember: Always test scripts in a development environment before deploying them to production to ensure they perform as expected without unintended consequences.

Mastering the /v1/credentials API in SDDC Manager for Enhanced Security Management

In the rapidly evolving landscape of VMware’s Cloud Foundation, security management is a cornerstone for maintaining the integrity and confidentiality of the software-defined data center (SDDC). The SDDC Manager, a critical component of VMware’s Cloud Foundation, offers a comprehensive suite of APIs for managing various aspects of the SDDC, including credentials management. This blog post delves into the specifics of leveraging the /v1/credentials API in SDDC Manager, offering a detailed guide for VMware professionals to enhance their security posture through efficient credentials management.

Understanding the /v1/credentials API

The /v1/credentials API endpoint in SDDC Manager facilitates the management of credentials used across the SDDC components. It enables administrators to perform crucial operations such as creating, listing, updating, and deleting credentials securely. These credentials encompass a wide range of use cases, including but not limited to, ESXi hosts, vCenter servers, and backup solutions.

Key Operations and Their Significance

  • Creating Credentials: The ability to programmatically create credentials ensures that administrators can automate the deployment and configuration processes, adhering to security best practices such as the use of strong, unique passwords for each component.
  • Listing Credentials: By listing the available credentials, administrators can audit and review the credentials being used across the SDDC, ensuring compliance with the organization’s security policies.
  • Updating Credentials: The dynamic nature of security necessitates regular updates to credentials. The /v1/credentials API provides a straightforward mechanism for rotating credentials, thereby enhancing the security against potential breaches.
  • Deleting Credentials: In scenarios where certain credentials are no longer required or components are decommissioned, the ability to delete credentials helps in maintaining a clean and secure environment.

Practical Use Cases

  1. Automated Deployment Scripts: Incorporate the /v1/credentials API in deployment scripts to dynamically create and assign credentials during the setup of new components, streamlining the deployment process while maintaining a high security standard.
  2. Routine Security Audits: Utilize the API to list and review credentials as part of routine security audits, ensuring that all credentials meet the organization’s security requirements and identifying any credentials that need rotation.
  3. Operational Efficiency: Leverage the API to update and delete credentials as part of operational tasks, such as decommissioning old components or responding to security incidents, ensuring a swift and secure response to changes in the environment.

Best Practices for Using the /v1/credentials API

  • Secure API Access: Always secure access to the SDDC Manager APIs, using HTTPS and strong authentication mechanisms to protect against unauthorized access.
  • Regular Credential Rotation: Implement a routine process for rotating credentials using the API, minimizing the risk exposure from potential compromises.
  • Audit and Compliance: Regularly audit the credentials through the API, ensuring they comply with your organization’s security policies and industry standards.

Conclusion

The /v1/credentials API in SDDC Manager is a powerful tool for VMware professionals, enabling efficient and secure management of credentials within the SDDC. By understanding and leveraging this API, administrators can significantly enhance their security posture, streamline operations, and ensure compliance with security standards.


This guide serves as a foundation for mastering credentials management in SDDC Manager. However, the landscape of cybersecurity is constantly evolving, and it’s crucial to stay informed about the latest threats, vulnerabilities, and best practices to safeguard your SDDC environment effectively. Always refer to VMware’s official documentation and consider engaging with the community through forums and social media for the latest updates and insights.

Stopping a Running Task in SDDC Manager: A Step-by-Step Guide

In the world of VMware’s Cloud Foundation, the SDDC Manager plays a pivotal role in streamlining and automating the deployment, management, and orchestration of the software-defined data center components. However, administrators occasionally face the need to halt an ongoing task for various reasons, such as incorrect parameters or prioritizing other operations. This blog post provides a detailed walkthrough on how to gracefully stop a running task in SDDC Manager, ensuring minimal impact on the environment and maintaining system integrity.

Understanding the SDDC Manager’s Task Framework

Before diving into the procedure, it’s important to grasp how SDDC Manager handles tasks. Tasks in SDDC Manager represent operations such as deploying a new workload domain, adding a cluster, or updating software components. Each task is associated with a unique ID and comprises one or more subtasks, reflecting the task’s complexity and multi-step nature.

Identifying the Task to be Stopped

First, you need to identify the task you wish to stop. This can be done via the SDDC Manager UI or API. In the UI, navigate to the ‘Tasks’ tab where you can view ongoing, completed, and scheduled tasks along with their IDs. If you’re using the API, you can list the current tasks by querying the /tasks endpoint.

Gracefully Stopping the Task

After identifying the task, the next step is to stop it gracefully. This involves two critical considerations:

  1. Determine if the Task Can Be Stopped: Not all tasks can be safely interrupted. Check the documentation or use the API to query the task’s state and understand if it’s in a state that can be safely stopped.
  2. Use the SDDC Manager API to Stop the Task: SDDC Manager doesn’t provide a direct ‘Stop Task’ button in the UI for all tasks. Instead, use the API to send a stop command. This usually involves sending a PUT request to the /tasks/{taskId}/cancel endpoint, where {taskId} is the ID of the task you wish to stop.
  3. Option 2 Use the CLI:
curl -X DELETE http://localhost/tasks/registrations/{taskId}

Monitoring and Verification

After issuing the stop command, monitor the task’s status through the UI or API to ensure it transitions to a ‘Stopped’ or ‘Cancelled’ state. It’s crucial to verify the partial execution of the task hasn’t left the system in an inconsistent state. Depending on the task, you may need to revert certain operations or manually complete the task’s intended actions.

Conclusion

Halting a running task in SDDC Manager is a powerful capability, but it comes with the responsibility of ensuring system integrity and consistency. Always assess the impact and necessity of stopping a task before proceeding.

Remember, in the realm of VMware and SDDC Manager, thorough understanding and careful operation are key to maintaining a robust, efficient, and agile data center infrastructure.


This guide aims to arm VMware professionals with the knowledge to manage their SDDC environments more effectively. However, as every environment is unique, it’s important to adapt these guidelines to fit your specific situation and consult VMware documentation for the latest features and best practices.

VMware Aria Suite Lifecycle upgrade to 8.16

In this guide i will go over the steps of getting an existing 8.x vRSLCM appliance upgraded to the latest 8.16 release. The release notes can be found here. We can upgrade from vRealize Lifecycle Manager to VMware Aria Suite Lifecycle.

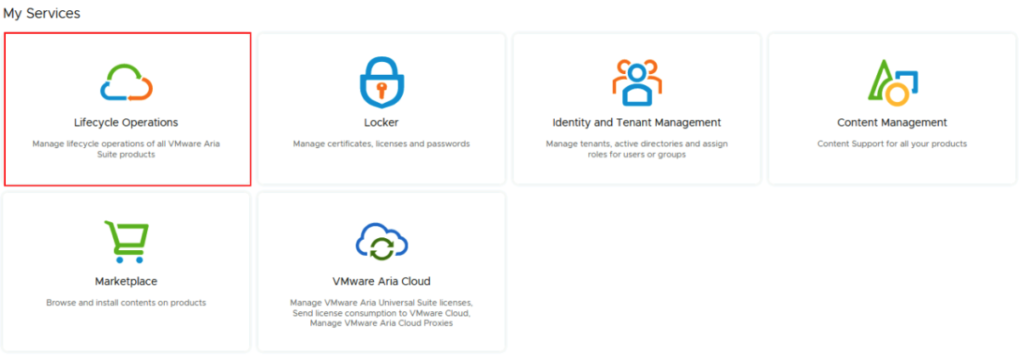
The first step is to log in to VMware Aria Suite Lifecycle under the Lifecycle Operations section

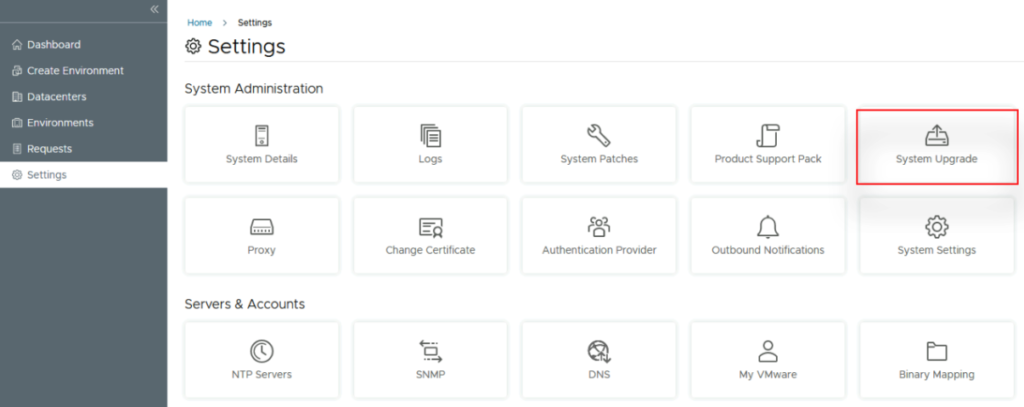
Go to Settings -> System Upgrade

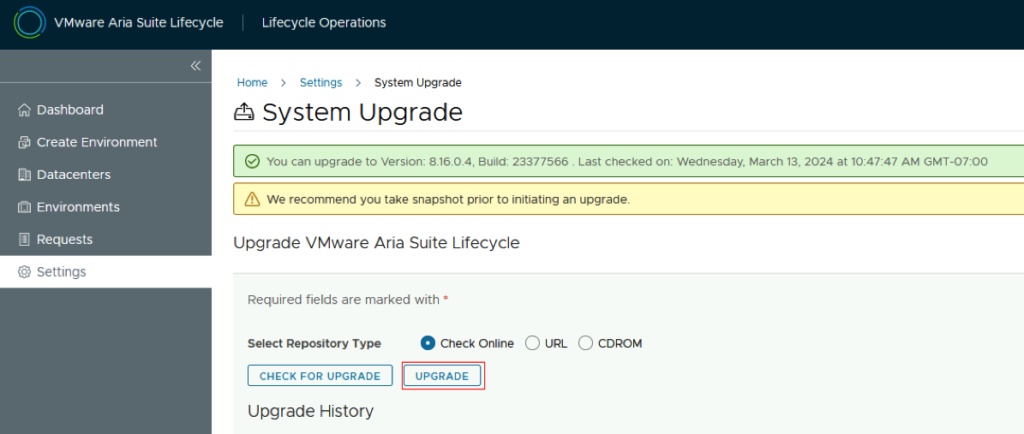
Click on Check for Upgrade

We can see that the check found a new version available for 8.16. Click on Upgrade

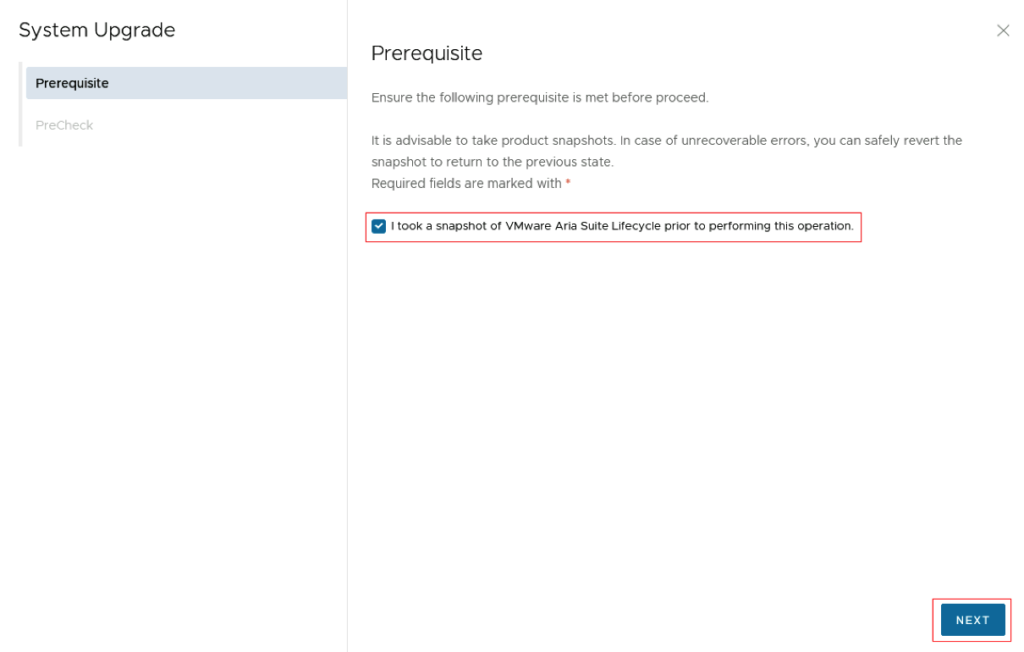
Verify that a snapshot or backup exists in case the process fails. Check the check mark for I took a snapshot of the vRealize Suite Lifecycle Manager before I performed this operation. Click Next

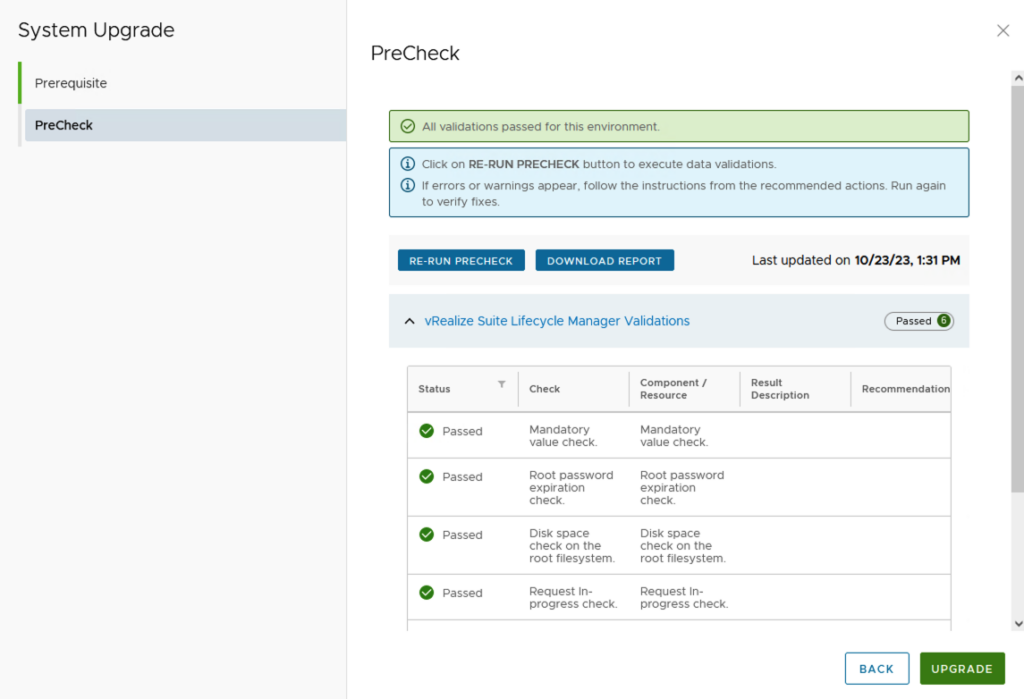
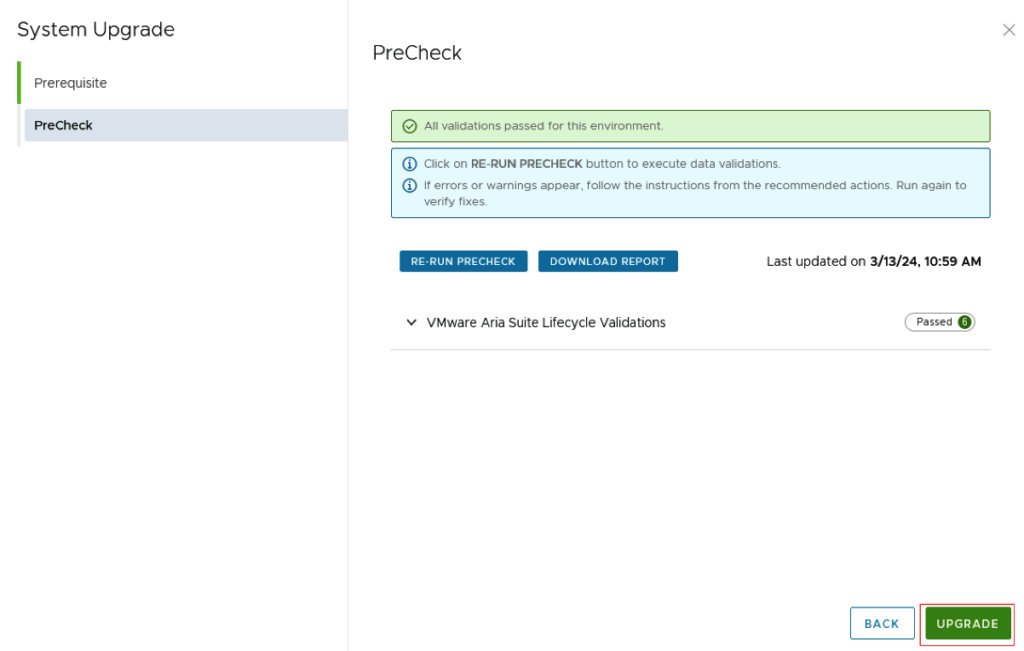
Click on Run Precheck, verify that all check have passed, and click on Upgrade

This will fire up the upgrade process and start upgrading packages. The system will automatically reboot on 8.16 once completed. We can check the version by going to Settings -> System Details

Don’t forget to clear the browser cache in order to avoid any caching issues.

Downloading specific VCF bundles via CLI

I wanted to reuse my VCF downloaded bundles on another SDDC Manager system so that i wont have to download it from internet again. I found an easy guide here in the VMware documentation. My goal was to download the specific bundle once and upload it on other SDDC Managers.

The first command from SDDC manager was to list the bundles. The lcm bundle transfer utility can be found in /opt/vmware/vcf/lcm/lcm-tools/bin

./lcm-bundle-transfer-util -du ${depotUser} -l -p ${product_version}

I replaced the ${depotUser} with my vmware email address and ${product_version} with the version of the VCF product i wanted to install in my case 5.0.0.0. I was greeted with a list of bundle IDs and the specific component that it was for:

Enter Myvmware user password:
Validating the depot user credentials...

Bundle         Product  Bundle Size  Components
               Version  (in MB)
bundle-80035   5.0.0.0  599.5 MB     ESX_HOST-8.0.1-21813344
bundle-80031   5.0.0.0  10089.9 MB   NSX_T_MANAGER-4.1.0.2.0-21761691
bundle-80029   5.0.0.0  2044.7 MB    SDDC_MANAGER_VCF-5.0.0.0-21822418
bundle-80030   5.0.0.0  251.3 MB     SDDC_MANAGER_VCF-5.0.0.0-21822418
bundle-80033   5.0.0.0  9867.6 MB    VCENTER-8.0.1.00100-21815093

In my case i need the installer. To download a specific bundle we run

./lcm-bundle-transfer-util --download --outputDirectory ${absolute-path-output-dir} --depotUser ${depotUser} -b ${bundle_name}

in my case it was:

./lcm-bundle-transfer-util --download --outputDirectory /some/temporary/location --depotUser [email protected] -b bundle-80029

This allowed me to grab the download from /some/temporary/path and save it/upload it on my other SDDC Managers that were missing it.

Finally before the patch can be used in SDDC Manager we need to upload it to the repo. Please note that once we issue the upload command the download gets deleted, so make sure you save the download ahead of time

./lcm-bundle-transfer-util --upload --bundleDirectory /some/temporary/path -b bundle-80029

or via API

curl -k http://127.0.0.1/lcm/bundle/upload -X POST -d ‘{“bundle”:”/some/temporary/path/bundle-80029.tar”,”manifest”:”/some/temporary/path/bundle-80029.manifest”, “signature”:”/some/temporary/path/bundle-80029.manifest.sig”}’ -H ‘Content-Type:application/json’

Once the upload was complete i was able to see it in SDDC Manager as a package that i can apply.

A list of bundles can be found here

VCF depot build numbers

VCF VersionBundle NameSizeComponentTypeBundle ID
5.1.0.0bundle-99536640.0MBESX_HOST-8.0.2-22380479PATCHefca585c-4fd8-4ec4-9b08-c50701aa2f7d
bundle-9954110500.4MBNSX_T_MANAGER-4.1.2.1.0-22667789PATCH39759b15-d985-4c15-85d6-7d44fd24df45
bundle-995392089.2MBSDDC_MANAGER_VCF-5.1.0.0-22688368PATCHb9308692-c98a-4afc-b49f-601f16105d92
bundle-995400.0MBSDDC_MANAGER_VCF-5.1.0.0-22688368PATCH(Drift)f3a11b49-4209-4c2b-8b26-aea98b1f8450
bundle-9953716801.6MBVCENTER-8.0.2.00100-22617221PATCH0a1ba239-eab9-41c6-b0e6-9738a463bdbe
bundle-9954214606.2MBNSX_T_MANAGER-4.1.2.1.0-22667789INSTALLc5a39cf5-eca2-4206-8375-082f827612b8
bundle-9953810493.0MBVCENTER-8.0.2.00100-22617221INSTALL96cf61e1-85b3-461f-8dfe-5abbeed33ab7
5.0.0.1bundle-943752044.9MBSDDC_MANAGER_VCF-5.0.0.1-22485660PATCH8fe51a93-ff6b-45e1-b9b9-49ad60612703
bundle-94376251.5MBSDDC_MANAGER_VCF-5.0.0.1-22485660PATCH(Drift)0602cf8f-9a37-4b38-90ba-f26a19a80cf6
5.0.0.0bundle-80035599.5MBESX_HOST-8.0.1-21813344PATCHef970211-02bf-429a-8edd-91f3bc7c1b42
bundle-8003110089.9MBNSX_T_MANAGER-4.1.0.2.0-21761691PATCH3ae76665-4c93-422e-9af8-aafe79a1ee7f
bundle-800292044.7MBSDDC_MANAGER_VCF-5.0.0.0-21822418PATCHb562189e-0c93-489e-a0b9-e12b01efffb8
bundle-80030251.3MBSDDC_MANAGER_VCF-5.0.0.0-21822418PATCH(Drift)393fb05f-23ff-47d1-8b84-db39647677ce
bundle-800339867.6MBVCENTER-8.0.1.00100-21815093PATCHb862f68d-22a8-457d-a85d-56d72370076e
bundle-8003213874.6MBNSX_T_MANAGER-4.1.0.2.0-21761691INSTALL7df70351-902f-49e4-a366-553f340d2f3a
bundle-800349867.6MBVCENTER-8.0.1.00100-21815093INSTALLb1f5bf8e-c133-44a3-9393-efa772c9c0ce
4.5.2.0bundle-83610382.1MBESX_HOST-7.0.3-21930508PATCHb9462fde-a7d0-4965-b217-cd09bd21bcc5
bundle-873188615.4MBNSX_T_MANAGER-3.2.3.1.0-22104592PATCH259b722b-f8b5-4b4c-9e71-4ebe135cd38e
bundle-884452012.6MBSDDC_MANAGER_VCF-4.5.2.0-22223457PATCH363bd141-7d19-4287-9c7a-091c11042ca0
bundle-88446250.5MBSDDC_MANAGER_VCF-4.5.2.0-22223457PATCH(Drift)85192dee-1d47-4211-bbdb-999d604f601f
bundle-811466420.0MBVCENTER-7.0.3.01500-21784236PATCH4ac2b679-5e5b-43a6-b74b-5fd4e3c978c0
bundle-8731910618.2MBNSX_T_MANAGER-3.2.3.1.0-22104592INSTALLfcde592c-7a6c-4c92-a6b3-669833dc6910
bundle-811478575.4MBVCENTER-7.0.3.01500-21784236INSTALL659351d3-9d66-45d6-84b0-14451f54cd6f
4.5.1.0bundle-73789381.8MBESX_HOST-7.0.3-21424296PATCH2b458531-b783-458e-bc43-3da1ddcd096f
bundle-737858402.7MBNSX_T_MANAGER-3.2.2.1.0-21487560PATCHe5f9e44f-9123-425e-bee9-07806379d671
bundle-772612150.0MBSDDC_MANAGER_VCF-4.5.1.0-21682411PATCH65b6d750-5ef3-4456-b4c2-65ef96048fb6
bundle-77262250.2MBSDDC_MANAGER_VCF-4.5.1.0-21682411PATCH(Drift)8a132cc7-f9b7-4f69-b654-7ea8f7059905
bundle-737876419.8MBVCENTER-7.0.3.01400-21477706PATCH3b8ae94b-582b-4356-b152-2b01e947a072
bundle-7378610461.8MBNSX_T_MANAGER-3.2.2.1.0-21487560INSTALLf90627d1-a038-4771-9a8a-dfbe1ffa760b
bundle-737888575.1MBVCENTER-7.0.3.01400-21477706INSTALL37ec3570-d827-4f32-8eac-92e2b6e21964
4.5.0.0bundle-61598382.9MBESX_HOST-7.0.3-20328353PATCHc6a50311-47be-4b53-891d-9f5ecb75d087
bundle-627688064.0MBNSX_T_MANAGER-3.2.1.2.0-20541212PATCH4f2f5d65-53ca-4b58-a85c-49d5b337cc64
bundle-635992106.0MBSDDC_MANAGER_VCF-4.5.0.0-20612863PATCHb984c5e4-167a-4886-8f23-be34c9176ca9
bundle-63600247.6MBSDDC_MANAGER_VCF-4.5.0.0-20612863PATCH(Drift)4581e5e3-b82f-46b9-99cc-e35584f14de0
bundle-615946381.1MBVCENTER-7.0.3.01000-20395099PATCH34b75350-c552-4c93-b306-75658a3332a4
bundle-6276910053.7MBNSX_T_MANAGER-3.2.1.2.0-20541212INSTALL4fe5a96f-d5c3-4730-9970-6d94bc5a63af
bundle-615968344.2MBVCENTER-7.0.3.01000-20395099INSTALL8da5d209-c8ac-493f-9e6a-f00a5bd5f155
4.4.1.1bundle-5834710246.1MBSDDC_MANAGER_VCF-4.4.1.1-19948546PATCH193486eb-53f5-40c7-8012-b5dcab515ebf
bundle-58348233.8MBSDDC_MANAGER_VCF-4.4.1.1-19948546PATCH(Drift)3c32c5d6-b5e0-49c6-9a86-90bcd3de671e
4.4.1.0bundle-56937395.5MBESX_HOST-7.0.3-19482537PATCH043e2b99-b36f-45b9-a4a2-1632a24764ef
bundle-573477127.2MBNSX_T_MANAGER-3.1.3.7.4-19762317PATCH193486eb-53f5-40c7-8012-b5dcab515ebf
bundle-5734410246.2MBSDDC_MANAGER_VCF-4.4.1.0-19766960PATCH13d87a53-298d-4ee5-98ca-b9e10eece7a5
bundle-57346233.8MBSDDC_MANAGER_VCF-4.4.1.0-19766960PATCH(Drift)8c178f33-b28d-47d0-88da-aa94f309a042
bundle-557437139.0MBVCENTER-7.0.3.00500-19480866PATCH05be2afd-990d-45bd-9472-fab032e8c696
bundle-573488535.7MBNSX_T_MANAGER-3.1.3.7.4-19762317INSTALL3c32c5d6-b5e0-49c6-9a86-90bcd3de671e
bundle-557459202.7MBVCENTER-7.0.3.00500-19480866INSTALL4073e1c9-4eeb-4d46-97b5-374daa24be41
4.4.0.0bundle-52995395.3MBESX_HOST-7.0.3-19193900PATCHd214e445-8509-4d50-adac-59d56acd86ae
bundle-529807154.5MBNSX_T_MANAGER-3.1.3.5.0-19068434PATCH348187d2-9930-41d6-9ee1-345857e53a3f
bundle-5343110188.6MBSDDC_MANAGER_VCF-4.4.0.0-19312029PATCH4f22c22f-441d-4ed9-bb70-697d10bcf028
bundle-53432230.3MBSDDC_MANAGER_VCF-4.4.0.0-19312029PATCH(Drift)54485cb4-8db2-4e86-8962-5c4fc54d5727
bundle-56535230.4MBSDDC_MANAGER_VCF-4.4.0.0-19617653PATCH(Drift)b27c6275-742c-4d51-a907-eba0e158ede3
bundle-529867223.8MBVCENTER-7.0.3.00300-19234570PATCH3bbd1018-1e3f-478d-b201-4287aeb136d8
bundle-529828610.0MBNSX_T_MANAGER-3.1.3.5.0-19068434INSTALL7ae68403-5863-4fcf-8886-f27460c59e85
bundle-529909244.9MBVCENTER-7.0.3.00300-19234570INSTALL7b7816d6-64f9-42a1-be35-3c5d185f08a3
4.3.1.1bundle-5270410695.5MBSDDC_MANAGER_VCF-4.3.1.1-19235535PATCH4ea809be-5359-4ac8-b32f-2337c0820d8b
bundle-52705230.5MBSDDC_MANAGER_VCF-4.3.1.1-19235535PATCH(Drift)fd85a861-a972-4da8-b708-8b35aa897e25
4.3.1.0bundle-47505389.4MBESX_HOST-7.0.2-18426014PATCH50f69840-b920-4d1b-81fa-bb934fa13c24
bundle-475017105.9MBNSX_T_MANAGER-3.1.3.1.0-18504668PATCH2f39eed1-94e3-4295-937d-2ea785a2485a
bundle-4839010336.5MBSDDC_MANAGER_VCF-4.3.1.0-18624509PATCH4162045d-0b25-4ca3-8e38-0371908ed9e6
bundle-48392230.5MBSDDC_MANAGER_VCF-4.3.1.0-18624509PATCH(Drift)8f26c34a-7488-4960-aaf7-276ba313846b
bundle-475035394.0MBVCENTER-7.0.2.00500-18455184PATCH47d01e0c-ae43-4f74-a57a-b8b3ecbe878b
bundle-475028501.4MBNSX_T_MANAGER-3.1.3.1.0-18504668INSTALL9e3175b7-57bc-49cf-8e22-c3885061b48a
bundle-475047383.3MBVCENTER-7.0.2.00500-18455184INSTALLc49b858d-ed29-48bb-9d13-403d96a3ece3
4.3.0.0bundle-43745390.1MBESX_HOST-7.0.2-17867351PATCH1625a9f9-a96b-4dda-98c6-58938fb29667
bundle-464667123.1MBNSX_T_MANAGER-3.1.3.0.0-18328989PATCH104298b4-bee8-4eae-9791-fc8ff5516f31
bundle-4700610331.2MBSDDC_MANAGER_VCF-4.3.0.0-18433963PATCH3f44edc1-6862-4d85-b646-a6bc24698c32
bundle-47008230.3MBSDDC_MANAGER_VCF-4.3.0.0-18433963PATCH(Drift)5c1a58d6-2e2d-45bf-960a-5d05b7fee2e3
bundle-464685394.4MBVCENTER-7.0.2.00400-18356314PATCH8d83266a-3b96-467c-8071-74617e10da05
bundle-464678568.5MBNSX_T_MANAGER-3.1.3.0.0-18328989INSTALLf14e528f-df76-447d-a235-93b069291f5c
bundle-464697383.7MBVCENTER-7.0.2.00400-18356314INSTALL3f560300-18e9-4d9b-bcf5-0b4688c7612b
4.2.1.0bundle-425156995.1MBNSX_T_MANAGER-3.1.2.0.0-17883596PATCHc6550bcc-9519-423f-b383-625774fed5a6
bundle-4290510142.7MBSDDC_MANAGER_VCF-4.2.1.0-18016307PATCHdf3c4a11-cca4-4cad-b776-35f2035633dd
bundle-42906209.3MBSDDC_MANAGER_VCF-4.2.1.0-18016307PATCH(Drift)a534958a-5af3-4728-bcfc-4196e813f6fe
bundle-425215114.4MBVCENTER-7.0.1.00301-17956102PATCH731433e4-122e-40a9-aaba-3ebc1be133d3
bundle-425198394.9MBNSX_T_MANAGER-3.1.2.0.0-17883596INSTALL5881bb39-180f-4563-b434-824d9aa10413
bundle-425227722.8MBVCENTER-7.0.1.00301-17956102INSTALL300a8dcd-c774-4c22-9ea0-b0f08d38e004
4.2.0.0bundle-37983369.0MBESX_HOST-7.0.1-17551050PATCHe7ee206d-069f-4982-8271-38e7970dcf9a
bundle-328107057.7MBNSX_T_MANAGER-3.1.0.0.0-17107167PATCHff249395-d58a-4d3d-8111-9237fe6a6a45
bundle-3797910070.0MBSDDC_MANAGER_VCF-4.2.0.0-17559673PATCH906c8d8f-c28d-4122-8720-43be7af2cbfd
bundle-37982209.3MBSDDC_MANAGER_VCF-4.2.0.0-17559673PATCH(Drift)e53edad7-26df-4282-8874-d1724e63ac5b
bundle-353215140.8MBVCENTER-7.0.1.00200-17327517PATCHa9938c7e-d30c-4ce9-adab-831f835e6c12
bundle-328118427.7MBNSX_T_MANAGER-3.1.0.0.0-17107167INSTALL1cce3a86-7292-4c91-b0db-20274f2c741d
bundle-353227749.3MBVCENTER-7.0.1.00200-17327517INSTALL9d272a97-9a55-492e-b661-0a8f3f2dfd4a

Source https://kb.vmware.com/s/article/96099

How to use: Downloading specific VCF bundles via CLI

Upgrading Aria Automation without Lifecycle Manager: A Step-by-Step Guide

Upgrading Aria Automation (formerly known as vRealize Automation, vRA) is crucial for maintaining the efficiency, security, and compatibility of your automation tasks. For environments without VMware Aria Suite Lifecycle, you can still perform the upgrade using the vracli command-line utility. This blog post will guide you through the process of upgrading Aria Automation using two different methods: from a mounted ISO (CD-ROM) and from an online update repository URL.

Prerequisites

  • SSH access to your Aria Automation appliance.
  • Sufficient backup of your Aria Automation environment.
  • Downloaded ISO for the Aria Automation upgrade, if using the CD-ROM method.
  • Access to the Aria Automation appliance with root privileges.

Method 1: Upgrading from a Mounted ISO (CD-ROM)

  1. Prepare the ISO Image: Before starting, ensure that the ISO image for the Aria Automation upgrade is downloaded and available.
  2. Mount the ISO to the Appliance: Mount the ISO image to your Aria Automation appliance. This step might require physical access to the server or through the management interface provided by your hypervisor (e.g., ESXi). To mount the CD-ROM we can use:
mount /dev/sr0 /mnt/cdrom
  1. SSH into the Aria Automation Appliance: Access your appliance via SSH as the root user.
  2. Execute the Upgrade Command: Run the following command to start the upgrade process:
vracli upgrade exec -y --profile lcm --repo cdrom://
  1. This command will automatically start the upgrade process using the ISO mounted on the CD-ROM drive. The -y flag automates the acceptance of the upgrade process, and --profile lcm specifies the use of the lifecycle manager upgrade profile, even though the Lifecycle Manager itself is not being used.
  2. Monitor the Upgrade Process: The upgrade process will provide output to the console. Monitor this output for any errors or prompts that require manual intervention.
  3. Use 'vracli upgrade status --follow' to monitor the progress.
  4. Finalize the Upgrade: Once the upgrade completes, follow any on-screen instructions to finalize the upgrade. This may include rebooting the Aria Automation appliance.

Method 2: Upgrading from an Online Update Repository URL

  1. SSH into the Aria Automation Appliance: Ensure you have SSH access to the appliance as the root user.
  2. Determine the Repository URL: Identify the URL of the update repository you intend to use for the upgrade. This URL should point to the VMware online repository or an internally hosted repository mirror.
  3. Execute the Upgrade Command: Use the following command to initiate the upgrade from the online repository:
vracli upgrade exec --profile lcm -r <url>
  1. Replace <url> with the actual URL of your update repository. Similar to the CD-ROM method, --profile lcm indicates the lifecycle manager upgrade profile.
  2. Monitor the Upgrade Process: As with the ISO method, keep an eye on the console output for any actions required on your part.
  3. Use 'vracli upgrade status --follow' to monitor the progress.
  4. Complete the Upgrade: After the upgrade process finishes, perform any additional steps prompted by the system, which may include system reboots.

Post-Upgrade Steps

  • Verify the Upgrade: Log in to the Aria Automation user interface to verify that the upgrade was successful and all services are running correctly.
  • Review Logs: Check the upgrade logs for any warnings or errors that might need attention.
  • Test Deployments: Execute a few test deployments to ensure that all functionalities are working as expected.

Conclusion

Upgrading Aria Automation without the Lifecycle Manager is straightforward with the vracli utility. Whether you’re upgrading from a mounted ISO or an online repository, the process is designed to be seamless. Always ensure that you have backups and a rollback plan in case of any issues.

Navigating Alerts, Symptoms, and Notifications in VMware Aria Operations

In the realm of IT infrastructure management, staying ahead of potential issues and ensuring optimal performance are paramount. VMware Aria Operations, formerly known as vRealize Operations (vROps), provides a comprehensive solution for monitoring, troubleshooting, and optimizing virtual environments. A critical feature of Aria Operations is its alerting system, which uses symptoms to detect issues and then notifies administrators through various channels. This blog explores the intricacies of alerts, symptoms, and notifications within VMware Aria Operations, offering a guide to effectively utilizing these features for maintaining a healthy IT environment.

Understanding Alerts in VMware Aria Operations

Alerts in Aria Operations serve as the first line of defense against potential issues within your virtual environment. They are generated based on specific conditions or thresholds being met, which are identified through symptoms. An alert can signify anything from performance degradation, capacity issues, to compliance violations, providing administrators with the immediate knowledge that action is required.

The Anatomy of an Alert

An alert in Aria Operations consists of several components:

  • Trigger: The specific event or metric threshold that initiates the alert.
  • Severity: Indicates the urgency of the alert, ranging from informational to critical.
  • Symptoms: The conditions that lead to the generation of the alert.
  • Recommendations: Suggested actions or remediations to resolve the underlying issue.

Symptoms: The Building Blocks of Alerts

Symptoms are the conditions that Aria Operations monitors to detect issues within the virtual environment. They can be based on metrics (such as CPU or memory usage), log entries, or events, and are defined by thresholds that, when breached, indicate a potential problem.

Creating Custom Symptoms

While Aria Operations comes with a vast array of predefined symptoms, the platform also allows for the creation of custom symptoms. This flexibility enables administrators to tailor monitoring to the unique needs of their environment, ensuring that they are alerted to the issues most pertinent to their infrastructure.

Notifications: Keeping You Informed

Once an alert is triggered, it’s crucial that the right people are informed promptly so they can take action. Aria Operations facilitates this through its notification system, which can deliver messages via email, SNMP traps, or webhooks to other systems for further processing or alerting.

Configuring Notifications

Setting up notifications in Aria Operations involves defining notification policies that specify:

  • Who gets notified: Determine the recipients of the alert notifications.
  • How they are notified: Choose the delivery method (email, SNMP trap, webhook).
  • What triggers the notification: Associate the notification policy with specific alerts or alert categories.

This granular control ensures that notifications are both relevant and timely, reducing noise and focusing attention on resolving critical issues.

Putting It All Together

Implementing an effective alerting strategy with VMware Aria Operations involves:

  1. Identifying key metrics and conditions that are critical to your environment’s health and performance.
  2. Creating and refining symptoms to accurately detect these conditions.
  3. Configuring alerts to trigger based on these symptoms, setting appropriate severity levels and recommendations.
  4. Establishing notification policies to ensure the right stakeholders are informed at the right time.

Conclusion

Alerts, symptoms, and notifications form the core of proactive infrastructure management in VMware Aria Operations. By leveraging these features, IT administrators can ensure they are always ahead of potential issues, maintaining optimal performance and availability of their virtual environments. As every environment is unique, taking the time to customize and fine-tune these settings is key to unlocking the full potential of Aria Operations for your organization.