The official documentation for deploying the Aria Suite can be found here
First step is to download the bundle by going to sddc-manager -> Repository -> Bundle management. Look for VMware Software Install Bundle – vRealize Suite Lifecycle Manager 8.16.0-23377566
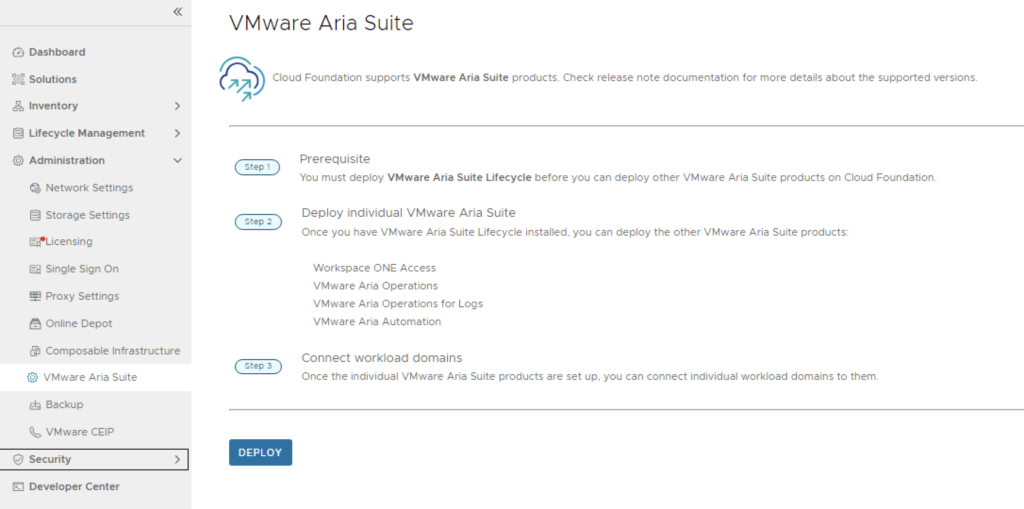
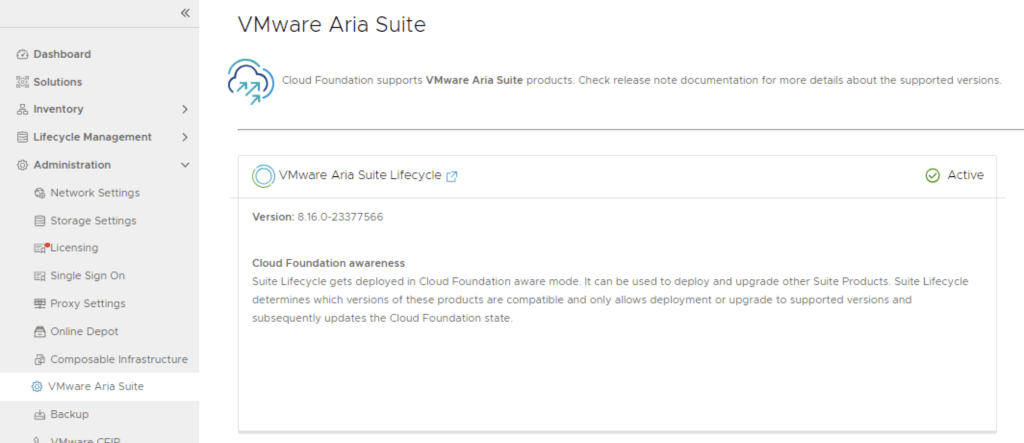
After the download is complete we can go to Administration -> VMware Aria Suite and a deploy button should be available. If the deploy button is not available due to X-Region Application Virtual Network is not created errorplease follow the instructions found here:
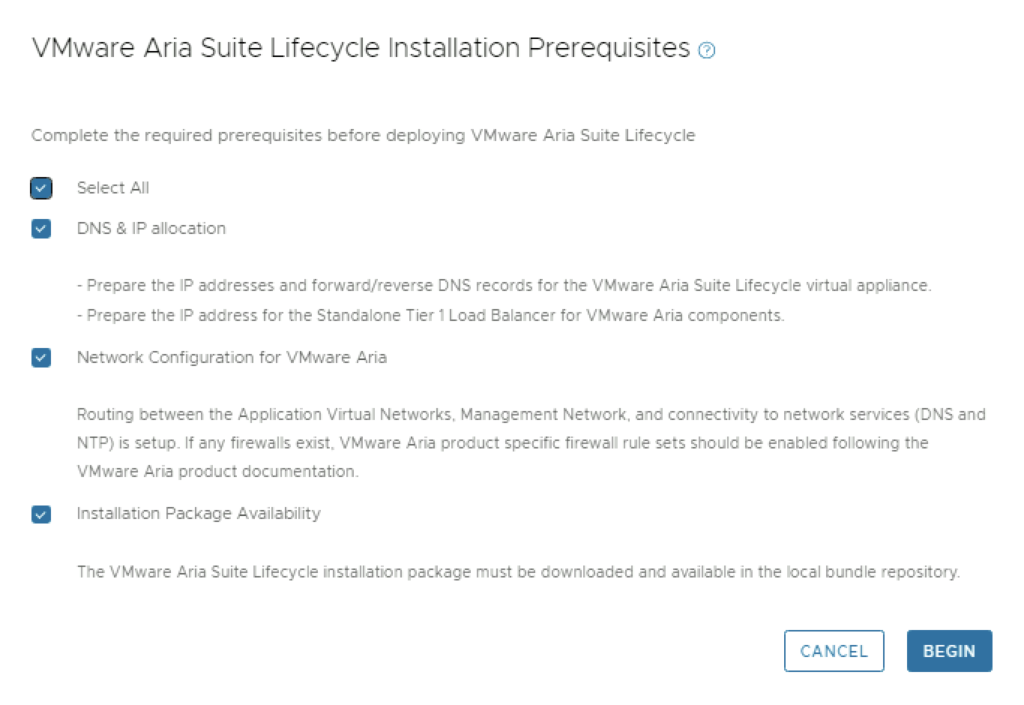
Verify the Prerequisites and click on begin
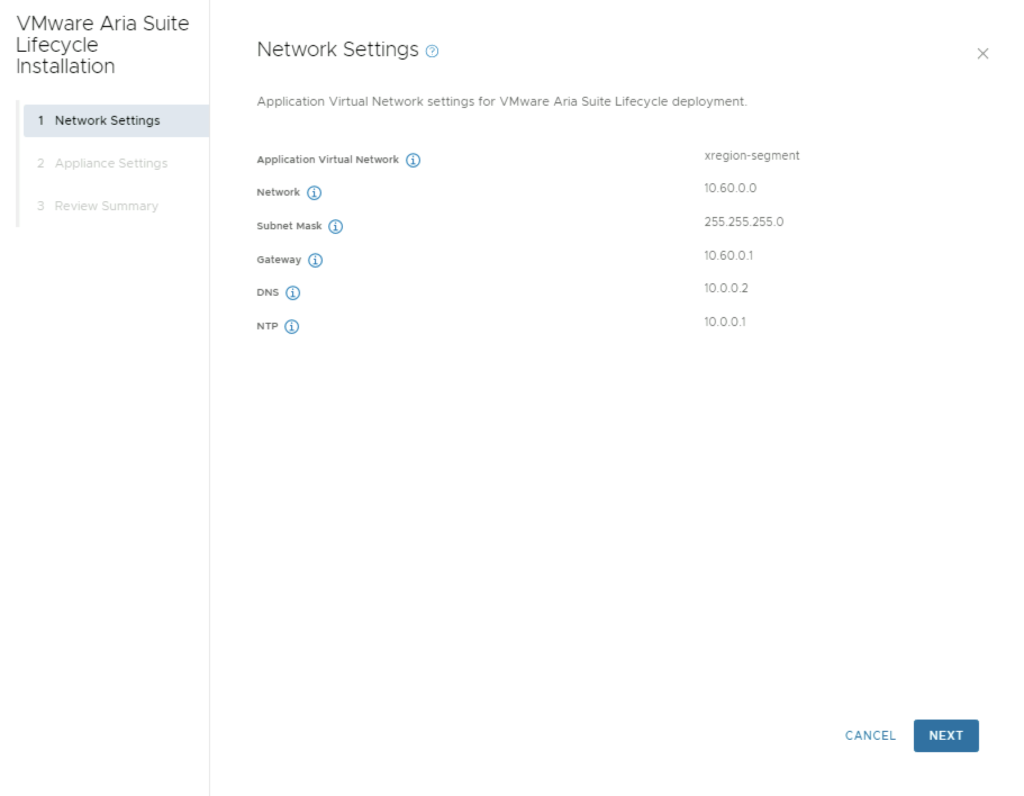
Verify the network settings and click Next
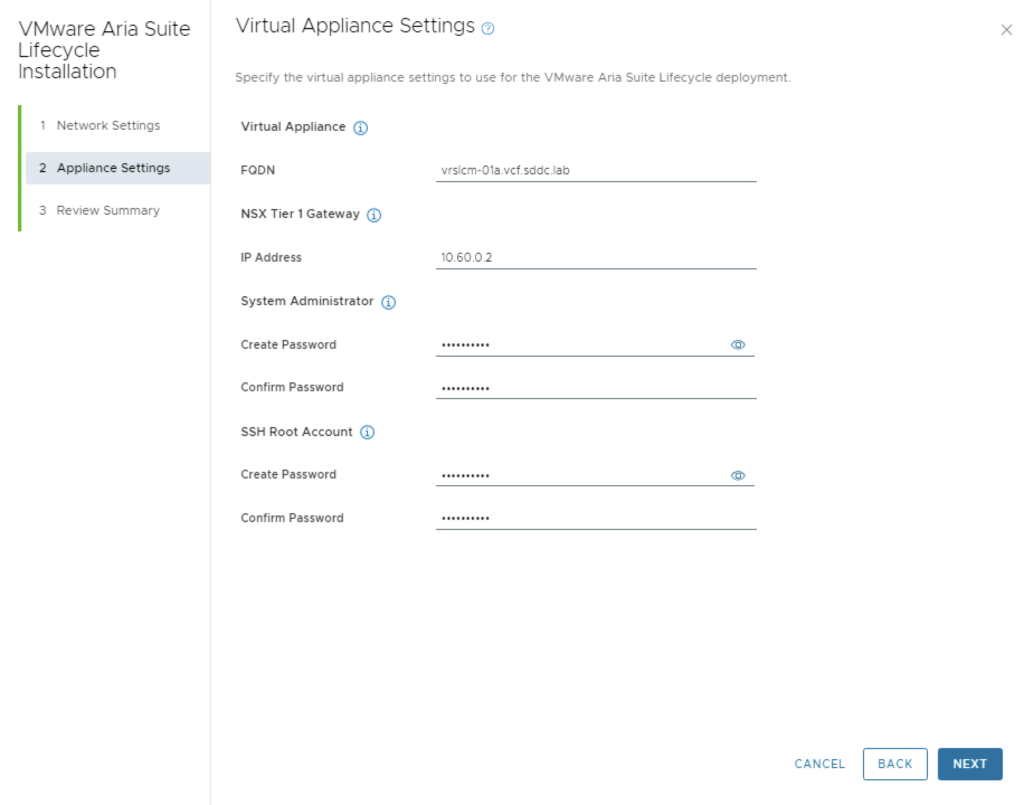
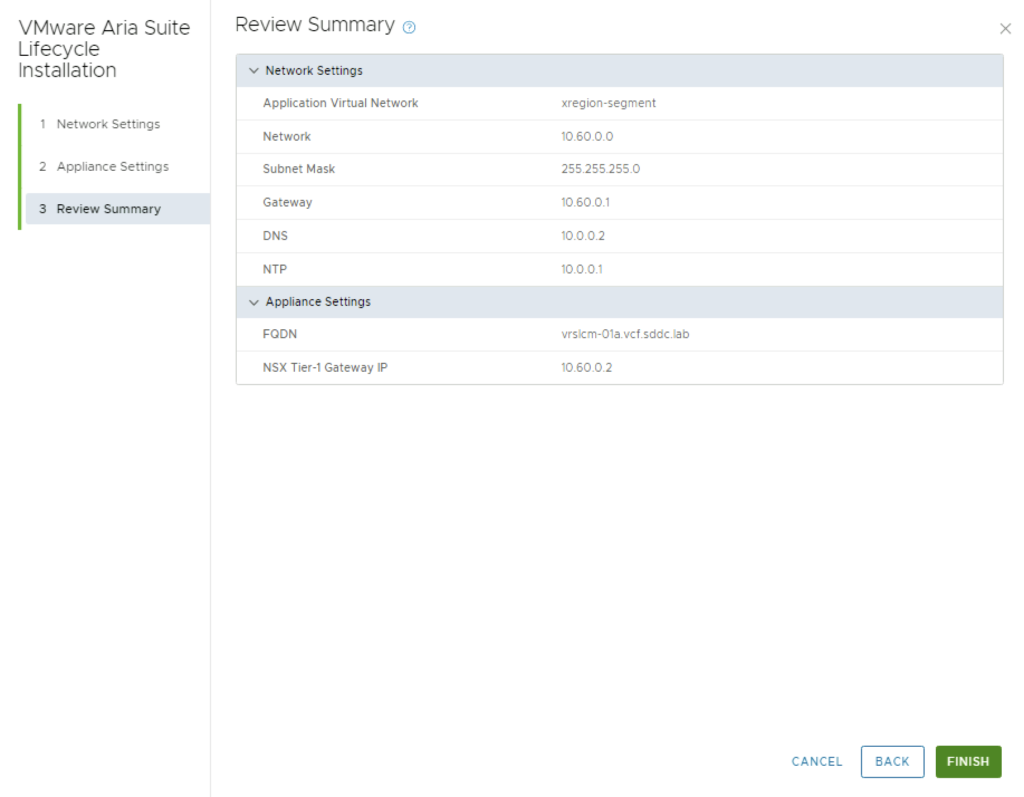
Fill up the network and appliance settings and click next
Review the summary and click Finish
We can follow the progress by click on the Task on the bottom of the screen
This allows me to see the subtasks that are running
Once the deployment is complete we can open the Aria Suite Lifecycle by clicking on the Window icon link
Additionally towards the bottom of the page we can see the rest of the Aria Suite components that can be deployed.
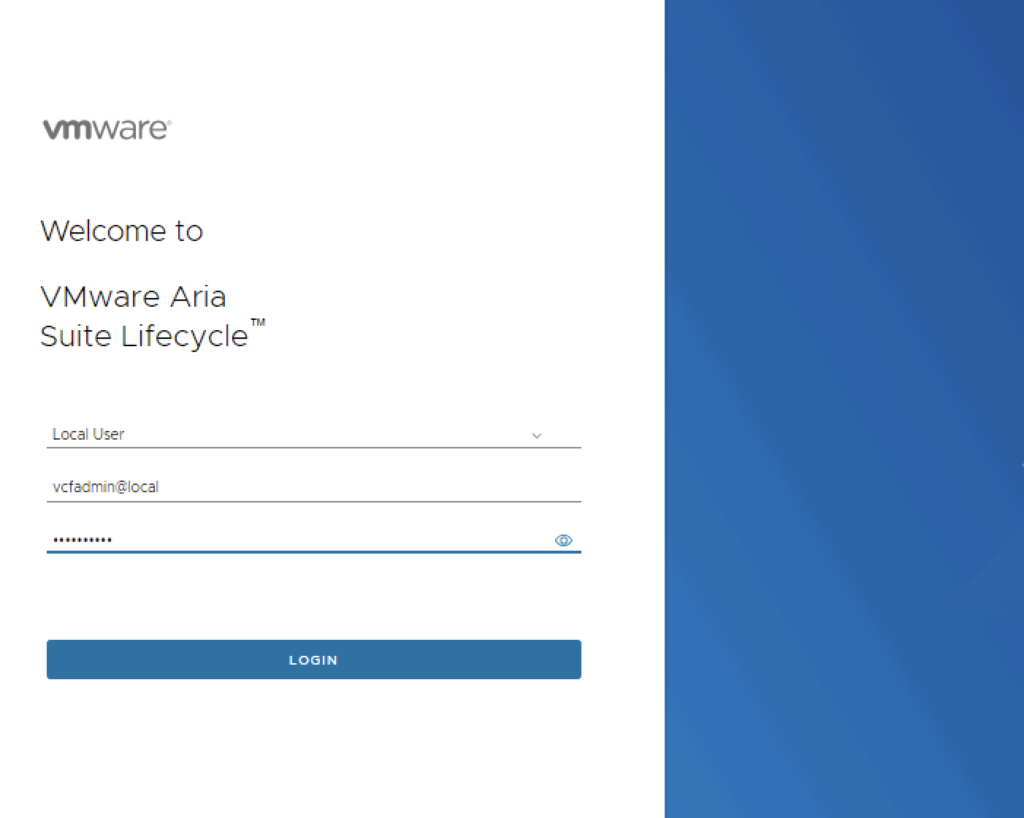
We can then log in to the Aria Suite Lifecycle using vcfadmin@local with the credentials used during the deployment.
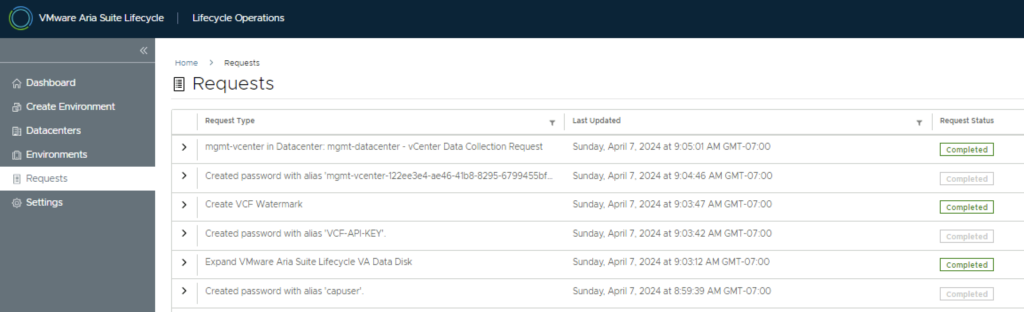
We can see that the deployment wizard also created a few configurations items.
We can now proceed with the deployment of the rest of the components. The deployments will be done from Aria Suite Lifecycle.
With all the recent releases for VCF i noticed that my file system was getting full and once the updates are complete i wanted to reclaim all that used space.
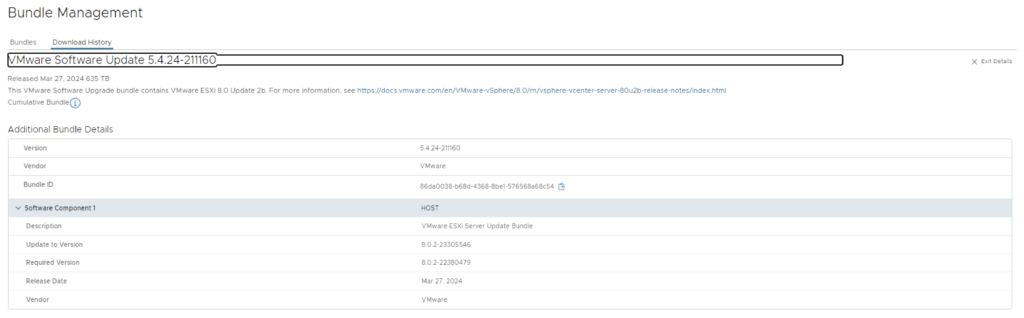
The first step was to identify the Bundle ID. We can find this by going to the bundle itself and checking out the details by clicking on View Details
For example this specific Bundle ID is 86da0038-b68d-4368-8be1-576568a68c54
At this point i had to log in to the sddc manager and issue the following command:
With the release of of VCF 5.1.1 I wanted to get my lab upgraded. The release blog can be found here and the release notes are here
Please note that some of the components within the VCF will still need additional upgrading. Please read the release notes for additional details.
We can start by going to Inventory -> Workload Domains -> Select the domain -> Update/Patches -> Select the VCF version -> Download now. If you do not see the newest releases go to Administration -> Online Depot and add a VMware Customer Connect account that has access to perform downloads.
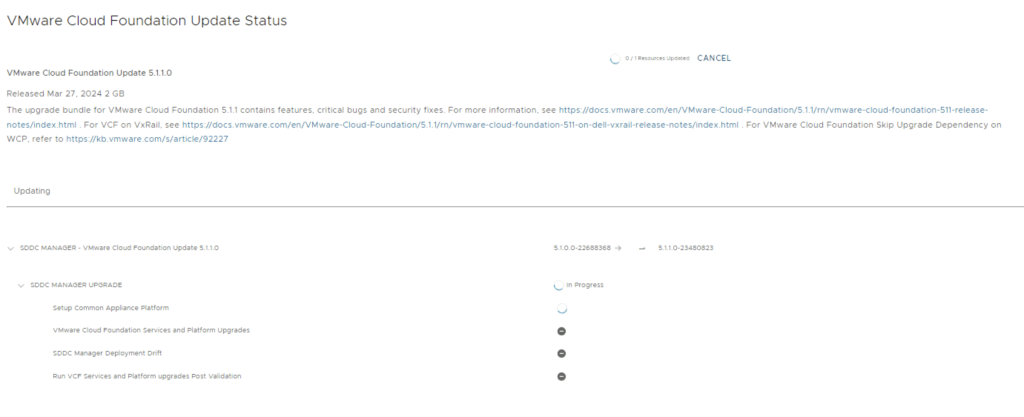
The next step is to upgrade VCF by going to Inventory -> Workload Domains -> Select the workload domain -> Update/Patches -> Select the cloud foundation version we’re upgrading to and click on Update Now for the VMware Cloud Foundation Update 5.1.1
Next we are taken to the Upgrade page where we can follow the upgrade for each one of the components
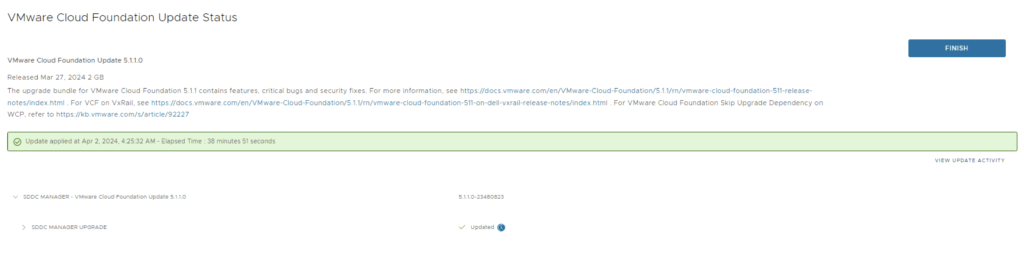
Once the upgrade is complete we can click Finish to be returned back to the main screen
Because we are changing the SDDC-Manager versions i would strongly recommend to clear cache and log back in before going forward.
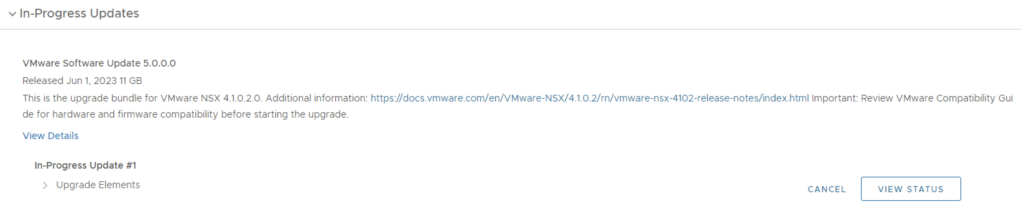
Next step is to upgrade NSX-T installation to NSX-T 4.1.2.3. The release notes can be found here.
We can also download it directly from the workload domain by going to Inventory -> Workload Domains -> Select the domain -> Update/Patches -> Download now
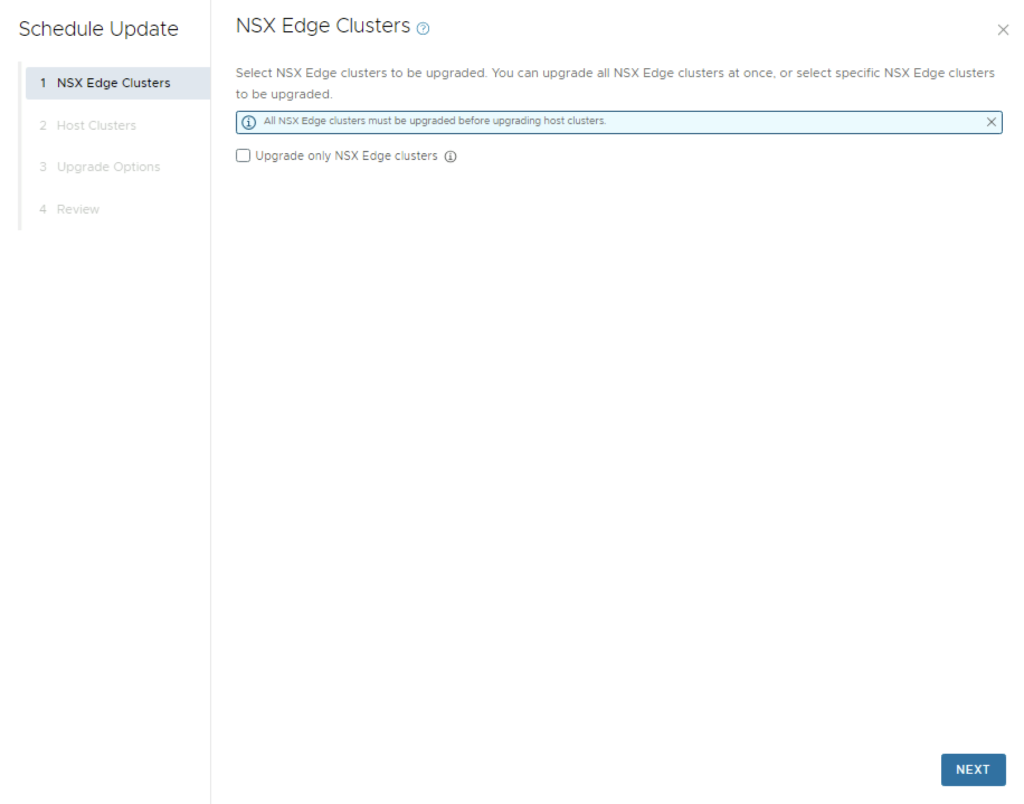
Once the download is complete we can proceed with updating the NSX components by clicking on the update now
Make the proper selection and click next
Make the proper selection and click next
Make the proper selection and click next
Review the options and click on Finish
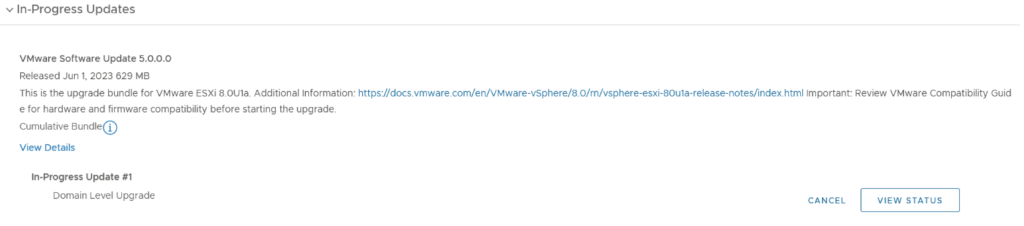
The upgrade will go thought upgrading the NSX edges. We can view the upgrade status by clicking on view status
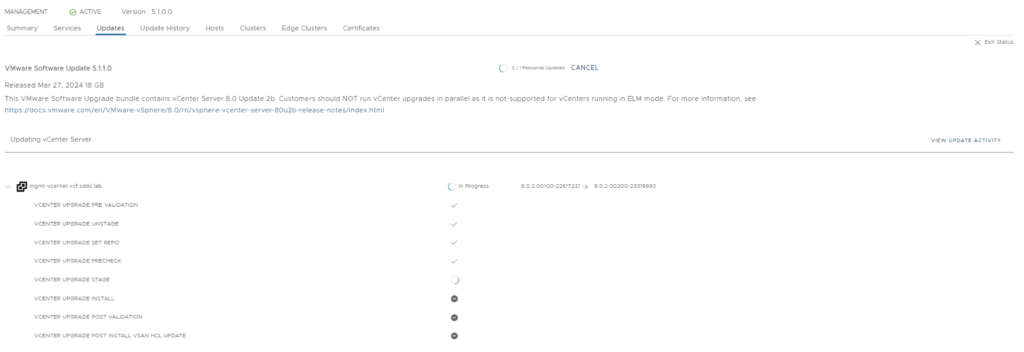
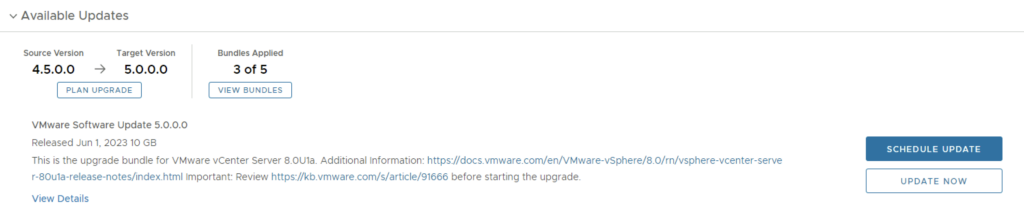
Once the upgrade is complete we can proceed with the vCenter Upgrade. VCF 5.1.1 comes with vCenter Server 8.0 Updated 2b. The release notes can be found here. We can go to Inventory -> Workload Domains -> Select the workload domain -> Update/Patches -> Under Available updates click on Download now.
Once the download is complete we can click on Update now
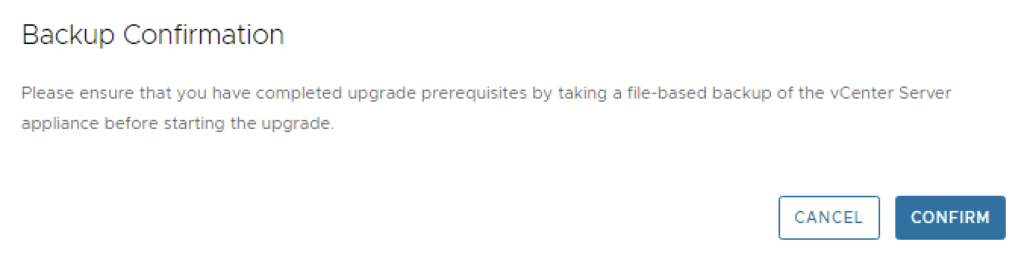
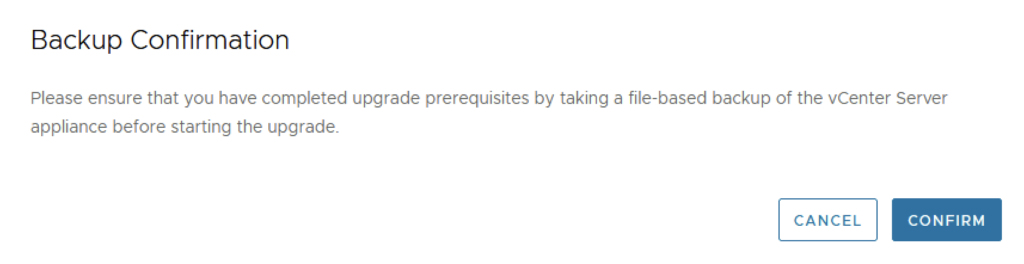
Confirm that we have a backup
We can follow the status of the upgrade by clicking on the view status tab
Here we can see the different components that are getting upgraded
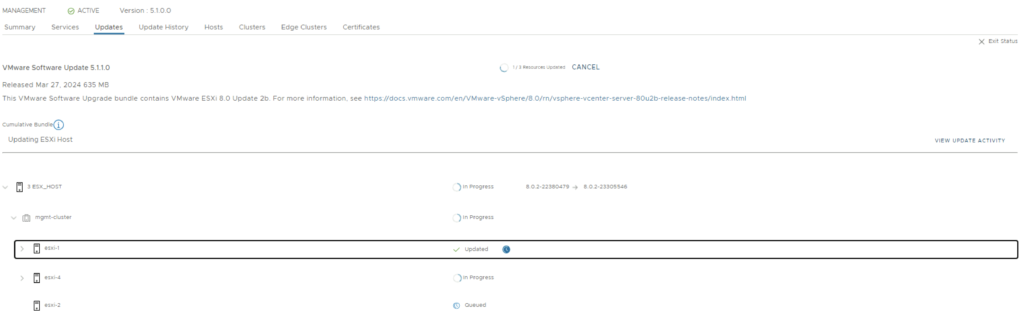
Once the upgrade is complete we are taken back to the previous page where we can see that the ESXi servers are next. The release notes can be found here. Click on Download Now.
Once the download is complete we can click on Update now
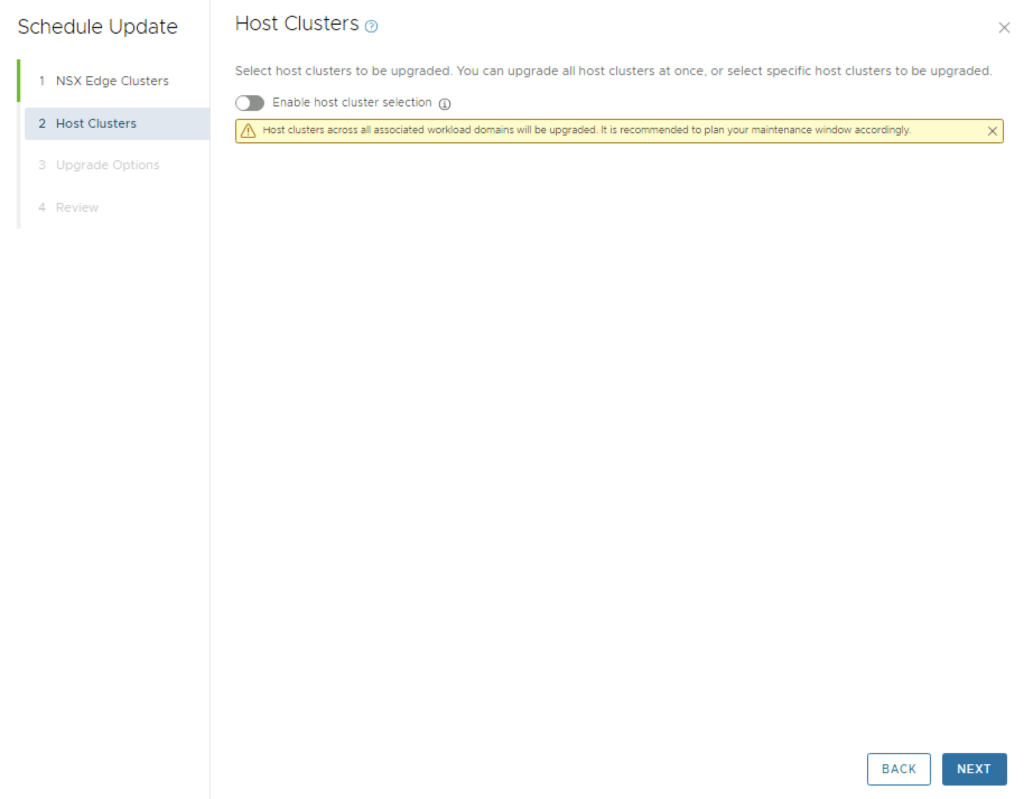
If we have multiple clusters we can enable Cluster-level selection and select the specific cluster(s) we want to upgrade.
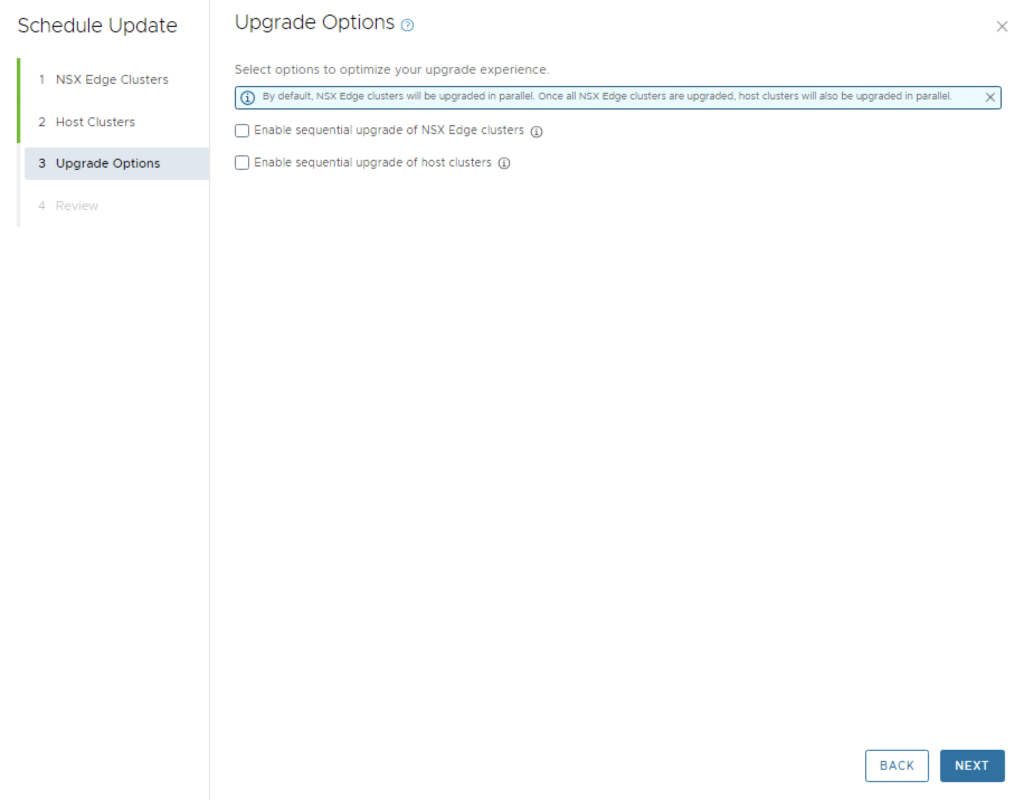
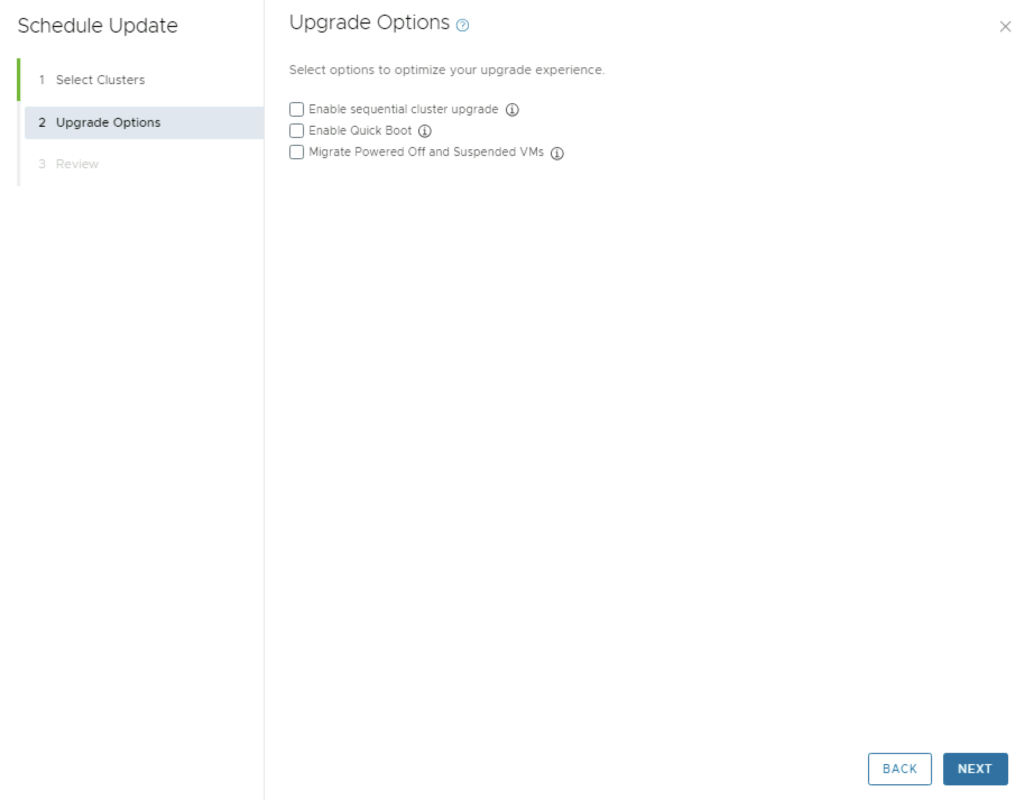
We can also enable sequential cluster upgrade, quick boot and the ability to evacuate offline VMs part of the maintenance. Click Next
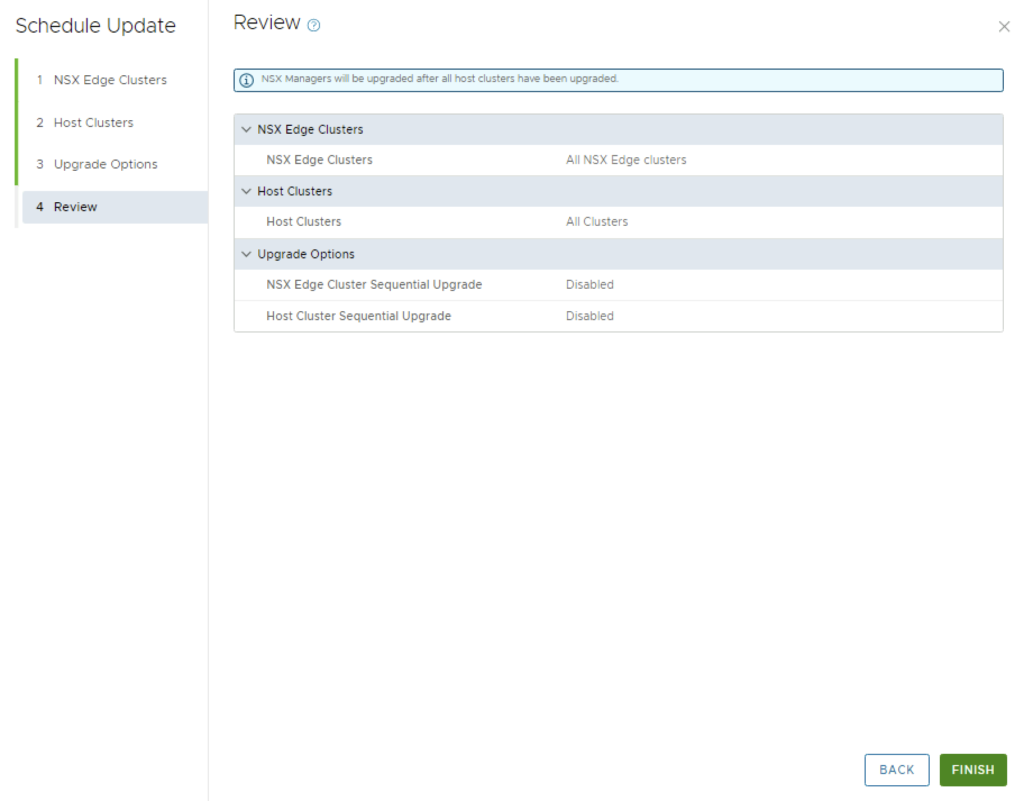
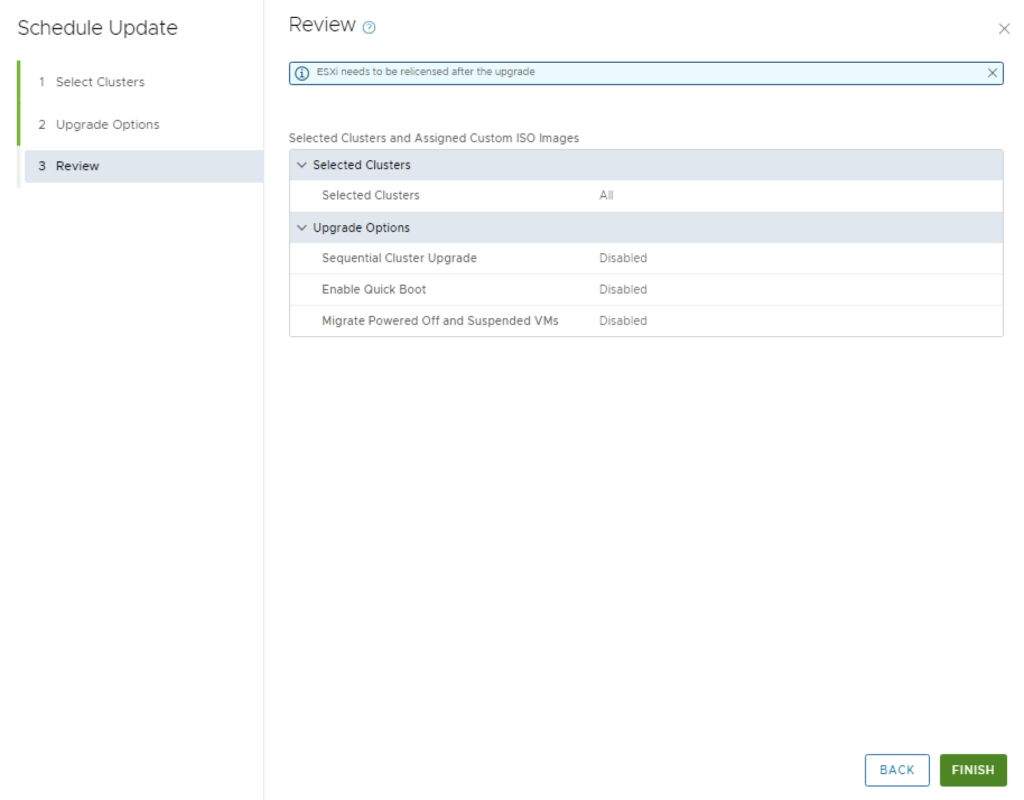
We get to review the options once again before we click finish to to submit the task
Once submitted we can view the status by clicking on View Status
And with that we are finished with the workload domain. We can follow the same steps for the other domains
Don’t forget to clean up the download bundles by following the steps from my other blog here
I wanted to reuse my VCF downloaded bundles on another SDDC Manager system so that i wont have to download it from internet again. I found an easy guide here in the VMware documentation. My goal was to download the specific bundle once and upload it on other SDDC Managers.
The first command from SDDC manager was to list the bundles. The lcm bundle transfer utility can be found in /opt/vmware/vcf/lcm/lcm-tools/bin
I replaced the ${depotUser} with my vmware email address and ${product_version} with the version of the VCF product i wanted to install in my case 5.0.0.0. I was greeted with a list of bundle IDs and the specific component that it was for:
Enter Myvmware user password:
Validating the depot user credentials...

Bundle         Product  Bundle Size  Components
               Version  (in MB)
bundle-80035   5.0.0.0  599.5 MB     ESX_HOST-8.0.1-21813344
bundle-80031   5.0.0.0  10089.9 MB   NSX_T_MANAGER-4.1.0.2.0-21761691
bundle-80029   5.0.0.0  2044.7 MB    SDDC_MANAGER_VCF-5.0.0.0-21822418
bundle-80030   5.0.0.0  251.3 MB     SDDC_MANAGER_VCF-5.0.0.0-21822418
bundle-80033   5.0.0.0  9867.6 MB    VCENTER-8.0.1.00100-21815093
In my case i need the installer. To download a specific bundle we run
This allowed me to grab the download from /some/temporary/path and save it/upload it on my other SDDC Managers that were missing it.
Finally before the patch can be used in SDDC Manager we need to upload it to the repo. Please note that once we issue the upload command the download gets deleted, so make sure you save the download ahead of time
./lcm-bundle-transfer-util --upload --bundleDirectory /some/temporary/path -b bundle-80029

or via API

curl -k http://127.0.0.1/lcm/bundle/upload -X POST -d ‘{“bundle”:”/some/temporary/path/bundle-80029.tar”,”manifest”:”/some/temporary/path/bundle-80029.manifest”, “signature”:”/some/temporary/path/bundle-80029.manifest.sig”}’ -H ‘Content-Type:application/json’
Once the upload was complete i was able to see it in SDDC Manager as a package that i can apply.
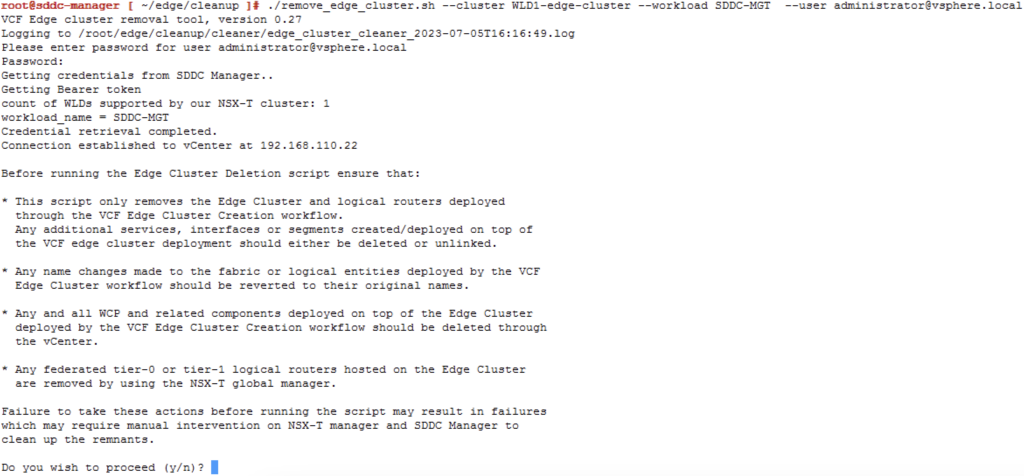
VMware Cloud Foundation (VCF) has revolutionized data center virtualization by seamlessly integrating compute, storage, and networking components. In a VCF environment, the NSX platform provides crucial software-defined networking capabilities. At times, removing NSX edges becomes necessary due to infrastructure changes, optimization efforts, or other reasons. To simplify this process, VMware has introduced the NSX Edge Removal Tool. In this blog post, we will explore how this tool can streamline the removal of NSX edges in a VCF environment while preserving dependencies.
Understanding the NSX Edge Removal Tool
The NSX Edge Removal Tool is a powerful utility developed by VMware to assist with removing NSX edges in a VCF environment. It simplifies the edge removal process and ensures the preservation of critical dependencies. Let’s delve into the steps involved in using this tool effectively.
Step 1: Preparing for NSX Edge Removal
Before utilizing the NSX Edge Removal Tool, it is crucial to thoroughly understand your VCF environment and identify all dependencies associated with the NSX edges you plan to remove. Review your network configuration, firewall rules, security policies, and any applications or services relying on the edges. This assessment will help you plan and execute the edge removal process more efficiently.
Step 2: Installing and Configuring the NSX Edge Removal Tool
To begin, download the NSX Edge Removal Tool from the VMware website. As of the writing of this blog the latest download can be found here. Follow the installation and configuration instructions provided by VMware to integrate the tool into your VCF environment seamlessly. Ensure that you have the necessary credentials and permissions to access and modify the NSX edges. In my case I downloaded edge_cluster_cleaner_0.27.tar.gz and transferred it to the server.
Step 3: Running the NSX Edge Removal Tool
Once the tool is installed and configured, it’s time to execute the removal process. Launch the NSX Edge Removal Tool and provide the required information, such as the NSX Manager IP address, credentials, and the specific edges you wish to remove. The tool will validate the environment and dependencies, ensuring a safe removal process. ex ./remove_edge_cluster.sh --cluster WLD1-edge-cluster --workload SDDC-MGT --user [email protected]
Step 4: Verifying and Analyzing the Dependency Report
After executing the removal process, the NSX Edge Removal Tool generates a dependency report. This report provides crucial insights into the dependencies associated with the removed NSX edges. Review the report thoroughly to understand any potential impacts on your network infrastructure and applications.
Step 5: Addressing Dependencies and Network Adjustments
Based on the generated dependency report, it’s essential to address the identified dependencies and make necessary adjustments to your network configuration. Collaborate with network administrators, application owners, and other stakeholders to migrate the dependencies to alternative network resources. Update firewall rules, adjust routing configurations, and ensure seamless connectivity for critical services.
Step 6: Post-Removal Validation and Testing
After addressing the dependencies and making the required adjustments, perform comprehensive validation and testing to ensure that the network connectivity and critical services are functioning optimally. Monitor the network closely for any abnormalities or performance issues, and address them promptly.
Conclusion
The NSX Edge Removal Tool provides a streamlined approach to removing NSX edges in a VMware Cloud Foundation (VCF) environment while preserving critical dependencies. By following the steps outlined in this blog post and utilizing the tool effectively, you can simplify the edge removal process and ensure the smooth operation of your VCF environment. Embrace this tool to optimize your network infrastructure and enhance the agility of your virtualized data center.
I wanted to reuse my VCF downloaded bundles on another SDDC Manager system so that i wont have to download it from internet again. I found an easy guide here in the VMware documentation. My goal was to download the specific bundle once and upload it on other SDDC Managers.
The first command from SDDC manager was to list the bundles. The lcm bundle transfer utility can be found in /opt/vmware/vcf/lcm/lcm-tools/bin
I replaced the ${depotUser} with my vmware email address and ${product_version} with the version of the VCF product i wanted to install in my case 5.0.0.0. I was greeted with a list of bundle IDs and the specific component that it was for:
Enter Myvmware user password:
Validating the depot user credentials...

Bundle         Product  Bundle Size  Components
               Version  (in MB)
bundle-80035   5.0.0.0  599.5 MB     ESX_HOST-8.0.1-21813344
bundle-80031   5.0.0.0  10089.9 MB   NSX_T_MANAGER-4.1.0.2.0-21761691
bundle-80029   5.0.0.0  2044.7 MB    SDDC_MANAGER_VCF-5.0.0.0-21822418
bundle-80030   5.0.0.0  251.3 MB     SDDC_MANAGER_VCF-5.0.0.0-21822418
bundle-80033   5.0.0.0  9867.6 MB    VCENTER-8.0.1.00100-21815093
In my case i need the installer. To download a specific bundle we run
This allowed me to grab the download from /some/temporary/path and save it/upload it on my other SDDC Managers that were missing it.
Finally before the patch can be used in SDDC Manager we need to upload it to the repo. Please note that once we issue the upload command the download gets deleted, so make sure you save the download ahead of time
With the release of of VCF 5 I wanted to get my lab upgraded. The release blog can be found here and the release notes are here
Please note that some of the components within the VCF will still need additional upgrading. Please read the release notes for additional details.
We can start by going to Inventory -> Workload Domains -> Select the domain -> Update/Patches -> Select the VCF version -> Download now. If you do not see the newest releases go to Administration -> Online Depot and add a VMware Customer Connect account that has access to perform downloads.
We can also download it directly from the domain by going to Inventory -> Workload Domains -> Select the domain -> Update/Patches -> Select the VCF version -> Download now
Next we need to download the configuration drift bundle by going to Lifecycle Management -> Bundle Management -> Download now
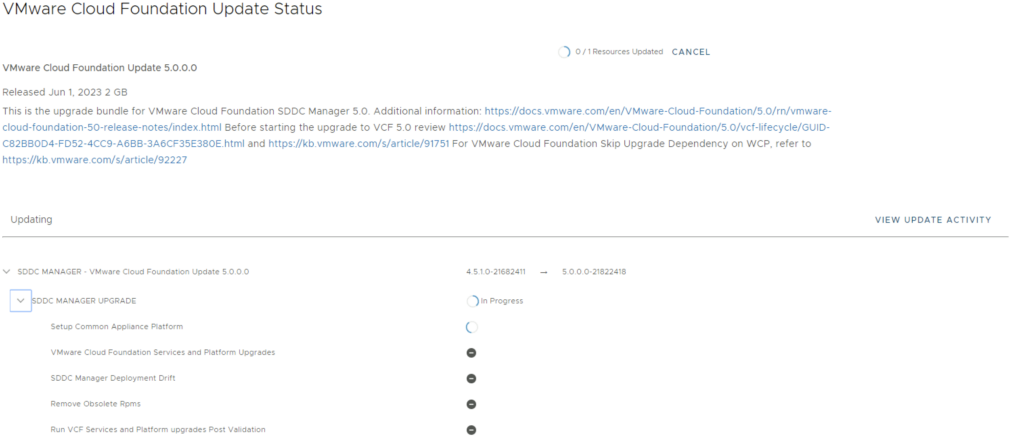
The next step is to upgrade VCF by going to Inventory -> Workload Domains -> Select the workload domain -> Update/Patches -> Select the cloud foundation version we’re upgrading to and click on Update Now for the VMware Cloud Foundation Update 5.0
Next we are taken to the Upgrade page where we can follow the upgrade for each one of the components
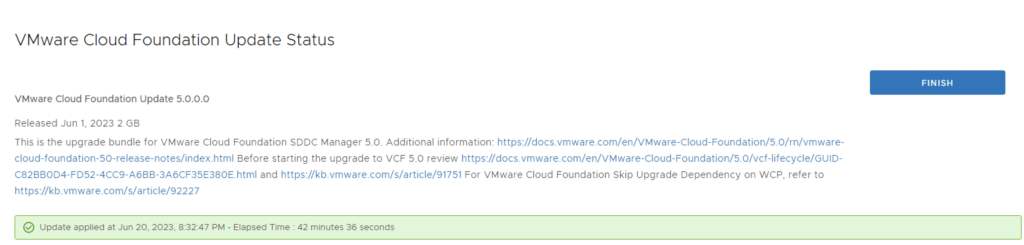
Once the upgrade is complete we can click Finish to be returned back to the main screen
Because we are changing the SDDC-Manager versions i would strongly recommend to clear cache and log back in before going forward.
The next step is the drift remediation VCF by going to Inventory -> Workload Domains -> Select the workload domain -> Update/Patches -> click on Update Now for the VMware Cloud Foundation Update 5.0
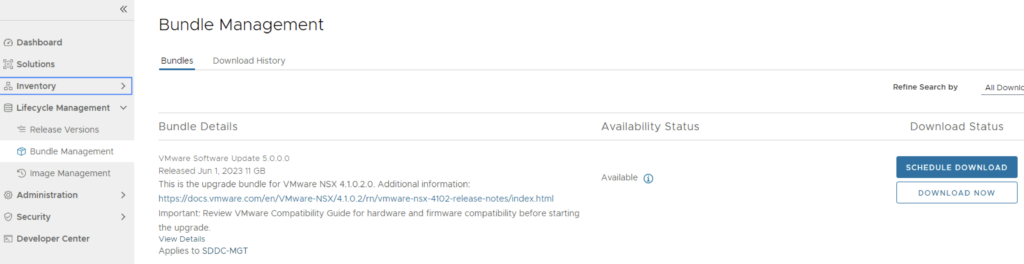
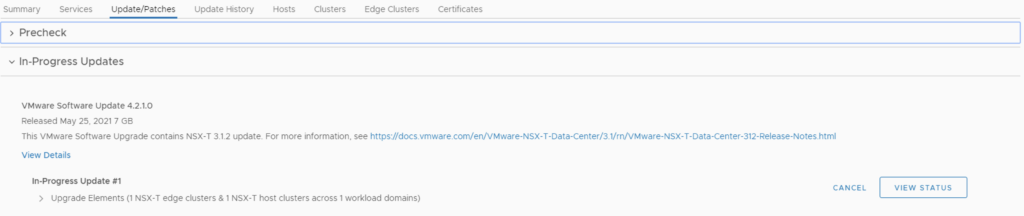
Next step is to upgrade NSX-T installation to NSX-T 4.1.0.2.0. The release notes can be found here. We can go to Lifecycle Management -> Bundle Management -> Download now.
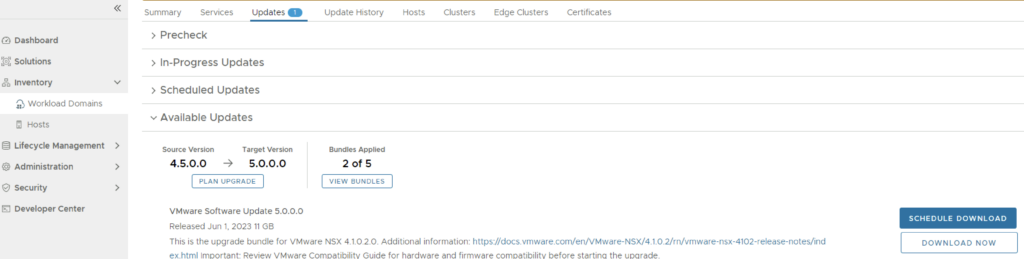
We can also download it directly from the workload domain by going to Inventory -> Workload Domains -> Select the domain -> Update/Patches -> Download now
Once the download is complete we can proceed with updating the NSX components by clicking on the update now
Make the proper selection and click next
Make the proper selection and click next
Make the proper selection and click next
Review the options and click on Finish
The upgrade will go thought upgrading the NSX edges. We can view the upgrade status by clicking on view status
Once the edges are upgraded we an go back to Inventory -> Workload Domains -> Select the workload domain -> Update/Patches -> Under Available updates click on Update Now
Review the selection and click next
Review the host clusters and click next
Review the upgrade options and click next
Review the selection and click finish
We can view the status of the upgrade by selection view status
Once the upgrade is complete we can proceed with the vCenter Upgrade. VCF 5 comes with vCenter Server 8.0 Updated 1a. The release notes can be found here. We can go to inventory -> Workload Domains -> Select the workload domain -> Update/Patches -> Under Available updates click on Download now.
Once the download is complete we can click on Update now
Confirm that we have a backup
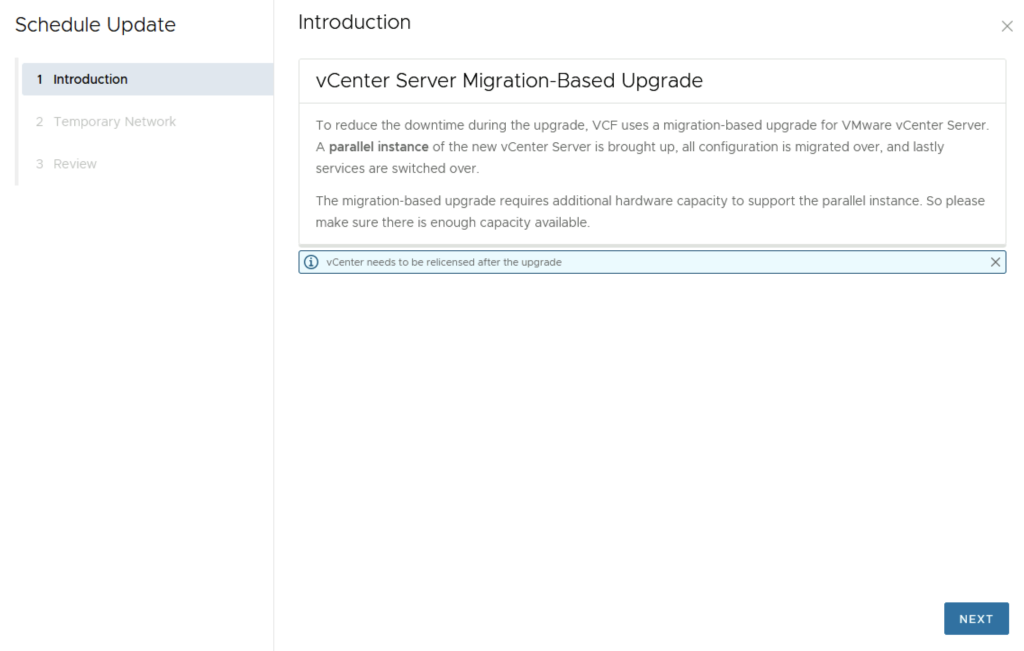
Considering that the vCenter upgrade is not in place we are presented with a wizard that can automate most of the background work for us. Click next
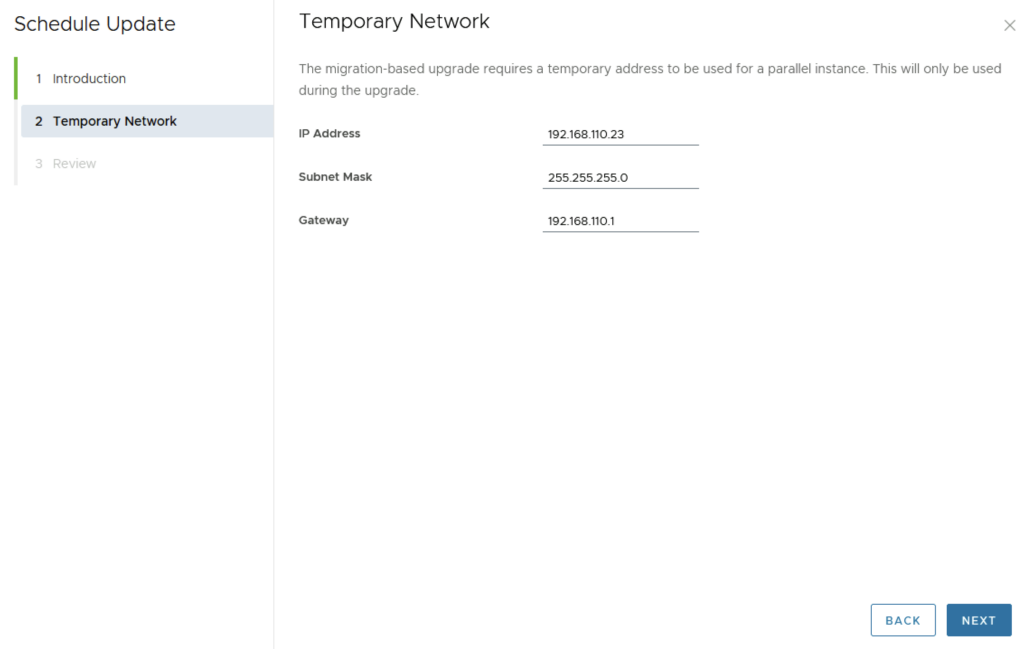
Provide a temporary IP for the temporary appliance
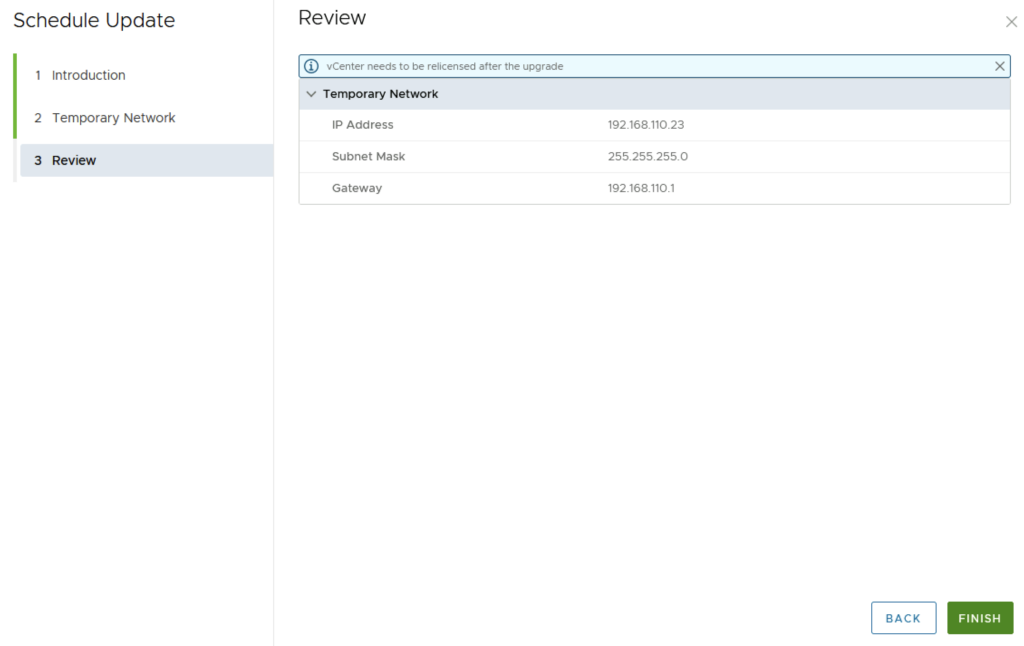
Review the information and click Finish
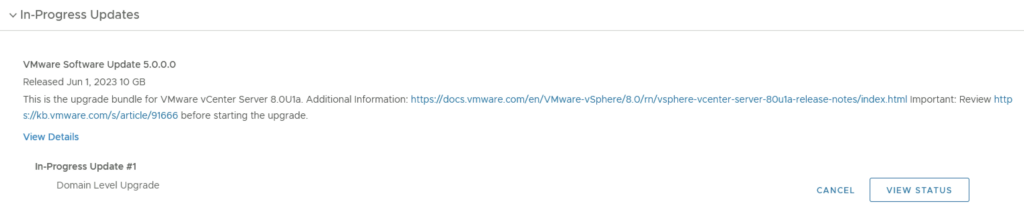
We can follow the status of the upgrade by clicking on the view status tab
Here we can see the different components that are getting upgraded
Once the upgrade is complete we are taken back to the previous page where we can see that the ESXi servers are next. The release notes can be found here. Click on Download Now
Once the download is complete we can click on Update now
If we have multiple clusters we can enable Cluster-level selection and select the specific cluster(s) we want to upgrade.
We can also enable sequential cluster upgrade, quick boot and the ability to evacuate offline VMs part of the maintenance. Click Next
We get to review the options once again before we click finish to to submit the task
Once submitted we can view the status by clicking on View Status
And with that we are finished with the workload domain. We can follow the same steps for the other domains
Don’t forget to clean up the download bundles by following the steps from my other blog here
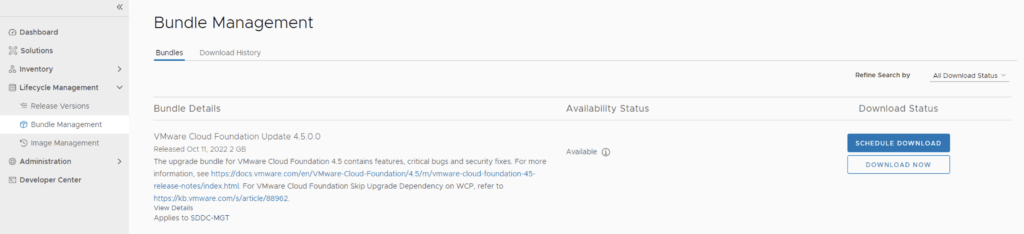
With the release of of VCF 4.5 i wanted to get my lab upgraded. The release blog can be found here and the release notes are here
Please note that some of the components within the VCF will still need additional upgrading. Please read the release notes for additional details.
We can start by going to Lifecycle Management -> Bundle management -> Download now. If you do not see the newest releases go to Administration -> Repository settings and add a VMware Customer Connect account that has access to perform downloads.
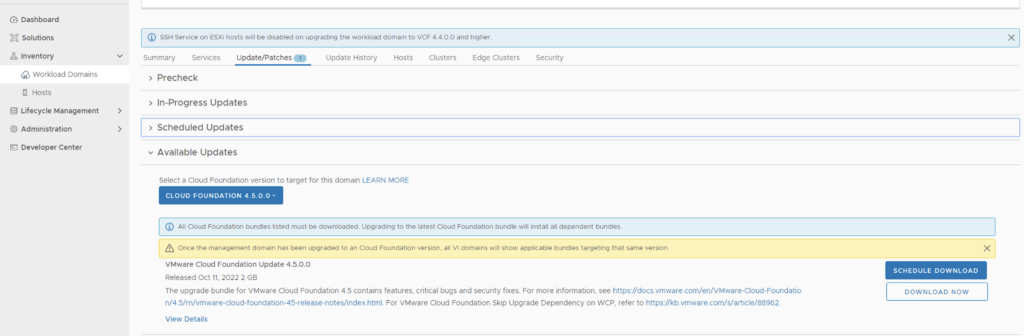
We can also download it directly from the domain by going to Inventory -> Workload Domains -> Select the domain -> Update/Patches -> Select the VCF version -> Download now
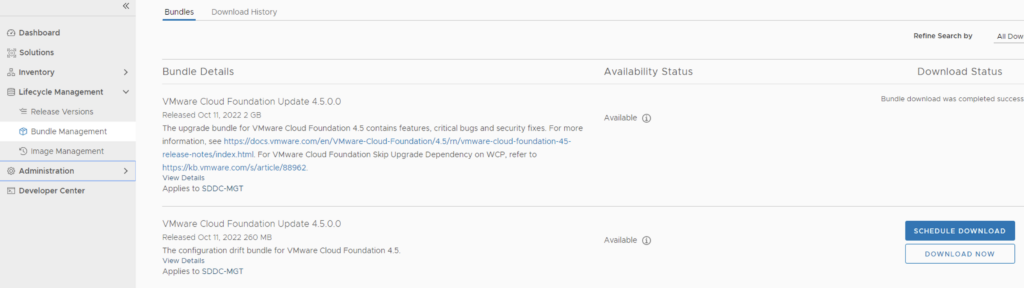
Next we need to download the configuration drift bundle by going to Lifecycle Management -> Bundle Management -> Download now
Alternatively it can also be downloaded directly under the Workload domain Inventory -> Workload Domains -> Select Workload domain -> Updates/Patches -> Select the cloud foundation version and click on Download now
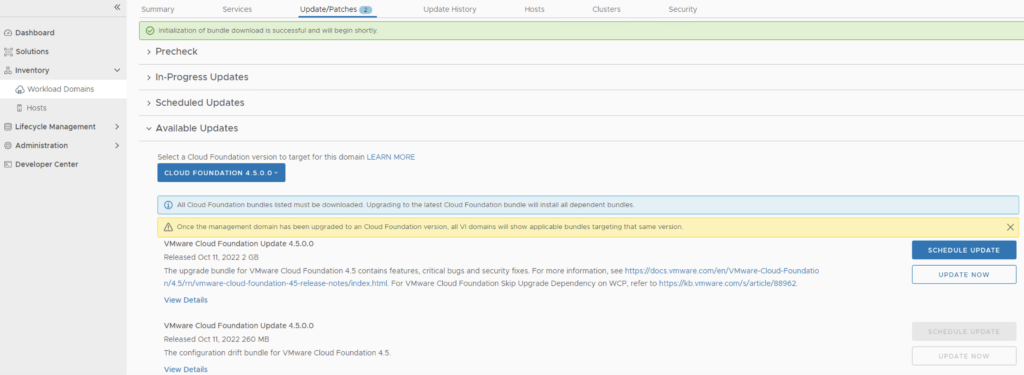
The next step is to upgrade VCF by going to Inventory -> Workload Domains -> Select the workload domain -> Update/Patches -> Select the cloud foundation version we’re upgrading to and click on Update Now for the VMware Cloud Foundation Update 4.5. This will install both the Cloud Foundation update as well as the drift remediation
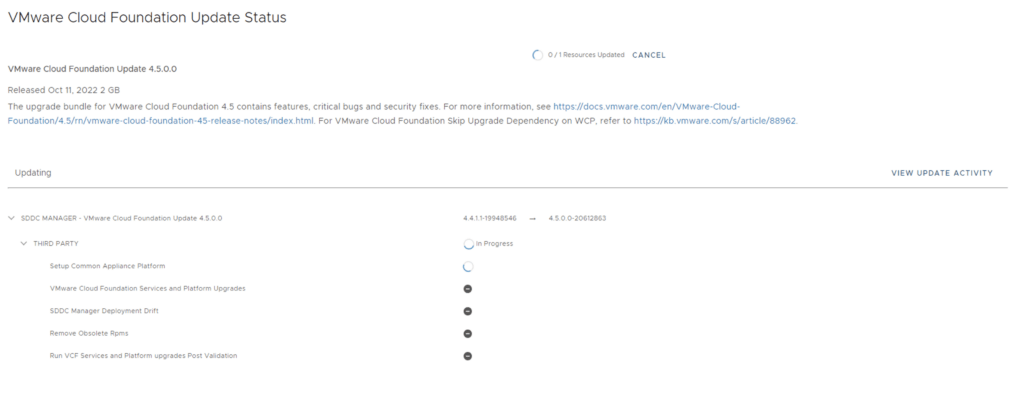
Next we are taken to the Upgrade page where we can follow the upgrade for each one of the components
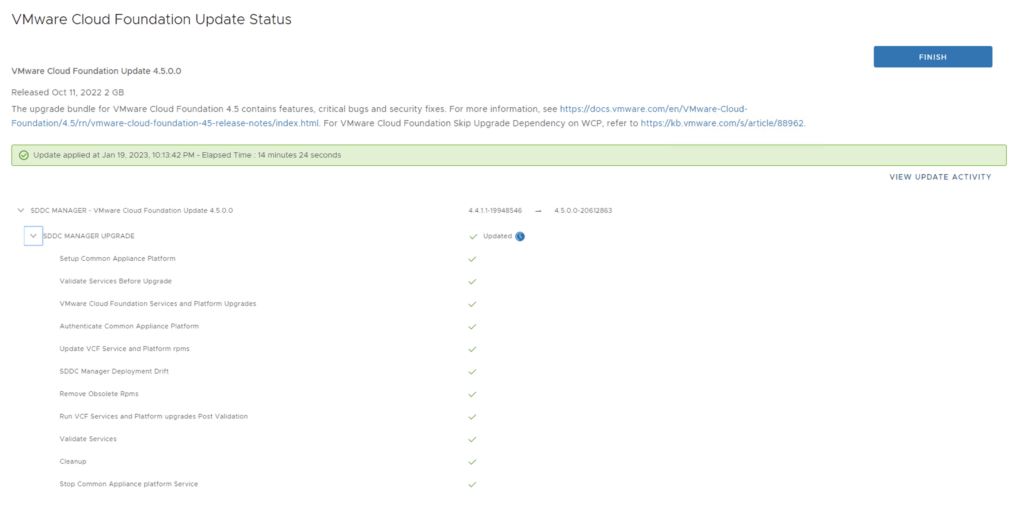
Once the upgrade is complete we can click Finish to be returned back to the main screen
Because we are changing the SDDC-Manager versions i would strongly recommend to clear cache and log back in before going forward.
Next step is to upgrade NSX-T installation to NSX-T 3.2.1. The release notes can be found here. We can go to Lifecycle Management -> Bundle Management -> Download now. The 4.5 release actually comes with NSX-T 3.1.3, however because I haven’t upgraded my environment yet, I need to get to 3.1.2 first. The 3.1.3 release notes can be found here and the process is the same.
We can also download it directly from the workload domain by going to Inventory -> Workload Domains -> Select the domain -> Update/Patches -> Select the VCF version -> Download now
Once the download is complete we can proceed with updating the NSX components by clicking on the update now
Make the proper selection and click next
Make the proper selection and click next
Make the proper selection and click next
Review the options and click on Finish
The upgrade will go thought upgrading the NSX edges. We can view the upgrade status by clicking on view status
Once the edges are upgraded we an go back to Inventory -> Workload Domains -> Select the workload domain -> Update/Patches -> Under Available updates click on Update Now
Review the selection and click next
Review the host clusters and click next
Review the upgrade options and click next
Review the selection and click finish
We can view the status of the upgrade by selection view status
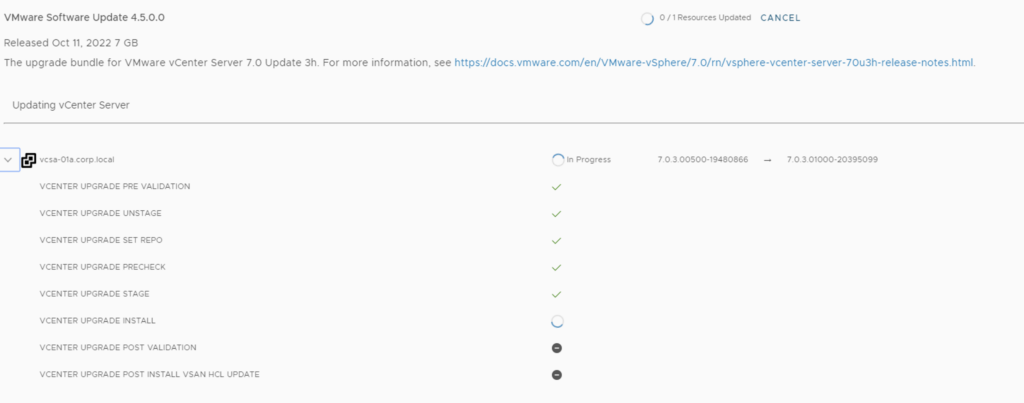
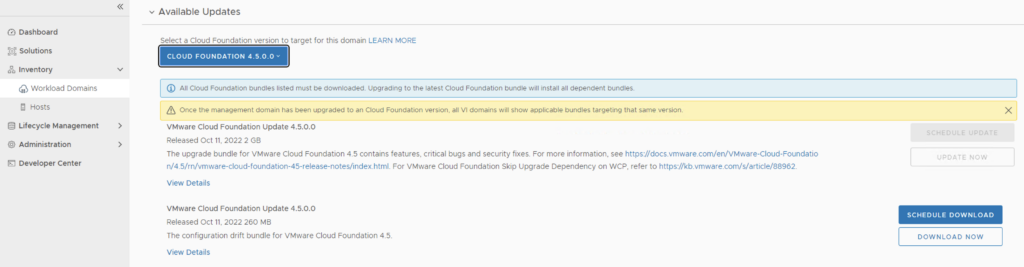
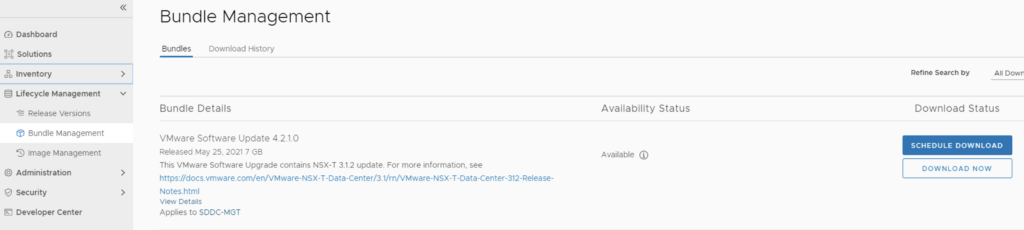
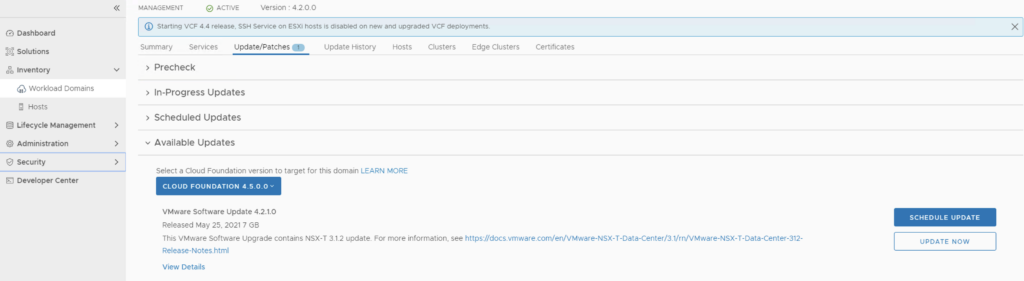
Once the upgrade is complete we can proceed with the vCenter Upgrade. VCF 4.5 comes with vCenter Server 7.0 Updated 3h. The release notes can be found here. We can go to inventory -> Workload Domains -> Select the workload domain -> Update/Patches -> Under Available updates click on the drop down and select Cloud Foundation 4.5 -> Download now.
Once the download is complete we can click on Update now
We can follow the status of the upgrade by clicking on the view status tab
Here we can see the different components that are getting upgraded
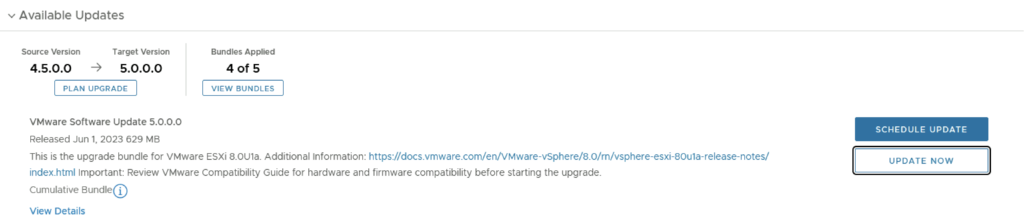
Once the upgrade is complete we are taken back to the previous page where we can see that the ESXi servers are next. The release notes can be found here. Click on Download Now
Once the download is complete we can click on Update now
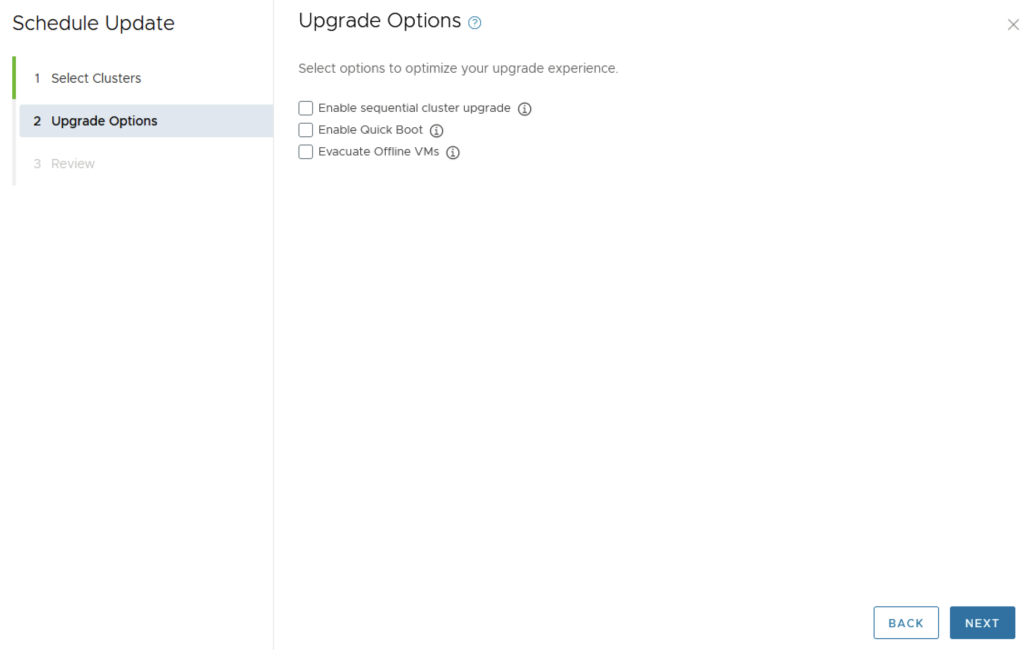
If we have multiple clusters we can enable Cluster-level selection and select the specific cluster(s) we want to upgrade.
We can also enable sequential cluster upgrade as well as quick boot
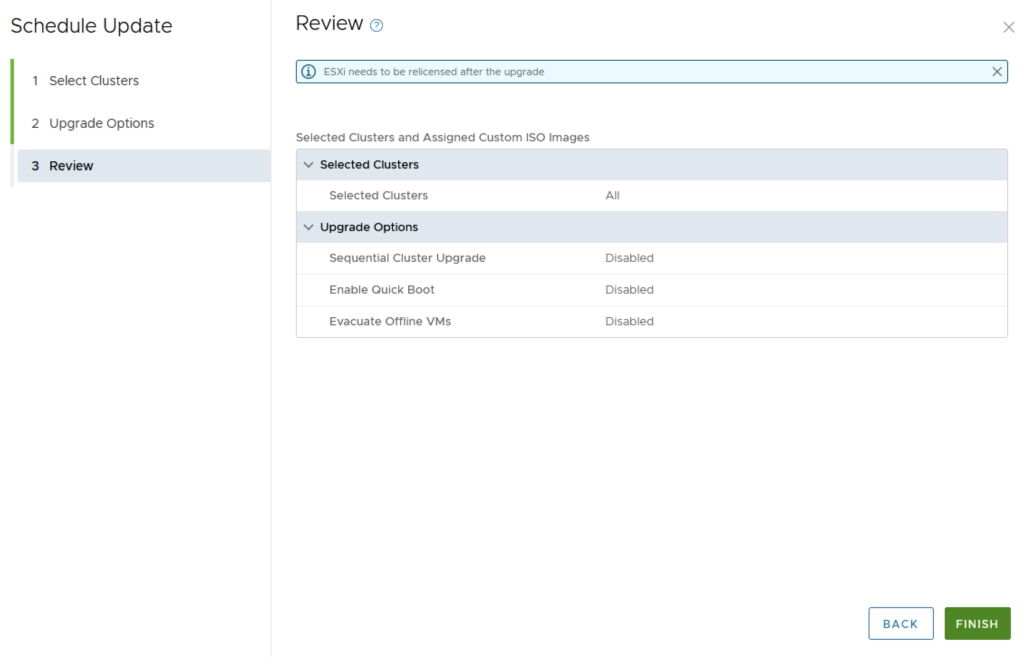
We get to review the options once again before we click finish to to submit the task
Once submitted we can view the status by clicking on View Status
And with that we are finished with the workload domain. We can follow the same steps for the other domains
Don’t forget to clean up the download bundles by following the steps from my other blog here
With the release of of VCF 4.4.1 i wanted to get my lab upgraded. The release blog can be found here and the release notes are here
In order to get to 4.4.1.0 in the past we had to upgrade to each version incrementally. As per the documentation found here we can now upgrade from any release past 4.1.0.1 directly to 4.4.1 skipping the releases in between. We can do so by going to Repository -> Bundle management -> Download now.
Alternatively if we are on 4.4.1.0 it can be found under Lifecycle Management -> Bundle Management -> Download now
We can also download it directly from the domain by going to Inventory -> Workload Domains -> Select the domain -> Update/Patches -> Select the VCF version -> Download now
The next step is to upgrade VCF by going to Inventory -> Workload Domains -> Select the workload domain -> Update/Patches -> Select the cloud foundation version were upgrading to and click on Update Now for the VMware Cloud Foundation Update 4.4.1.0
Next we are taken to the Upgrade page where we can follow the upgrade for each one of the components
Once the upgrade is complete we can click Finish to be returned back to the main screen
Because we are changing the SDDC-Manager versions i would strongly recommend to clear cache and log back in before going forward.
Next step is to download and install the configuration drift package. We can find it under Lifecycle management -> Bundle management -> Download now
We can also download it directly from the domain by going to Inventory -> Workload Domains -> Select the domain -> Update/Patches -> Select the VCF version -> Download now
Once the download is complete go to Inventory -> Workload Domains -> Select the domain -> Update/Patches -> Select the VCF version and click on update now
We can view the upgrade process by clicking on view status
Next step is to upgrade NSX-T installation to NSX-T 3.1.3.7.4. The release notes can be found here. We can go to inventory -> Workload Domains -> Select the workload domain -> Update/Patches -> Under Available updates click on the drop down and select Cloud Foundation 4.4.1.0 -> Download now.
Once the download is complete we can proceed with updating the NSX components by clicking on the update now
Make the proper selection and click next
Make the proper selection and click next
Make the proper selection and click next
Review the options and click on Finish
The upgrade will go thought upgrading the NSX edges. We can view the upgrade status by clicking on view status
Once the edges are upgraded we an go back to Inventory -> Workload Domains -> Select the workload domain -> Update/Patches -> Under Available updates click on Update Now
Review the selection and click next
Review the host clusters and click next
Review the upgrade options and click next
Review the selection and click finish
We can view the status of the upgrade by selection view status
Once the upgrade is complete we can proceed with the vCenter Upgrade. VCF 4.4.1 comes with vCenter Server 7.0 Updated 3d. The release notes can be found here. We can go to inventory -> Workload Domains -> Select the workload domain -> Update/Patches -> Under Available updates click on the drop down and select Cloud Foundation 4.4.1 -> Download now.
Once the download is complete we can click on Update now
We can follow the status of the upgrade by clicking on the view status tab
Here we can see the different components that are getting upgraded
Once the upgrade is complete we are taken back to the previous page where we can see that the ESXi servers are next. The release notes can be found here. Click on Download Now
Once the download is complete we can click on Update now
If we have multiple clusters we can enable Cluster-level selection and select the specific cluster(s) we want to upgrade.
We can also enable sequential cluster upgrade as well as quick boot
We get to review the options once again before we click finish to to submit the task
Once submitted we can view the status by clicking on View Status
And with that we are finished with the workload domain. We can follow the same steps for the other domains
Don’t forget to clean up the download bundles by following the steps from my other blog here
With the release of of VCF 4.4 i wanted to get my lab upgraded. The release blog can be found here and the release notes are here
In order to get to 4.3.1.0 in the past we had to upgrade to each version incrementally. As per the documentation found here we can now upgrade from any release past 4.1.0.1 directly to 4.4 skipping the releases in between. We can do so by going to Repository -> Bundle management -> Download now.
The next step is to upgrade VCF by going to Inventory -> Workload Domains -> Select the workload domain -> Update/Patches -> Select the cloud foundation version were upgrading to and click on Update Now for the VMware Cloud Foundation Update 4.4.0.0
Next we are taken to the Upgrade page where we can follow the upgrade for each one of the components
Once the upgrade is complete we can click Finish to be returned back to the main screen
Because we are changing the SDDC-Manager versions i would strongly recommend to clear cache and log back in before going forward.
Next step is to download and install the configuration drift package. We can find it under Lifecycle management -> Bundle management or Inventory -> Workload Domains -> Select workload domain -> Update/Patches -> Under the drop down select Cloud Foundation 4.4.0.0 -> Download Now
Once the download is complete in the same location click on update now
We can view the upgrade process by clicking on view status
Next step is to upgrade NSX-T installation to NSX-T 3.1.3.5. The release notes can be found here. We can go to inventory -> Workload Domains -> Select the workload domain -> Update/Patches -> Under Available updates click on the drop down and select Cloud Foundation 4.4.0.0 -> Download now.
Once the download is complete we can proceed with updating the NSX component by clicking on the update now
The upgrade will go thought upgrading the NSX managers as well as the edges. We can view the upgrade status by clicking on view status
Once the upgrade is complete we can proceed with the vCenter Upgrade. VCF 4.4 comes with vCenter Server 7.0 Updated 3c. The release notes can be found here. We can go to inventory -> Workload Domains -> Select the workload domain -> Update/Patches -> Under Available updates click on the drop down and select Cloud Foundation 4.4 -> Download now.
Once the download is complete we can click on Update now
We can follow the status of the upgrade by clicking on the view status tab
Here we can see the different components that are getting upgraded
Once the upgrade is complete we are taken back to the previous page where we can see that the ESXi servers are next. The release notes can be found here. Click on Download Now
Once the download is complete we can click on Update now
If we have multiple clusters we can enable Cluster-level selection and select the specific cluster(s) we want to upgrade.
We can also enable sequential cluster upgrade as well as quick boot
We get to review the options once again before we click finish to to submit the task
Once submitted we can view the status by clicking on View Status
And with that we are finished with the workload domain. We can follow the same steps for the other domains